


Flower Buckle Card and Label SVG and SCUT File and Tutorial
 Hi Friends!! I was hoping to post this project this morning but life got a bit busy!! I finally found the time to post it now. . .:) How was your Mother's Day? I hope all of you mothers had a beautiful day filled with love and appreciation. I had a wonderful day. . I spent the day crafting and later had a Mother's Day dinner at the casino resort near our home. I did play the slot machines. . wow, there were a lot of moms there last night! LOL!! I lost $10 but while playing I won a little bit then lost them all. . . when I was down $10 I decided to stop playing. I was okay with the $10 loss. . .it was just fun winning and playing even if I lost whatever I did win. I'm good at cutting it short once I realize I'm spending my own money on the game.
Okay. . .enough of the chit-chat. . .I decided to create a svg file for a buckle card. It took forever to create the flower because I kept getting confused on the negative/positive cut of the flower. When creating files, you need to understand what will be cut out with your cutting machine. Colors are identified as either the cut-out part and what will remain after it cuts the image. Well, I kept using the wrong colors and the inner flower kept getting cut out completely. After I figured it out, I was able to create the file with the inner flower still intact. This is a simple buckle card with a flower silhouette and a liner. I also created a file for the label in front of my card. A tutorial is provided on how to create the liner. I didn't provide a file for the liner so you will need to follow the instructions provided.
The flap, as you can see, inserts into the lot like a belt buckle. When opened up, the card is like a 3 part card. I didn't decorate the inside of the card. I may do so with future cards. I just wanted to get the card done. The liner is not attached to the front of the card. You can, if you want, decorate the front flap of the liner further. Maybe I'll create another card in the next few days showing how you can design the front flap of the liner.
 Here is another sample. It's basically similar to the first card but the difference with this card is that I cut a designer paper instead of card stock and I only did a partial liner for the inner part of the card.
 As you can see, the inner liner don't have the front flap as in my first card. When you create the card, you want the liner to show through the flower silhouette and when the card base itself already has a design, using a solid inner liner is best and vice versa. When the card base is a solid color then using a designer paper for the liner is best. It allows more definition of the flower cut.
If you are downloading the svg file, be sure to adjust the size with a height of "5.5" and keep the proportion (meaning the width is adjusted accordingly when the height is adjusted). The SCUT file is already adjusted with the height at 5.5".

 Materials:
7 x 5 1/4" designer paper or card stock
3 x 1 3/4" designer paper or card stock
Round Corner Punch
Double stick tape, transfer tape, or glue
Scorer
 Punch the 7 x 5 1/4" designer paper or card stock at all 4 corners using a round corner punch
 Adhere the designer paper or card stock to the back panel of the inner aspect of the card base.
Do not adhere to the front panel (it'll make sense with the next photo)
Score the liner using the card fold as your guide
 As you can see, the designer paper is not adhered to the front panel, just the back panel.
Fold the liner at the score line

 Adhere the 3 x 1 3/4" designer paper or card stock with the straight side flushed at the edge of the flap fold.
If the rounded corners of the flap don't quite match up with the rounded edge of the designer paper, you may punch the corners of the panel with your round corner punch so the rounded corners appear more cohesive.

(optional) To give the flower silhouette more definition, shade the edge of the flower with ink using a sponge dauber
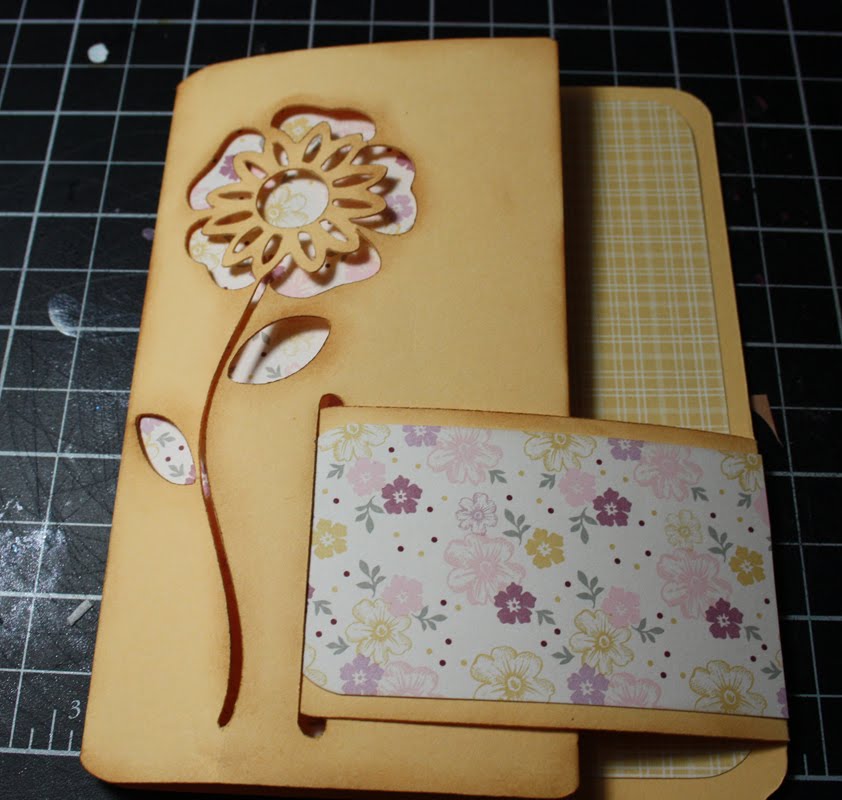
Photo of the Day
 I want to share the photo of the pretty flower bouquet that my husband got me for Mother's Day! Isn't it pretty? My husband is fabulous. . .he is the type of person that NEVER forgets special occasions. He always buy me flowers, plan events, and tries to make everything special. I am truly blessed to have a husband that cares for me that way.
I also want to share the beautiful gift my daughter gave to me for Mother's Day. She made this wonderful video for me and wrote a beautiful note at the end of the video. She is also very thoughtful and I am extremely blessed to have such a wonderful child. I cannot express how appreciative I am. Check out the video she created.
Just a note. . .I asked my daughter "why did you use only my "party girl" photos?" LOL! She said "that's the only ones I could find of you before you had me". OMG!! That's hilarious!!! You'll see what I'm talking about if you watch the video!! I had a good laugh at the photos!
Hope y'all have a wonderful Monday evening!!


19 comments:
Love this 'buckle' card, Maria! So cool!
Wunderful Card, thanks for the Tutorial
Best Wishes
Silvia
Maria, these cards are gorgeous! The video for Mother's Day is priceless. Great gift!
These are fabulous Maria! Love the flower die cut on the front. So pretty! One of these days I will learn how to use my Cricut machne and make fabulous things like you do! :o)
Hello!
I loved your cards, your flowers and your video! You are a very talented artist and a very loved wife and mother! :<)
Wishing you a happy week!
Barbara Diane
What an incredible video your daughter created. A fantastic gift. Thanks so much for sharing that and your awesome card idea and cut files. I can't wait to make one.
xoxo, Christine
Awesome video Maria, your daughter did a great job & you my friend did a fantastic job raising her!
A wonderful Mother's Day to a sweet & awesome lady!
Luv these buckle cards & I luv the colors. Thanks for sharing.
Wow! This card is beau-ti-ful!!! Re-Wow!!!! Love it!
Thank you for the cut file it's gorgeous. I downloaded it last night and have just it.... wow :)
Oh wow, what a great tribute to you from your daughter. I don't know about you, but it touched me. Many years ago I wrote a love letter to my parents thanking them for all they did etc, and was happy that I told them that while they were still alive. My mum died about 5 years ago and she knew how much she meant to me. You are lucky that you have a daughter who is able to show you her love.
aaawww, beautiful VIDEO. I love it. And that tutorial ROCKS!!! Thank you for always being an endless resource and a fantastic talented Papercrafter for ALL of us to look up to! :)
OMG...you have a wonderful blog and love everything...amazing talent....thank you for sharing
You have great talent, your works are amazing. You'll be my inspiration. Thank you for the Tutorial I will learn how to use my Cricut
Maria, I love this file and the tutorial. I'm going to make one in the next day or so, and am also hoping to make a bunch up for the Seniors at Ridgeview (where I volunteer) to make. Thanks a whole bunch!! PS: Do you do tutorials on how to make SVG files?
Wonderful card! Thanks for the SVG files and the tutorial to make it.
These cards are beautiful. Thanks for the files and the tutorial, they are going to make wonderful Mother's Day cards!
Thank you for the beautiful svg, I am going to have such fun following the tutorial :-)
hi hun love the cards ,but can't seem to download svg x
Great!
Thanks for the svg file
Post a Comment