Showing posts with label Templates. Show all posts

Wednesday, January 18, 2012

Shabby Chic Door Hanger

Hello Friends! I decided to work on something different yesterday. A while ago, I had created a wine bottle tag template but I found that if you enlarge the tag on your Sure Cuts a Lot program or other cutting program, you can actually use it as a hanging door sign. If you want the template: CLICK HERE

There was a time when I loved making different SVG files or templates but like everything I do, it became time consuming and rather than creating anything myself, I was working on tutorials and templates. It's fun making them but I need to concentrate on crafting things. When I have the free time, I'll work on tutorials and templates and share them when I have a chance, okay.

Do you have a lot of scrap materials from other projects. . .I have a ton of them. They tend to pile up after a while so I decided to use some of the scrap materials I have and decorate my door hanger with them.

I used my Unity Stamps for the sentiment. I think the sentiment is fitting for a door hanger. I'm going to hang this project on my door so every time I walk in my craft room, I'll have a little reminder. I think I'm going to make a door hanger for my daughter but something more fitting for a college student. She doesn't like pink and cute so I need to design it more edgier . . a little bit more rock and roll. That's more my daughter's style.

To create the shabby chic distressed look. . .I crinkled and mod podged tissue paper on to my door hanger. ..I did not add Mod Podge to the top of the tissue paper, just under to have it stick on to the hanger. I then applied acrylic paint in white and pink. The tissue paper will somewhat rub off a little as you apply the paint but that's a good thing. . .that is what creates the distressed texture. Maybe if I have the time this week, I'll create a tutorial on how to do this. . .:)

To create the skirt, I used a small piece of tulle and lace and gathered them using a sewing machine. . .similar to creating ruffles. It's very simple...if you don't have a sewing machine you could hand stitch it and create the ruffle that way.

The rest of my design is just adding embellishments to the hanger. I think I'll do something different at least once a week. . .I have a tendency to make cards all the time because they're easy for me to create but it'll be fun to do something different weekly just to change things up a bit!
Anyway, that's it for today! I hope you all have a wonderful Wednesday!

Tuesday, January 17, 2012

Creations by AR Valentine 3D Blog Hop

Hi Friends!! Welcome to the Creations by AR Valentine 3D blog hop! Adela is releasing two templates this time around and they are so darn cute:

SURPRISE PURSE

You have a chance to win both sets of templates by commenting my post! You have several opportunities to win by commenting the other design team members post!! You have until midnight PST today to comment. The winner will be announced on Thursday January 19! Good luck!


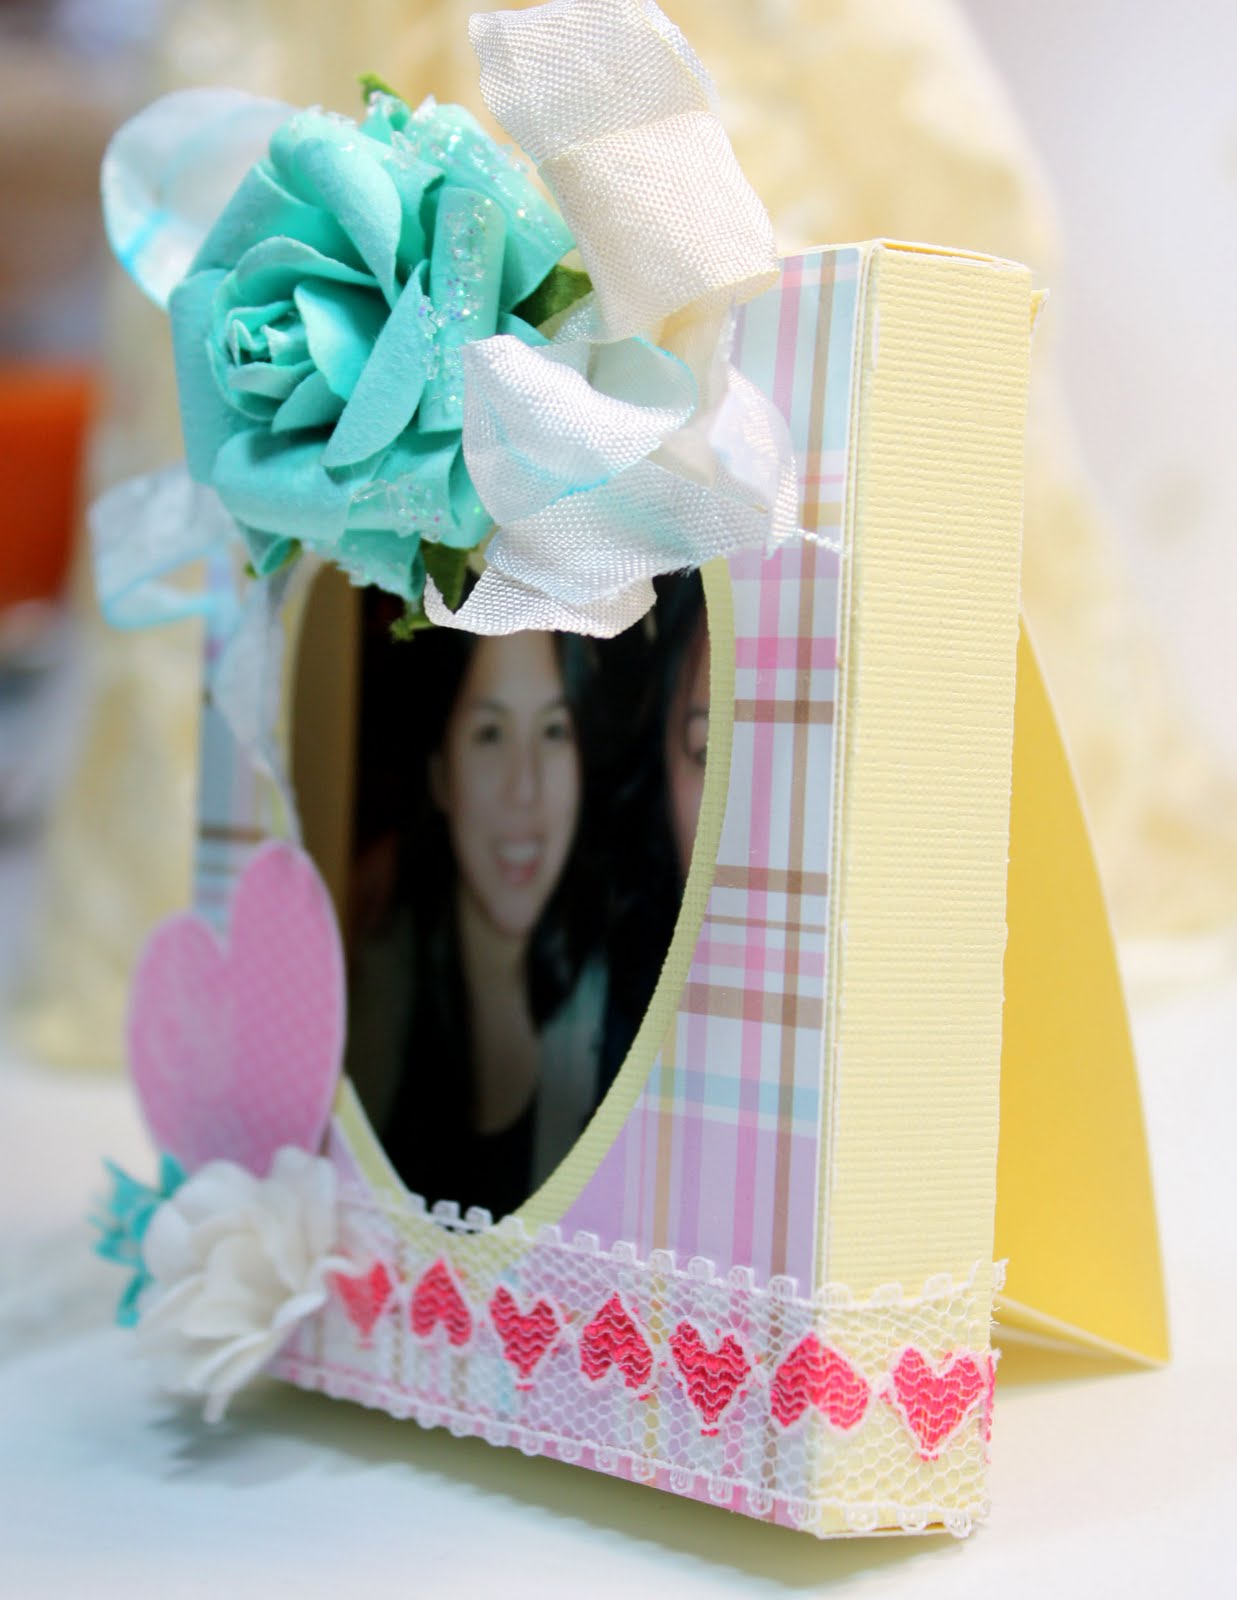
My project is using the "Shadow Box Frame Set". The set comes with 2 designs. I used the template with the heart window and the other template has a square window. I decided to create a photo shadow box using a photo of me and my daughter. I gave the shadow box to my daughter. She recently moved to campus housing and I thought it would be a nice frame to decorate her desk in her room.


In this photo it shows the stand in the back of the shadow box so it can be easily displayed. Without the stand, it makes for a perfect treat box!

To decorate the box I used a heart decorated lace trimming and several Prima flowers.

To complete the design I cut out a heart from a designer paper and added a seam binding bow.

I'll post a project using the "Surprise Purse" template on Thursday when I make the announcement. Visit the other designers blog and check out their design of the Surprise Purse and Shadow Box.

Don't forget to comment!! Hope you all have a wonderful Wednesday!


Saturday, September 17, 2011

Crazy for Challenges - C4C105

Hi everyone!

It's Saturday which means the "Crazies" are back with another fun challenge for you all.  It's Crazy 4 Challenges time again!!

Before we get into today's challenge, as this week is a sponsored challenge, we need to introduce this month's sponsor which is Creations by AR. Adela has some awesome templates on her site which I know the "Crazies" have had fun playing with for our challenge this week. The templates come in all formats: PDF, SVG and DXF so that you can use them with your electronic die cutting machines or cut by hand if you don't have a machine. This week's winner will receive two templates of their choice from Creations by AR.

Adela has also offered our blog readers a 10% discount on all her templates during this challenge so that is from September 17th to September 23rd. All you need to do is use the code: challenge10 when you go through the check out.


Photobucket


Now it is time for our challenge, Barb is back with another fun fall themed challenge for us all! This week all you have to do is create a card or project with a pumpkin on it in some form. It can be a card or 3D project.

Stop by Crazy 4 Challenges blog site and check out the awesome projects created using Creations by AR files or stop by the crazies individual blogs:

Like my Facebook Page 

Tuesday, August 30, 2011

Creations by AR New Release Blog Hop

Hello Friends! Welcome to the Creations by AR blog hop! Adela created 3 new templates this month! Whoohoo! And, they are all so darn cute!

Come and play along in our blog hop and you may win one of the new release templates listed above. All you need to do is comment my post. The wonderful thing is you have several opportunities to win by commenting the other designers post. Each designer will announce the winner on their blog. The winner will be announced on Thursday, September 1st.


I decided to work on the Once Upon a Time Carriage. There is a matching castle that goes along with the carriage. Together they make for a perfect gift box for a little princess. The carriage can be used as a box for treats as a party favor or given as a treat box. I'll post a sample of the castle on Thursday. Stay tuned. . .:)

To decorate the carriage, I used Stickles iridescent paint around the window of the carriage and added a few satin rosettes.

I also added a larger rose to the center of the carriage and decorated the wheels with SU Filigree designer brads and added a pink crystal to the center. This carriage is so easy to put together. . .it's just a matter of decorating it.

Okay. . .so be sure to comment so you'll have a chance to win! Good luck!

Hope you all have a wonderful Tuesday!

Like my Facebook Page

Tuesday, June 28, 2011

Creations by AR New Release and Blog Hop

Hello Friends!!! Welcome to the Creations by AR blog hop and template release! Play along with us by commenting my post and answering the question "what type of challenge do you like best" . . .you'll have a chance to win a template by Creations by AR! The winner will be announced on Thursday, June 30th! You also have multiple chances to win by commenting each designers post! Okay, let's get started!


If you get lost along the way, here is the list of designers participating in the blog hop:


This is the sample of the "Tray Chic" template. I decided to design all of my projects in "shabby chic" style! I basically used similar materials and embellishments on each of my projects, pearls, lace, buttons, seam binding bows, fabric flowers, crochet flowers, designer paper, etc. so I won't really discuss the design of each project.

The tray made for a fabulous storage for my seam bindings, lace, and crochet flowers! I love it!


The tag says "inspiration". . .:)

This sample is for the "Gift Card Purse" template. It's such a cute card purse to give to someone. It opens up and it has a notch to hold your gift card!


Here is gift card purse opened up. As you can see, the notch holds the gift card!


Oooh pretty flowers. . :)

This is a sample of the "Elegant Sole" template! Too bad it's not a real shoe.. ..I would wear it. Hehe! This is a cute project . . .it can be used to decorate your space, a table or even be sent out along with your gift card purse!


I just had to add my crochet flower and fabric flower! I love crocheting and creating fabric flowers!

Okay, be sure to comment my post so you'll have a chance to win a template!

Next on the hop is Sarah Gough's blog. . .

Good luck!!

Hope you all have a fabulous Tuesday!

Saturday, May 28, 2011

Free Happy Birthday Flower Word Art Digital Image


Hi Friends! I had created this digi word art image a year ago but it had the sentiment "Happy Mother's Day". By request I created a "Happy Birthday" version of it. Just add a flower at the top of the stem to create your design as shown in the picture above!

I created 3 versions of the image.
Click on each image, then right click your mouse and click "save image as". Upload the file in your photo editor as you would any digital image or you may use Microsoft Word clicking on "insert" then click "picture".


Enjoy! Hope you all have a wonderful Saturday!

Wednesday, April 27, 2011

Creations by AR Blog Hop and Release

Hello Friends! Welcome to Creations by AR Blog Hop and template release! Whoohoo! There are 2 new template being released today. . . Ribbon Keeper and Menu Keeper

Come play along with us and you may have a chance to win a Creations by AR template! All you need to do is comment my blog. You have multiple chances to win by just hopping on over to the the rest of the design teams' blogs and comment on the their blog! I will announce the winner on Friday, April 29th! Good luck!

Now hop on over to Sarah's blog. . :)

If you get lost along the way. . .here are the list of the design team:


Okay. . .this is the "menu keeper" but I tend to look through recipe books rather than filing them so . . .I decided the menu keeper makes for a wonderful "photo keeper". .:) To be quite honest, I was initially going to create a mini album with the inserts but didn't have time to complete it so I decided to create the photo keeper instead. This menu keeper has multiple purposes. . .:) It also comes with a stand (see the first photo) for your recipes or photo.

I labeled each of the tabs and added a photo to each of the inserts that can be used for your recipes, behind each tab are photos based on the label. For example, I have one labeled "Mother & Daughter", another is "Alexis" and the last one "Mark & Maria". I made extra inserts for any other photos that I'm going to store.

I created the flower using fabric. What I did was create a baste stitch on a strip of fabric using my sewing machine and gathered one end like you would if you were creating ruffles then I glued the fabric in a circular manner similar to creating paper flowers. I then added beads to the center. I thought a cute butterfly would be perfect for the flower. I created a shabby chic style tag and labeled it "photos". Last but not least, I added a seam binding bow and stuck beaded pins to it.

The other template being released is a "ribbon keeper" There are 2 sizes, regular and large. I used the "regular" sized keeper. As you can see you can store ribbons and there's a slot at the bottom for the ends of the ribbons to be pulled through.

I actually created the box to store my embellishments that's the reason why my box has the label "embellishments" rather than ribbons.


I added the shoe charm to my design. . I thought it was really cute!

Anyway, again don't forget to comment my blog and hop on over to the rest of the DTs' blogs!!!

That's it! Hope you all have a wonderful Wednesday!!

Tuesday, March 22, 2011

Creations by AR Blog Hop

Hello Friends! Welcome to the Creations by AR blog hop!!! Today, Creations by AR is releasing 3 new cutting file templates! Whoohoo! Each Designer will give away one of the new templates, so you'll have plenty of chances to win! To participate, bBe sure to comment my post and hop on to the other designers' blogs and comment as well. . . you have multiple chance of winning!!


This super cute tea bag holder was created using the "Tea Cottage" cutting file. I wanted my tea bag holder to be more permanent so I constructed it with fabric! Yup, fabric!! Actually, what I did was cut the template on card stock and using liquid stitch, I adhered fabric to the each shape and sewn parts of them together so they would hold together. The front bottom actual opens up so you can remove your tea bags.

I added a bit of lace, paper roses and beads as well. I did line part of the tea holder with designer paper because I couldn't cut the window opening on fabric but the rest of the holder was lined with fabric.


For the roof, I did add batting before I sewn the fabric on. I wanted it to have a cushion look to the roof. Constructing this project was actually very easy. The instructions were easy to follow so you shouldn't have any problems putting it together.

Okay. . .this little box is super cool. You'll see what I mean in the following photos! This box was created using the "Now That's Smashing" template. The leaf on the pencil was created using the "Leaves" cutting file. To complete the look, I added a daisy flower to the pencil.

Okay here is the cool part. . .the box top actually smashes down to close the box. You would push the top down and it closes. With this picture, the box is half way down. The top picture is with the top smashed down completely at a close position.

To open the box, you pull the top part of the box up and it opens up! So cool! I tell ya' this box is super easy and super fun! I love it!!

There is one more template being released today but I didn't have time to create a sample of it. It's a tea pot pull up card (Pot O'Tea) that goes well with the "Tea Cottage" tea bag holder.

Okay, now go hop on to the other designers' blog and don't forget to comment! Good luck!

Hope you all have a wonderful Tuesday!

Related Posts Plugin for WordPress, Blogger...
 
Share |