
Showing posts with label Cricut Projects. Show all posts

Tuesday, April 19, 2011

KaDoodle Bug Designs Hippity Hop Blog Hop


Hey Friends! Welcome to the KaDoodle Bug Desgins Hippity Hop Blog Hop! There are a lot of fun stuff going on at KaDoodle Bug Designs!

KaDoodle Bug Designs will be having a daily title freebie and a sale during the hop.

SALE - 50% off of $25 or more

Furthermore, you may win a prize if you play along in our hop!
The blog hop starts today and ends on April 21st!
The winner will be announced on Friday April 22nd!

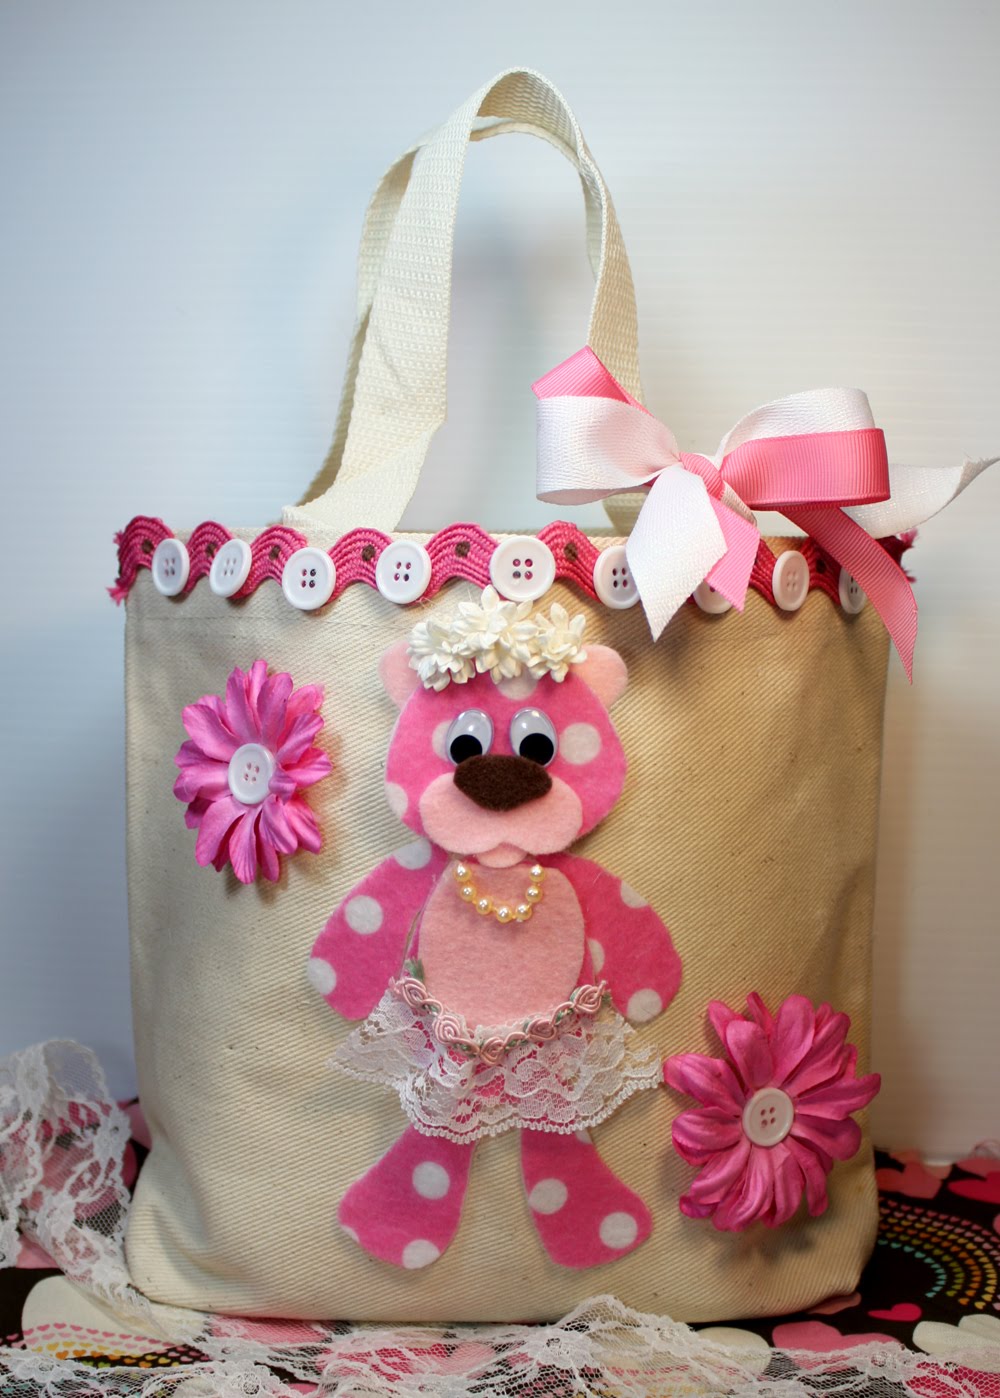
For my blog, the prize is your choice of winning the tote I created or your choice of a mini collection at KaDoodle Bug Designs!

To play along:

Comment this post

Follow my blog by clicking on the "follow" button in the followers box to the right of my blog

If you have a Facebook account, stop by the KaDoodle Bug Design Facebook page and "like" their page

You have a multiple chances to win prizes from the other designers blog by commenting their post as well. There are different prizes to be given out so be sure to hop on to the next designer's blog:

Dianne Shiflet of Dianne's Scrappy Creations


If you get lost in the hop or there's a break in the link, here are the list of participants.

KaDoodle Bug Designs Blog
Maria Bell (that's me)
Dianne Shiflett
Stacy Smith
Amanda Richardson
Patti
Lisa Peters
Corrine Paul
Deborah Foti
Martha Galves


Just a bit of information on my project. I decided rather than creating a paper craft project with the KaDoodle Bug Designs "Melvin the Bear" cutting file, I decided to create a fabric/sewing project by cutting the shape on to felt and paper piecing them together on to a canvas tote! Cutting files are not only for paper crafting, you can also use them on fabric to create designs on clothing, bags, and other projects.

What I did was cut the shapes on card stock using my Cricut Machine then traced the shapes on to felt. You can also cut the shapes on to fabric using your Cricut Machine by stiffening your fabric with a fabric stiffner, allowing it to dry, then directly cutting the shape on to the fabric using your Cricut or cutting machine.

Using "Craft Fuse" interfacing, I ironed the interfacing to the bear shapes then using "Liquid Stitch", an adhesive for fabrics, I attached the bear shape on to the canvas tote. I've never tried it but you could probably iron the interfacing to fabric then try cutting the fabric directly from your cutting machine. Maybe I'll try it next time. The only problem would be is that you'll end up wasting fabric.

If you want to add shapes to clothing, you may do it in the same manner or attach the design by straight stitching it on to the fabric or using a zig zag stitch. I couldn't stitch the design on to my bag because my tote was already completely made.

Anyway. . .don't forget to COMMENT my post, follow my blog, and "like" KaDoodle Bug Designs" on FB for your chance to win a prize, and hop on to the next designer's blog! Stop by KaDoodle Bug Designs and check out all the cute cutting files and digital images available!!!

Good luck!! That's it for today! Hope you all have a wonderful Tuesday!


Saturday, April 16, 2011

Crazy 4 Challenges C4C83 - Easter Box or Bag Challenge

Hello Friends! It's that time again! Yup, it's Crazy 4 Challenges time and Silke Kittman came up with a fun challenge this week! The challenge is to create an Easter box or bag! It's been a while since I created a box project so this challenge was a great opportunity for me to do so!

This month our sponsor is Krisi's Kreations. Krisi's store sells templates which are available in a number of different formats, including PSD, TIFF, PNG, PDF & SVG. She's got some awesome cutting files. . .one of them I used for this week's challenge. Go check out all the fun templates she sells! You'll love it.

Be sure to check out the other boxes by Krisi's Kreations on the C4C blog and see what the other ladies created or stop by the designers individual blogs:


* Barbara Anders
* Cindy Haffner
* Frances Byrne
* Jessie Rone
* Joanne Grzelak
* Joycelyn Pelkey
Lynda Benden
*Silke Ledlow
* Silke Kittmann
* Tammy Hershberger
Vicki Garrett


I wanted to create a vintage design to my box by adding a vintage image, roses, and lace. I'm so into vintage and shabby chic stuff right now. . .:) I can't remember what site I had grabbed the image. It's from one of the free vintage image sites and there are a ton of them. Just Google free vintage images and you'll find a whole bunch of them online.


The roses are from the 5 petal Prima flowers I had worked on a week ago. I took all of my little flowers and scrunched 3 layers of Primas and glued them together to create a rose. Now I can put those neglected Primas to good use. . .:)


I have so many projects I want to work on but I've been feeling exhausted. I think I'm going to take a few days break from crafting next week and just kick back for a few days to get my mojo juiced up again. Too much crafting can sometimes be just that "too much crafting". . .LOL!

Anyway, that's it for today! Hope you all have a wonderful Saturday!

Tuesday, March 22, 2011

Creations by AR Blog Hop

Hello Friends! Welcome to the Creations by AR blog hop!!! Today, Creations by AR is releasing 3 new cutting file templates! Whoohoo! Each Designer will give away one of the new templates, so you'll have plenty of chances to win! To participate, bBe sure to comment my post and hop on to the other designers' blogs and comment as well. . . you have multiple chance of winning!!


This super cute tea bag holder was created using the "Tea Cottage" cutting file. I wanted my tea bag holder to be more permanent so I constructed it with fabric! Yup, fabric!! Actually, what I did was cut the template on card stock and using liquid stitch, I adhered fabric to the each shape and sewn parts of them together so they would hold together. The front bottom actual opens up so you can remove your tea bags.

I added a bit of lace, paper roses and beads as well. I did line part of the tea holder with designer paper because I couldn't cut the window opening on fabric but the rest of the holder was lined with fabric.


For the roof, I did add batting before I sewn the fabric on. I wanted it to have a cushion look to the roof. Constructing this project was actually very easy. The instructions were easy to follow so you shouldn't have any problems putting it together.

Okay. . .this little box is super cool. You'll see what I mean in the following photos! This box was created using the "Now That's Smashing" template. The leaf on the pencil was created using the "Leaves" cutting file. To complete the look, I added a daisy flower to the pencil.

Okay here is the cool part. . .the box top actually smashes down to close the box. You would push the top down and it closes. With this picture, the box is half way down. The top picture is with the top smashed down completely at a close position.

To open the box, you pull the top part of the box up and it opens up! So cool! I tell ya' this box is super easy and super fun! I love it!!

There is one more template being released today but I didn't have time to create a sample of it. It's a tea pot pull up card (Pot O'Tea) that goes well with the "Tea Cottage" tea bag holder.

Okay, now go hop on to the other designers' blog and don't forget to comment! Good luck!

Hope you all have a wonderful Tuesday!

Monday, January 24, 2011

Creations by AR Template Release and Blog Hop

Hey Friends! It's Creations by AR blog hop time! Yipee! Come join in the fun! Check out blog hop details below. Creations by AR is releasing new templates today so be sure to stop by the store and check it out. One of the new releases is this totally, totally cute bird cage called Home Tweet Home!! OMG! I had so much fun creating this bird cage and it was super easy too!! I cut the file on designer using my Cricut and SCAL and added embellishments. . that's it! Super simple!!!

HOPjan-190x317x300


EVENT
NEW Valentine's Day Templates at Creations by AR!

WHEN
Monday, January 24, 6:00 am (Pacific Time)

PRIZE
One winner per blog of a Valentine template of their choice.

Each designer will pick one random winner -- so leave a comment on each of the designer's blog hop post and you could be one of the lucky ones! Each designer will announce their winner on Wednesday, Jan 26. Okay, now go hoppin'!!!! Good luck

Don't forget to comment and hop on to the other designers' blogs!!!

DTMem Jan19-180x180x300
Amy Park
Andrea Budjack
Magdalena Cortez
Mandy Gill


Okay back to the cute bird cage! Depending on the size you cut the file, it can be tall or short. The height of my bird cage measures about 7 1/2 inch tall from the very top to bottom and 4" wide. If you don't have a cutting machine, a PDF file is also provided. As you can see in the photo, the top opens up so you can put a goody bag inside like I did. There's 2 types of top available.

This one is a "Heart Basket"! There is also a "Heart Box" being released. I'll create a project with it on another day. You're thinking "whoa. . .that's a lot of blings going on with you basket"! LOL! Yeah. . . .now that I'm into jewelry making, it was fitting to make a beaded handle! Why not? It's something different but you can add a ribbon if you don't want to go nuts and add all the beads. . .:)

There's an extra heart panel included in the files and in SCAL, I just embedded the heart to the center of the box template and cut it so it provides an opening to the front of my box. I then added acetate (overhead projector film) over the opening so it's see through. If you don't want an opening in the front, you can use the heart panel as a regular panel as a decorative feature to the front of the box.

Do you see how I created the heart at the top of the handle? Well, I had made the handle too long so I improvised! I twisted the wire and shaped the top into a heart. It wasn't what I originally planned to do but it worked out fine. I actually really like it!!


Creations by AR also has embellishments! This butterfly comes in a set of embellishments! They are super cute and they will add a perfect touch to your Valentine projects!!! Check out the embellishments: Click Here Don't forget to check out the new template releases as well and the other awesome files at Creations by AR!! There are a lot of cute ones!!!
Home Tweet Home
Isn't She Lovely Dress

Okay, that's it for now! I hope you'll play along in our blog hop! Have a beautiful Monday, everyone!!!


Wednesday, November 10, 2010

Creations by AR Template Release and Contest


NewRelease 11-10-10


Hello Friends! Hey Creations by AR has a fun release today! How fun is that. There are two cutting file/template designs being released. The first one is a "3D Fireplace Card" and the other a "Totally Tote-able" box. Be sure to stop by Creations by AR and the design team individual blogs!

There's a contest going on!! You can win a Creations by AR template by commenting my post and you have more chance to win by commenting the other designers post! Good luck!!

The contest ends on Sunday, November 14th 6:00 pm PST so be sure to comment my post so you'll have a chance to win the cute templates!!


My first project is the "3D Fireplace Card". It's sort of like a diorama card. . it collapses and it can be inserted into an envelope! How fun is that? Well since I've been doing a lot of vintage/shabby chic projects lately. . .I decided to create a shabby chic fireplace! LOL!

I did create a matching box using the "Totally Tote-able" Box. Isn't it adorable or what? Although it's not a Christmas theme, I used the same elements similar to the 3D Fireplace. . it can work as a gift set. I really had fun creating this box. I used vellum for the body to create a transparent appearance. The large flowers are by Prima. . .love, love them!!

I just love the Prima flowers!! So pretty!


Here's a close up of the stockings. . .I used K&CO designer paper. . .I love the vintage look!

Anyway. . .that's it with today. I hope you all have a wonderful Wednesday!!

Saturday, October 23, 2010

Crazy 4 Challenges - C4C60 Halloween Challenge

Hello Friends! In one week it'll be Halloween and this week at Crazy 4 Challenges has a fabulous challenge for you! Yup, you guessed right. . .it's a Halloween challenge! How fun!! Be sure to stop by Crazy 4 Challenges and play along with the crazy gals! The team created such cute projects for this Halloween. . .you can see all the cuteness at C4C or stop by the designer's individual blogs:


* Barbara Anders
* Cindy Haffner
* Frances Byrne
* Jessie Rone
* Joanne Grzelak
* Joycelyn Pelkey
Lynda Benden
* Angela Wood
*Silke Ledlow
* Silke Kittmann
* Tammy Hershberger


I was really excited about this challenge because I really wanted to create this Witch Hat Box. The box was cut using myscrapchick.com cutting files!! I love the Halloween Treat Boxes set. . .there's various types of boxes that you can create including Frankie, Dracula, Pumpkin and others!!! Be sure to check out myscrapchic.com . . .there's a ton of Halloween files that you can work with.

Anyway. . .I actually created a bunch of other Halloween projects but I'll post them tomorrow.

Hope you all have a wonderful Saturday!

Tuesday, October 5, 2010

My Scrap Chick Halloween Treat Box - Ghost

Hello Friends! Just another Halloween box I created yesterday. Again, I used the myscrapchick.com "Halloween Treat Box" file set similar to the Dracula box (scroll down to previous post) I created yesterday but this time around I used the "ghost" file. I decided to create a frame and add my daughter's picture to personalize the box. Personalizing a box is a great way to make the treat box more special, don't you think?


I love adding the web on to my Halloween creations. . .I have a lot of them so don't see surprised to see more of my Halloween creations with web to the design. . .:)

Anyway, just a short post today. . .I have a lot of things to do today. Hope you all have a wonderful Tuesday!

Monday, October 4, 2010

My Scrap Chick Halloween Treat Box - Dracula

Hello Friends! Happy Monday!! Boy, I had a lot of fun creating this Halloween treat set! I actually started on the weekend but sort of lost my crafting mojo and decided to chill out. I finally finished the set this morning!

I used myscrapchick.com "Halloween Treat Box" set. There are different characters with this set such Frankenstein, Ghost, Pumpkin. . .etc. so maybe if I have the time, I'll work on a few more treat sets!

I did have a lot fun creating the set. . .initially, I was only going to work on just a box but decided to add a card. What's a treat box without a card? Well, that's what I think anyway!

Here is the box. I decided to add a handle using a ribbon. I stiffened the ribbon using fabric stiffener so it holds its shape.

The designer paper is by DCWV, the ribbon by Basic Basic, the spider came with the web . . .you know, the ones that you normally decorate your house with. They work fabulously with cards and treat boxes! It just makes the design much more fun. . .:)

Yesterday, we decided to watch a spooky movie and we chose "the Orphanage" . . .a film by Guillermo Del Toro. . the same director that created "Pan's Labyrinth. If you like scary, mystery, haunting, with a surprise ending. . .well "the Orphanage" is the movie to watch. It's subtitled because it's a foreign film. It's not really scary . . .just eerie with a great story line. I really enjoyed the movie. I added the trailer below. Our next scary movie to watch is "Let the Right One in". . .it's the original of the remake "Let It in" which is currently in theaters. The original is a Swedish film so again, it's subtitled. I love foreign films because they are very creative with their storyline and have a different take on life. In my opinion, they have more of a creepy factor because many of the elements in the films are unfamiliar to us in the US. Anyway, check out the trailer.


Okay, that's it for today. I'll work on a few more Halloween stuff this week! Can't wait to play around a bit!

Hope you all have a wonderful Monday!

Wednesday, September 29, 2010

My Scrap Chick Haunted House

Hello Friends! Well, I worked on another Halloween project! I'm on the roll here! This is the most paper crafting I've done in a week for a long time which is great. Perhaps my paper-crafting mojo has returned and won't go away again!

I decided to alter a recycled box I had lying around. Why not? It's a perfectly nice box. All I did was cover it with designer paper then decorated it with myscrapchick.com cutting files. I again used the "Haunted House" files. There's a lot of possibilities with this file. . .you can change the size of pumpkin and decorate your card or create a great center piece for your Ghoulish Halloween table for a party. There's a lot of possibilities!


When the box is opened. . .it says Happy Halloween on the cover. It's another myscrapchick.com file that was given for free with their weekly newsletter. I do recommend signing up because each week, you receive a free cutting file and all of them are fun stuff!

Here's Mr. Ghost again with his googly eyes. I used this same file for my project yesterday. . .he is a cutie! By the way. ..the designer paper that I used for the Haunted House is by Stampin Up. . .love their designer papers. . .:)

Anyway. .. I'll see what else I can come up with while my crafting mojo is still around. . .LOL!

Hope you all have a wonderful Wednesday!

Monday, September 27, 2010

Myscrapchick.com Halloween Decorative Plaque

Hello Friends!! I worked on this decorative plaque last night using myscrapchick.com cutting files again. The same ones that I used for yesterday's projects: Mr & Mrs. Spiders and Haunted House!! Fun, fun, fun!

I actually bought this wood plaque at a garage sale. It was still new with a label and I believe it was only 50 cents. I hate altering stuff that are new. . .and expensive. It's pointless to pay a lot of mula for it if you're going to cover it up so I buy these things at garage sales! LOL!

I Mod Podged the designer paper on to the wood plaque but I think it's too fragile to be hung outdoors for a long period of time so for now, I hung it on my craft room door. I'll probably move it to our front door closer to Halloween.

I basically decorated the plaque like I would a card. . .that's all I know to do but I like how it turned out!!

I used those webs that you decorate your house with on Halloween! Fun!!


I added googley eyes to the ghost. . .thought it would be cute.

Okay. ..I'm having a blast making my Halloween projects! I'll work on more today! Can't wait!

Hope you all have a wonderful Monday!

Related Posts Plugin for WordPress, Blogger...
 
Share |