Friday, December 31, 2010

Snowflake Afghan Pattern Request


For those who requested the Snowflake Afghan pattern, I just wanted to let you know that I haven't had the chance to go through all my email and all your requests with the holidays being so busy but not to worry, after tomorrow, life will slow down a bit and I'll be able to email the pattern out to you. I wanted to let you know in the case you thought I did not get your email. If you don't receive the pattern by the end of the week, please email your request again. I have so many emails that have piled up the past weeks that I may miss have missed your email.

Happy New Year, Friends!

Mobile. . . .Everything's Changing


Went back home again
this sucks gotta pack up and leave again
say goodbye to all my friends
can't say when I'll be there again
It's time now to turn around
Turn my back on
EVERYTHING (turn my back on) everything....

Everythings changing when I turn around all out
of my control I'm a mobile.
Everythings changing when I turn around all out
of my control I'm a mobile.

Start back at this life
Stretch myself back into the vibe
I'm waking up to say I've tried
Instead of waking up to another TV GUIDE
It's time now to turn around
Turn and walk on this crazy ground oh oh oh....

Hanging from the ceiling lifes a mobile spinning
round
with mixed feelings crazy & wild ...
sometimes I wanna SCREAM OUT LOUD ....

Everythings changing when I turn around all out
of my control I'm a mobile
Everythings changing out of what I know
everywhere I go I'm a mobile
I'm a mobile


Saturday, December 25, 2010

Merry Christmas From Our Family to Yours


Merry Christmas, Friends!!! I hope are all having a wonderful Christmas, spending time with your family and friends and celebrating this blessed day filled with love and joy! I wanted to share a video to wish you all a Merry Christmas. My daughter made the video but this is the condensed version. . .it's actually a longer video with personal messages of love and gratitude and it was very touching. I cut out the personal stuff and uploaded the music video portion. Hope you like it!!!

I hope you all have a blessed day! Again, Merry Christmas!!!

Friday, December 24, 2010

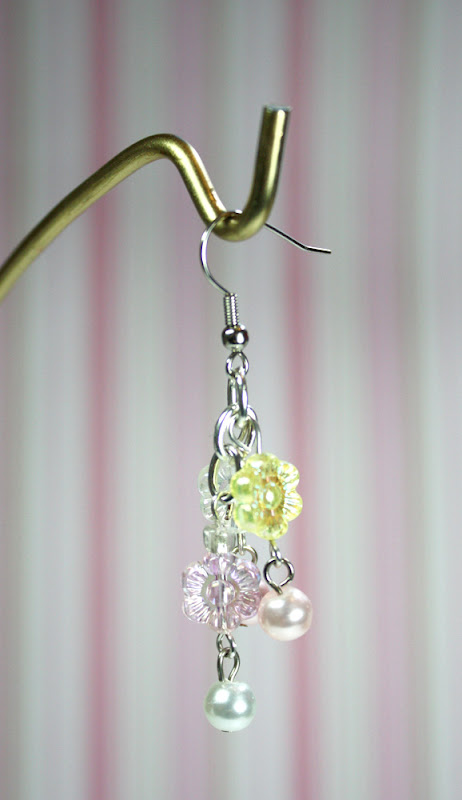
Simple Earrings


Hi Friends! I just wanted to share a few of the earrings I've created this week. I'm just playing around with the different beads I currently have. I actually made a few more but I'll share them next time. As you know, I just started learning to create jewelry about a 2 weeks ago and I'm truly enjoying it. I'd like to get to a point where I can create more unique types of jewelries. Right now, my goal is just to be able to hold and use the pliers correctly. . .too funny. I cannot tell you the countless times I've dropped the wire while trying to twist it and all the bead fall off and unravel whatever I've created. It can literally drive you crazy when you're just about done and you need to start over.


All of the bead I used are either glass or stone. . . .mostly semi quality beads. I'm trying to avoid plastic beads. Unfortunately, quality beads at the craft stores are quite pricey. I've always wondered why costume jewelry are so expensive sometimes and well, I now know why.


Right now I'm sticking to creating earrings until I can find a store that sells quality beads at a reasonable price. I can create a lot of earrings with the few beads I have. If I create bracelets and necklaces, well. . .the cost will increase exponentially so until I get better at jewelry making, I'll stick to earrings and simple bracelets and necklaces.


I've been practicing on manipulating wire to create different designs so my jewelry can be more unique and not just about stringing beads and charms together. I did create a few earrings with wire designs and I'll share them next time.

For the past years, I've been primarily a paper crafter and I really wanted to expand and learn other types of crafts. Next month, I'll be taking sewing lessons. I'm really excited about it. Sewing isn't something that I want to learn from watching YouTube videos because I really want to do it right and be able to use my sewing machine properly. As a Christmas gift, I had asked my husband for "sewing lessons" and he confirmed that he is giving that gift to me. He had to let me know because he needed to know what was the best time for me to take the lessons. . . .so. . .I already know what I'm getting for Christmas. . .LOL!

My goal is to actually integrate the different hobbies I already know and am learning to do and combine them together. For example, fabric with paper crafting and crocheting or beading with crocheting and sewing, etc. I think it'll be fun to combine the different arts and create different things.

Anyway. .. Oooh, tomorrow is Christmas!! OMG! Time has flown so quickly. . .I'm really excited for the new year. I believe I'm going to have a fun year next year!!!

Hope you all have a wonderful Christmas Eve!!!


Thursday, December 23, 2010

Snowflake Crochet Afghan

Hi Friends! Hey, I finished the "Snowflake Afghan" that I was working on. If you recall, I started in November and I actually almost didn't finish it in time for Christmas. I started on the project and I was about 75% done and sort of set it aside and worked on other projects. I decided to work on it this week and finish it up. I'm so happy that I'm done and actually, I'm in the process of making another one for next Christmas. I'm working on the snowflakes right now because this project requires 33 snowflakes so it's a good idea to start now. LOL!

I found the pattern in the Crochet World special edition magazine that was out on the stands in November. I can't share the pattern with you because it's in a magazine . I wonder if it would be okay to scan the pattern and share it. Well, if you want it, email me and I'll share the pattern with you if you want to try it out. There are a bunch of patterns similar to this one on the Internet, obviously, not exact but similar nonetheless.

The pattern actually calls for 6 rows but I only created 5 rows because it didn't look symmetric with the 6th row. Actually, you can add as many snowflakes as you want. This would actually make a great bed cover if you add more snowflakes.


Was it hard to create? I've been crocheting for 5 months now so I'm technically a beginner and in my opinion, it's a beginner level pattern . I didn't find it difficult to follow. It's basically repeating the pattern over and over and attaching all the parts together. Anyway, if you want the pattern, email me and I'll scan the pattern and share it with you.

That's it for today. Christmas in 2 days. . .OMG!!! I'm actually going to start on Christmas projects for next year so I'll have a head start! LOL!!

Have a wonderful Thursday!!!


Wednesday, December 22, 2010

Christmas Decoration 2010


Hi Friends! Just wanted to share a bit of Christmas decor now that Christmas is right around the corner. Do you like decorating your house during the holidays? Well, we like to do it but this year, we didn't put everything up. . .but we still decorated quite a bit regardless. I'm just posting a few . . .not everything that we did. This tree is actually a very small tree. . .4 ft tall and it's located in our family room


Just the fireplace area


This is the main tree in the living room. It's decorated with "special ornaments" that we've been collecting close to 20 years. Most are for my daughter. I buy her one ornament each year since she was born and we also buy a "family" ornament. The rest of the other ornaments are from places we've traveled to such as Europe, different parts of the US, etc.


This is one of my most special ornament. . .not because it's the prettiest but I bought it at the Vatican store at the Vatican in Rome and had the Pope bless it so for that reason it's special.

Just the dining table center piece.


This is the decoration on our stair's banister. There's a huge wreathe hanging but you can't see it in the photo.

Anyway. . .that's it for today! Hope you are all having a wonderful Wednesday. Can't believe it but in 3 days it'll be Christmas!! Yay!

Monday, December 20, 2010

Puff Slouchy Crochet Hats and Visor Cap

Hi Friends! Happy Monday to all of you! I created a few crochet hats last month but didn't have a chance to post them. The first hat above is a brim hat that I wanted to try. I used this "Visor Cap" pattern on the Red Heart Yarn site. It's pretty easy to crochet but the size seem a bit small so on another cap that I made I used a larger crochet hook and it fit my head better. I did modify the pattern a little by twisting the strap a little in front and adding a bead to the button. Click Here for the pattern.

For the "Puff Stitch Slouchy Hats" in the following photos, I used this pattern on "Crafty Pants" blog: Click Here I used a soft worsted yarn for all of the hats. If you use regular 4 ply worsted yarn, they appear stiffer and not as slouchy looking. I liked the really slouchy look but either way, they looked nice. With the above hat, I actually used two colored yarns to give the yarn a mixed colored look.
With this hat, I used an already mixed colored yarn. . .again, soft yarn. I used the same yarns for both hats but inverted the colored yarns to create a different look.

With the pale plum hat to the left, I used a sports weight yarn and it made the hat less slouchy. With the one on the right, I used a fabric type of yarn. I'm sorry I don't have the brands or names of the yarn. . .whenever I create a project, I forget to keep the labels and note them. I have to remember to write them down so I can share the info with you.

Finally, with the the left hat. . .I used a sparkly white yarn. You can't really see it in the picture but it has a glittery look to it. The one to the right, I used "Bernat Satin Yarn". . .I remembered the brand because I bought a few of skins of yarn of the same type and took a mental note of it.

Anyway. . .if you like to crochet and is a beginner level crocheter. . .this slouchy hat is actually quite easy to create. Try it out.

Well, that's it for today. . hope you are all having a wonderful

Friday, December 17, 2010

My Art Journal - Me and Landscape

Hey Friends! Happy Friday!! I've been wanting to create an art journal for a while now but had put off making one. I tried the scrapbooking journal route initially but that didn't work out so I decided to start an art journal instead.

This is my first art journal and above is my first page. I thought the subject "me" was a good one for the very first page. It's interesting to do an art journal. A lot of art journals I've seen literally is only about their art work. I want mine to be somewhat to be a "real" personal journal with some of my thoughts written down somewhere although the art work is the primary focus.

If you're interested in trying it out, there are a TON of video tutorials on YouTube to help you out. I viewed a few of them and from there just did my own thing. I don't want to grab too much of other people's ideas mainly because then it'll sort of feel that it's not my own expression but it's good to find ideas if you are stumped.

With this first page, I basically used every stamping and coloring medium I had! LOL!! I used SU ink, Making Memories acrylic paint, Twinkling H2O, SU Watercolor Crayons, SU Markers, Scribbles Paint and I even used my SU stamps to stamp the flower and the butterfly. I didn't draw them.

Because the subject of my page was "Me". . I wrote a little something about me. . .LOL! Just to let you know. . .my journal is just a regular sketch book that you can find at the art store. Actually, you can find them at any store that sell art products like Walmart and Borders.

I prepared the page for painting using gesso. The paper is too thin for watercoloring and painting so the gesso provides a layer of prime to allow you to paint and water color on the paper without breaking down the integrity of the paper. I read that some people use watercolor paper for their art journal and other thicker paper. I may try it in the future but a lot of artist use regular sketchbooks.


Do you have to be a paint artist to make an art journal? From what I saw of other people's work, the answer is no. Some people collage and cut up scraps of paper, many stamp their design and color in the stamped images or just doodle their design. Do you see the "me"? Well, I used my Cricut to cut out a stencil and colored it in. I used the negative part of the cut. I didn't want to mess up my writing so I used a stencil.


I decided to add my photo to identify the book as mine. . . LOL!! I created the word art on my computer and changed the hue of the photo and just printed it on regular computer paper. I didn't want to use photo paper because I wanted to decoupage it on to the page so it lays flat. I then used Mod Podge to adhere it to the page and seal it. I then painted the edge to create a frame.


This is the second page of my journal. I actually started out with a "my favorite things" theme, and started coloring the background. I noticed that what I painted could make for a nice landscape so I went in a different direction and painted a landscape instead. The funny thing is I used "Making Memories" acrylic paint which isn't necessarily used for painting but more for scrapbooking so it wasn't the best acrylic to use. I also had a limited amount of colors so I did my best mixing the colors.


Painting this landscape was pretty easy. . .it was just mainly stippling the trees and foliage and adding tree trunks. That's about it.

Anyway. . .sorry for the long post! If you like to doodle, I say try creating an art journal. Again, if you need help starting out, there are a lot of video tutorials on YouTube showing you different art journal techniques!!

Hope you all have a wonderful weekend!!!

Thursday, December 16, 2010

Wine Bottle Tag Cards Template SVG File

Hey Friends! It's me again! Wow, I can't believe it but I've been feeling seriously creative the past few days but the fun thing is I've been doing different things. Honestly, I was getting a bit tired of creating the same thing day in and day out. Creatively, it felt like a crazy monotonous routine that I've been going through for the past year and it sort of stopped being fun. So to change things up a little, I decided to learn new things such as jewelry making, crocheting, sewing, photography techniques, etc. to add to my routine. One day, I feel like crocheting, the next day paper crafting, the next photography, etc. I now feel a sense of renewal and excitement with crafting.

Okay, enough of my blah, blah. . .yesterday I decided to create a bunch of wine bottle tag/cards. I actually created more but I'll share it on another day. I created an SVG file/template and cut the tag shape on my Cricut. I posted the file below.

I live in a town that has at least 20 wineries and it's all about wine, wine, wine! Seriously! Unfortunately I don't drink alcohol so I don't get to enjoy all the hoopla. There are a few wineries that have mini craft fairs on a weekly basis so I was thinking maybe I'll see if I can sell a few crafty stuff there this Spring and I think the wine bottle tags may be popular at the wineries. . .well, I'm hoping it will.

The design is very simple. I wanted the design to be a bit more elegant so I avoided anything cutesy. The customers at the wineries are primarily in their 30s and older and usually they have a more refined taste so I felt something vintage looking would be more appropriate for them.

I used my Stampin Up stamps to stamp the images.

This one is a masculine tag/cards. . . very simple, nothing with frills. I decided to not add a sentiment so it can be given to anybody. I was thinking that I'll stamp a bunch of different sentiments and give the customers an option to choose a sentiment and I'll stick them on for them if they want.

Anyway, I hope these tags will sell well at the wineries.


Click on the image to download the template for hand cutting


Click on the image for the SVG file

**when cutting the file, resize the width to 2.75" (keep proportions). I did create the file at that size but for some reason when I open the file on my SCAL2, it resizes the width to 3" or so. It's okay to cut it at any size actually depending on how large and how wide you want it but in my photos, the width of the tag/card is 2.75".

**I attached a folded card stock measuring 2.5 x 4.5" and attached it to the the wine bottle tag to create a tag card. It's not necessary but I wanted to add a card feature to the tag.

Anyway, try it out. It's an easy project. . .:) That's it for today. . .hope you all having a fabulous Thursday!!!

Wednesday, December 15, 2010

Altered Cork Boards Shabby Chic Style

Hello Friends! Two post in a week so far. . .I'm doing good! I thought I wasn't going to post anything again until the new year but funny how my crafting mojo sort of kicked in when I was thinking I would take a crafting and blogging break. I think it's the freedom to create or not to create that inspired me want to make something.

I was looking through a container I had laying in the hallway and was about to put it in the garage and I saw a package of cork boards and I decided to create something with it. I've had them for such a long time. It's one of those purchases that I made thinking I was going to make something with them but never got around to doing it.

This Spring I'm thinking of selling at the craft fairs and Farmers Market and I wanted to create something that was a little more functional. That is part of the reason why I'm learning new hobbies so I have a variety of things to sell other than just paper crafting projects/cards.

I decided something functional and useful may sell well at a craft fair. The cork board comes with detachable parts. . .the post it note is attached to an altered coaster and it is attached to the cork board with a stamped clothes pin.

I also added pretty metallic push pins that can be used to attach photos or notes to the cork board.

As you can see, the clothes pin is stamped and I just added a prima flower. The clothes pin attaches the note pad to the cork board and it can be removed if you just want to place the post it note on a desk. The clothes pin can then be used to attach messages or used for something else.

I decided to design the boards in different colors. The colors were based on the color of the metallic push pins that I had so they would match nicely. This one is a vintage one.

Just to let you know. . .I brushed on gesso to the cork board so I could stamp on it. The cork board as you know is actually brown.

Here is a pink one. After the gesso dried, create the design of the board was pretty quick. Each of the boards only took me about 15 minutes to create because they have a simple design. Sometimes simple is best and lately I've been enjoying creating simpler projects.

Anyway, that's it for today. I hope you all are having a wonderful Wednesday!!

Related Posts Plugin for WordPress, Blogger...
 
Share |