3.75 x 6" Keepsake Box Tutorial and Coordinating Cards and the Happiness Project
 Hello Friends! Do you know ...when I post a card or project, it's a good indicator of my level of happiness? When I first started paper crafting and stamping, I found it was a great stress reliever and when I was unhappy or feeling a little down, I would step into my craft room and create something and it made me feel better.
Fast forward to about 2 years ago, I've noticed a change in my behavior when it came to crafting. Rather than crafting to feel happier, it changed to my having to feel happy in order to craft. As time went on, it became more pronounced. I don't know why the shift occurred. One of the factors could be that the "novelty" wore off
I'm sure you're thinking that I'm taking this all too seriously but the truth is, I'm the type of person that comes alive when I'm doing something new and different. I love the feeling of starting on an adventure, starting a new project, anything new and different. . .I've always been this way. Well, the past week or so, I've been wanting to start on a new hobby which is crazy. I already have too many of them already.
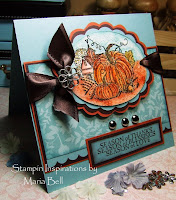
Recently, I've been fascinated by the subject of happiness. I found this interesting website a few days ago. It's called "The Happiness Project". The author of this website/blog post happiness challenges each week and after reading a few of her articles, it got me really excited. I thought "what a brilliant idea!!". Well, I signed up immediately and I'm excited to get started. Why don't you check out the website and tell me what you think about it. If you decide to join in, let me know. . . .I'd love to go on this journey with you. I created this card to match my coordinating "Keepsake Box". I posted a tutorial for the keepsake box if you're interested in trying it out. The box measures 3.75 x 6" inches. You can use it as a true keepsake box or it can be used as a treat box. Scroll down to the bottom of this post to check out the tutorial.
I was wondering, would you like tutorials on only "more involved" projects and techniques or would you like that I add tutorials for simple techniques as well. The reason I ask is that I always feel that I need to create tutorials that are a bit more involved but I know there's a lot of new stampers out there that are just learning the basics of paper crafting and stamping and probably find the complicated projects a bit overwhelming. Do you think I should post tutorials that are less involved along with the more complicated projects? Let me know. . .
To create the punched border on both the box and card, I used a large Martha Stewart punch and layered the border so it looks the way it does on my card. I'll create a quick tutorial tomorrow on how I did it. I heat embossed the sentiment and layered it on to the Nestabilities Scallop Circle. I found this decorative pin at the bead aisle at JoAnns. I added the white beads to decorate it a bit.
 Here is the "3.75 x 6" Keepsake Box" that I created. It's a very simple box to create. This box in particular stays in the closed position using a ribbon. I created a second box which I posted below using Velcro to keep the box in a closed position.
 Here is the box opened up. You can decorate the inside of the box as well for a better presentation but I wanted to get it done and have it posted so I didn't work on the inside of the box. It's not necessary but it's just an idea.
Card/Box Details:
Stamps: SU (Not sure which one)
Paper: SU designer paper, SU Blue Bayou, Soft Sky, ACE Foil card stock
Ink: Versamark Ink
Accessories: Silver embossing powder, Nestabilities, Martha Steward Punch, Grosgrain Ribbon, Decorative pin, beads Here is the second coordinating card and project I created. To color the flowers I used a technique that I posted about a week. Click Here for that Tutorial. With this project I decided to incorporate some lace to give it a femine look. I love lace.
 Here is the box opened up. I decided to add a bag of treats. This box remains closed using Velcro. The tutorial shows you both options.
 Here is the coordination card. Not much to say about this card.
 Anyway, try out the tutorial. It's fairly easy to create so it won't take you very long to create it.
I'm going to spend some time crafting tonight. Hopefully, I'll be able to finish something so I have something to post tomorrow. I'll see if I can finish resizing some of my European trip photos so I can post a few of them in the next day or so.
Hope you all have a beautiful Saturday evening!!
Card/Box Details:
Stamps: SU Flower Fancy, Sentiment(?)
Paper: SU designer paper, Regal Rose, Kiwi Kiss, Blue Bayou
Ink: Scribbles Iridescent Paint, SU Cameo Coral, Pink Passion
Accessories: Nestabilities, Lace, Sizzix Leaf Die, Martha Steward Border Punch
3.75 x 6" Keepsake Box 


30 comments:
I love your blog and your projects are all so inspiring - thank you for sharing :)
Angie
Hi Maria, wow, your creations are just incredible every single time; none simple or plain - just simply AMAZING! This is just awesome. I love the ribbon and the colors; you really make this a work of art! Thank you again for providing such detailed tutorials - it really helps to see the end result but even better to try it out. TFS! ;P
Wow Maria! They are beautiful! I love it and I can't wait to give it a try. Thanks for the tutorial.
Both cards and boxes are gorgeous Maria! Thanks for the tutorial, I do want to try this too!
Both of these sets are stunning Maria. The first one is my favorite :). Love these colors. And great tutorial. I like them all, easy and hard. :).
So beautiful cards and boxes ...!!
I love your image, the colours and the gorgeous paper and the details.
Thanks for the tutorial!!
xox doris
thanks for this tutorial..this is so cute box..I think I will make these for my best friends for valentines day..
take care
Mirja from Finland
Hiya - have the webpage for the happiness project open in another window - will check it out!
As far as tutorials go...I think it would be fab if you could post tutorials for simpler projects too - for two reasons...1, its great for beginners to have something to follow and 2, what you find easy others might find really hard!
Wow - thats abit long for this time on a Sunday (and ive done my ironing!) off shopping now!
Rx
Everything you make is always beautiful. These are WONDERFUL. Thanks for tutorial. I'm going to take a look at the "Happiness" blog.
Wow what a gorgeous projects and thanks for the wonderful tutorial. With a new post on my blog I will put a link to your lovely blog. Hugs Marja
Lovely boxes and fab tutorial, Maria. As soon as I get back into the groove, I am going to try these for sure :-)
Hugs,
Smita
Well Maria, I'm just happy looking at these two gorgeous projects of yours! They are beautiful!
Hugs Viv xxx
Fabulous projects Maria. Love the boxes and the matching cards... great colors and embellishments. :o)
Oh my Maria!!! These projects are stunning! You are an amazing creator at everything you do!!!
What a pretty box! I love the colors you chose on both of them. Very pretty flowers!
Maria, I love all your projects and your tutorials. You are very talented. I like both types of projects the advanced and the simple ones. Thank you so much for sharing.
Stunning projects today. I am so in love with the blue one--my fav color. I love the involved tutorials, but sometimes just have the time, so simple projects would be awesome on occasion. Sorry I don't have comment, but I am a very happy subscriber to blog. I have really been enjoying your European trip and can't wait to see more photos.
Wow, Maria! These are both so beautiful!! :0)
I love all your tutorials, complex or easy.
Maria, your projects are just amazingly beautiful. I am always stunned by all the detail you add to each thing you create. Thank you so much for the tutorials. Love that MS punch. I bought it the other day but haven't had a chance to use it. So glad I decided to buy it. Thanks for sharing!
xoxo, Christine
I think scrapbooking gave more sense to my hobby it feels never boring to record my story , thanks for the wonderful tutorial Maria
What an awesome project as usual. I love all types of your tutorials- thank you for making them so detailed and easy to follow! I look forward to more of your tutorials. Thank you
WOW!! These are amazing Maria!!
These are absolutely gorgeous! I love all the tutorials you post. For myself, I especially like a video tutorial (or even detailed pictures) for a very involved project, since I'm a visual learner. If there's a basic technique that's a little tricky, a tutorial would be great for that, too. Thanks for all you share with us!!
Oh Maria! These projects are striking, fantastic and incredible!! LOVE YOUR WORK!!
These colors and your design are just gorgeous! You work like a true artist.
Absolutely beautiful!! Love everything about it. Gorgeous dp too.
This box is really great!! You inspired me to make a box and put a photo on my blogspot. I noticed your website (if you don't mind!!) so the followers can see the original box.
By the way: your site is great!!
Hi Maria! I hopped over from Joy's blog to see your box tutorial....it's great! What a clever idea and perfect for Mother's Day or any celebration! Thank you!
Post a Comment