Top Notes Box Tutorial, RAK from Rita, and Little C's Stamp n' Scrap Hawaii
Hi Friends! I wanted to post this project earlier today but I was having problems loading my pictures to my computer. It was being testy today! Ugggh!! This project was inspired by a RAK that Rita of Rita's Little Corner sent me. Her project was so inspiring, I wanted to create one. I followed the measurement of the box she sent me and created a tutorial for it. Be sure to scroll down to the bottom of this post for the tutorial.
Here is the lovely RAK that Rita sent me:
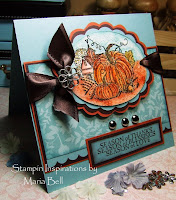
Look at the beautiful stuff I received. I love the Top Notes box and the beautiful card that Rita made for me. She is such a sweetheart. She also sent me a bunch of goodies, such as the rhinestones, stamps, and the mini notebook. Thank you Rita for the wonderful gift as well as inspiring me. Be sure to stop by Rita's blog and check out the rest of her beautiful work!!Today is also my day to post a project at Little C's Stamp n' Scrap Hawaii!! I got this cute CC Design stamp "Pumpkin Emma" from Little C's! Be sure to stop by Little C's and check out all the fun stamps at Little C's. You will most definitely want to get a lot of them! LOL!
I had also made another box. I was on the roll! This box is so easy to create! I just love it!
For both boxes, I colored my image using my Copic Markers and the designer paper is by Stampin Up. It was last year's fall designer paper. You can't buy it anymore so I'm not going to dig through my pile and figure out what the designer paper's name. . .LOL! Sorry. . .I just want to get this post done. There's so many things I gotta do. . .
Here is the box opened up!
Anyway. . .check out the tutorial. It's super easy to create. . .it's a no fuss box and I think it'll make for a great Halloween or Christmas box.
Hope y'all are having a wonderful Wednesday!!
Just to let you know, the tutorial was uploaded through Scribd.com and if you want to download or print the tutorial, you may need to register with Scribd. Scribd is just a site that allows you to upload Word and pdf. documents which you can't do directly on Blogger so I have to use another source to upload the tutorials rather than posting it directly on Blogger. You can find other crafters who post templates and tutorials on Scribd as well so it's a good idea to register. There's no obligation. It's a free site.
To view the tutorial directly from my blog, just scroll down using the scroll bar to the right of the tutorial. You can also enlarge the document by clicking the plus sign or magnifying glass. You have other options on the "more" drop down menu. Check it out!
Top Notes Box


19 comments:
These are so pretty Maria! I LOVE the images and paper you used too! Thanks once again for another fabulous tutorial!
Hugs,
Lisa
These are too cute! I love them! Thanks so much for sharing...you put so much work into your tutoials!
beautiful boxes!!
Again, an awesome project and post. Thanks for the wonderful tutorial.
WOW! More fun boxes! I love these!
BEautiful box Maria
cute - thanks for the tutorial
WOW!! Maria your box is adorable!! Can't wait to try out the tutorial!!
Beautiful boxes! I may "try" one for a rak I have to make for someone.
so very cute and thanks for the tut your the best
Hugs
Norine
Very pretty! Thank you for the wonderful tutorial....I recently found your blog and I could "live" here....
Your so very welcome Maria, I'm glad you liked it! Your Top Note boxes are so beautiful! Great job on the tutorial. You can glue the paper to the chipboard first (Same size as top note die, I don't have the measurements right now but if you want them let me know I'll go find them) then run it through the CB or Big Shot, it will save a step.
Maria!! This is the ultimate box!! I LOVE, LOVE, LOVE it!! I am seriously making one tonight!!
I know I've told you this before, but you really are the best for sharing these amazing tutorials with us! You are loaded with talent girl!!
Enjoy your weekend! Another hot one, so try to stay cool!
Darling boxes! Very cute!
Oh SUPER! These are such cute li'l boxes and looks like you can get a good amount of stuff in these?! Neat neat. I'll have to try this tutorial. THANKS! :)
Hugs xXx
Maria, Thanks so much for sharing such a beautiful project! The boxes are just gorgeous! Thanks to for the tutorial!
Rita's RAK is adorable!
Your project is fab also Maria!
hugs
Risa:)
[url=http://firgonbares.net/][img]http://firgonbares.net/img-add/euro2.jpg[/img][/url]
[b]adobe software classes, [url=http://firgonbares.net/]microsoft software phone[/url]
[url=http://firgonbares.net/][/url] legal to buy oem software cheap microsoft office word
adobe creative suite 3 design premium trial download [url=http://firgonbares.net/]9 Retail Price[/url] cs3 discount software
[url=http://firgonbares.net/]adobe photoshop cs3 extended[/url] opening coreldraw files
[url=http://firgonbares.net/]coreldraw 12 program access[/url] msdn academic software
microsoft office win 2007 enterprise on dvd [url=http://firgonbares.net/]adobe software discounts[/b]
WOW! What a fabulous Tutorial Maria! You Rock Woman!
Hugs
Vicki
Post a Comment