2 1/2 x 5 1/2" Rectangular Gift Box Tutorial
Hi Friends! Hey. . .I created another box tutorial. I'm on the roll this week! LOL! I've been coming up with different ideas for Christmas gift ensembles and will ultimately decide on what will be the best gift box/bag option that I'll be using this Halloween and Christmas.
This box is 2 1/2 x 5 1/2" rectangular gift box. The depth of the box is 1 1/2" and you use one sheet of 8 1/2 x 11" card stock. It's a cute box for stocking stuffers or just for small gifts or treats. It's a perfect box for Halloween. . .like for candies or small pieces of cake. You're probably wondering why I don't use templates? Well, I would rather know the steps to cutting and scoring than tracing a template. Once I memorize the cutting and scoring guide lines, it's much faster to create the box. Scroll down to the bottom of this post for the tutorial.
 Anyway. . .I decorated the box with a simple design. . .most people throw away the box once it's opened so I don't like making them too fancy. LOL! I didn't add any treats in the box . . .once the holidays roll around, I'll add the goodies in the box. When it comes to candy treats especially. . .I have a tendency to eat the stuff so it's best I stay away from putting stuff in the box until it's time to give them away.
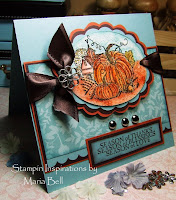
 I created a matching card for the box. I'm just coming up with samples right now. Later I'll probably make several of them assembly style. Time goes by quick and it's best to plan ahead, if you know what I mean. Nothing much to this card. I cut the tag using the SU Large Tag Punch. . .colored the image with my Copic Markers and added a bit of glitter to the image. The rest is basically layering and using my Nestabilities and CB embossing folder.
 Anyway. . .when you have the time. . .try out the tutorial. It's a really easy, easy box to make. I'll work on a few more boxes and other projects and create tutorials when I have the time.
Card Details:
Stamps: Inkadinkado, SU
Paper: SU Ski Slope, SU Real Red, Baja Breeze
Ink: Copic Markers
Accessories: Nestabilities, CB Embossing Folder, Prima Flower, JoAnn Heart Brad, SU Large Oval Punch, Grosgrain Ribbon, Stickles Glitter
Just to let you know, the tutorial was uploaded through Scribd.com and if you want to download or print the tutorial, you may need to register with Scribd. Scribd is just a site that allows you to upload Word and pdf. documents which you can't do directly on Blogger so I have to use another source to upload the tutorials rather than posting it directly on Blogger. You can find other crafters who post templates and tutorials on Scribd as well so it's a good idea to register. There's no obligation. It's a free site.
To view the tutorial directly from my blog, just scroll down using the scroll bar to the right of the tutorial. You can also enlarge the document by clicking the plus sign or magnifying glass. You have other options on the "more" drop down menu. Check it out!
2.5x5.5 Gift Box


21 comments:
very cute and you have gone to alot of work on this girlie....
have a great weekend..janny
I just love that.
thanks for the tutorial also.
I have never tried anything like this before.
So beautiful and elegant.
I love boxes it's always fun to make.
Thanks fr the tutorial.
Freakin' fantastic, Maria!!! Love the projects! You are amazing! Where do you find the time to do all these? Brilliant, yes you are! TFS! I hope to try this very soon!
You are just so talented!! Love this!
thanks for the tutorial...Iam going to give this one a go....cute stuff.
What a cute box! and I love the card that goes with it!
Thanks for the tutorial! This is a very beautiful project, I love the blue & red together. You have been one busy bee. Thanks for the inspiration!
Gorgeous box & card Maria! Thanks for taking the time to do a tutorial, we all appreciate it! Your the best my friend!
Wow, that's beautifull !!!
I've just linked you on my blog. Hope that's ok?
Monique
Darling gift set Maria!! You are on a roll!! Can't wait to give your tut a try!!
great box and card! Looks like you have a great start on Christmas!
Beautiful box and card set Maria.
Thank you for the great tutorial!
Hugs
Sandy x
You never cease to amaze me. Your card and box are awesome Maria. Thanks for sharing the tutorial.
Mary
Awesome gift box Maria! Here you go again and I'm glad you're on a roll. Geez, I could visit blogs due to relatives visiting and gosh look at all you've created in the meantime! You're just awesome. Thanks for sharing the tutorial! Hugs, Cami P.S. ALL your projects are just great!!!!
Wow gorgeous project Maria, thanks so very much for the tutorial, you are super wonderful to share your expertise with us!
Maria, I love this!! What a perfect little box for a Christmas surprise!! Hugs, CAthy
You ARE on a roll. This is magnificent. Talk about the perfect box! :o)
Another beautiful project Maria! Your card is stunning, I love the layout and layers! Thanks for the awesome gift box tutorial, I will be sure to give this one a try!
hugs
Risa:)
I am crazy about all your work and helping people with your tutorial they are great. You are appreciated so much, it helps to learn how to make items that I could never do.
Thank You much.
Lori
I am crazy about all your work and helping people with your tutorial they are great. You are appreciated so much, it helps to learn how to make items that I could never do.
Thank You much.
Lori
Post a Comment