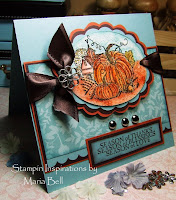
Video Tutorial #2 - Watercoloring with SU Markers on Watercolor Paper
Click on the "play" button to start the video tutorial
Sorry. . .I just had to make another video. I am having way too much fun with it! I did attempt to try making video tutorials in the past but I didn't like how I sound on video. I have a very young person voice. . my kid's friends' mistake me for my daughter when I answer the phone. It doesn't sound very commanding or professional so. . . now that I found a way that it wasn't necessary to talk. . . .well. . .it's the beginning of new things to come!! Whoohoo!Anyway, I did a video tutorial on a simple coloring technique. I know many of you are new with stamping and coloring is one of those things that may be a little difficult for you. For those of us who have been stamping for a while now, we sort of take it for granted that coloring an image is a simple process. It is . . .really. With a little practice, coloring an image will be a snap!!
Check out my video tutorial for a very simple way to watercolor with your SU markers or any water-based markers. Don't use alcohol based markers such as Prismacolor or Copic markers. It won't work with these markers. You may use Zig, Le Plume, SU, etc.
Let me know if the lighting is bad. . .it looks okay on my end but when I checked my previous video tutorial on my laptop, the color was too faded and I couldn't really see the colors as they were intended to look. On my desk computer, the color showed up really well. I guess it depends on the brightness of your computer screen.
I would like to improve my tutorial so feel free to let me know what you REALLY think about it, okay! Don't worry. . .I won't be offended.


18 comments:
You make it look so simple, Maria!! I really have to try some watercolor paper...can you believe I never have??
It looks great, thank you so much for doing these video's! It really does help us (newbies) who don't have anyone in real life to learn from, I have learned so much from blog buddies like yourself, so keep up the tutorials. Thanks again your the greatest!!!
Thank you Maria, I am going to go try it.
Maria, I love the tutorial, you really explained it with no words, I am a person who has to see it then can most of the time do it. Thanks so much for taking the patience and time to do this. I really love your site and all of your ideas! Bev Hammack (Rette Mom)
Grand Prairie, TX
Sorry to say that I couldn't play either video :-( Maybe it's just my computer. I was able to see them a little bit by stepping through the video a few seconds at a time. Looks like good information.
wow, thanks for the video, will have to give this a try
Wow, I love this tutorial. I didn't know SU markers could be used the same way as Tombow markers; how awesome. TFS.
Hugs,
Beth
Maria, I love all your work and I check both sites everyday. Thanks for the video,BUT the music is too loud and while the online instructions are good, use quieter music or that "lovely, young person voice. That would be an much better."
Bernice Fields
Awesome tutorial! I love to WC with my SU! markers on WC paper. I don't own any of those other markers...can't afford them...well can't justify buying them when my SU! markers work great for me! ;)
Good tutorial! A review of the basics is good for us all. Coloring was definitely one of the most useful things to learn as a newer stamper.
great tutorial, sister!!! do you have to use a certain type of cardstock - like glossy or regular would work? Please let me know...
hugs,
Jen
I really enjoy your video tutorials, straight and to the point. Thank you
Thanks for the tutorial Maria. Even those of us who have been stamping for awhile can learn new ways to color. There are so many mediums and so many different ways to do it. I just learned another way from your tutorial!
Hi, what other pens can i use for this that doesnt cost a fortune, i m at home due to disabilities so i cant afford something expensive and yes i do arts rofl
I loved your tutorial! I scribble with my marker on a plastic surface (similar to your foil) and pick up the color with an aquabrush. It works so well! I really liked seeing how you distributed the color from one area to the whole image...GREAT! Thanks so much, and keep them coming! :D
Awesome video!! How do you keep the colours from running together? For example, I just coloured a duck - I started with yellow, then I did his beak & feet orange - the orange ran into the yellow. Should I have let the yellow dry before moving on to another colour?? And how do you get rid of the "splotchy" marks once its dry?
I could have sworn I commented on here! Travesty! I hope it's okay that I linked to you. ;0) I tried this on gesso paper and LOVE it. I've ordered some of SU's watercolour paper so I can try it the real way. :0)
Great tutorial! No need to do a whole image when it is so simple... You can even show how to let it dry and go back for more depth and shadowing, "building" color...
The best thing is that folks can adjust the volume of their own speakers or leave them off, if they don't like the music... and folks who are deaf or watching it late at night when others might be sleeping don't even NEED the sound (this is not trivial). Even folks who talk should intersperse text so that folks don't HAVE to listen.
Nice work!
Post a Comment