Wednesday, November 10, 2010

Creations by AR Template Release and Contest


NewRelease 11-10-10


Hello Friends! Hey Creations by AR has a fun release today! How fun is that. There are two cutting file/template designs being released. The first one is a "3D Fireplace Card" and the other a "Totally Tote-able" box. Be sure to stop by Creations by AR and the design team individual blogs!

There's a contest going on!! You can win a Creations by AR template by commenting my post and you have more chance to win by commenting the other designers post! Good luck!!

The contest ends on Sunday, November 14th 6:00 pm PST so be sure to comment my post so you'll have a chance to win the cute templates!!


My first project is the "3D Fireplace Card". It's sort of like a diorama card. . it collapses and it can be inserted into an envelope! How fun is that? Well since I've been doing a lot of vintage/shabby chic projects lately. . .I decided to create a shabby chic fireplace! LOL!

I did create a matching box using the "Totally Tote-able" Box. Isn't it adorable or what? Although it's not a Christmas theme, I used the same elements similar to the 3D Fireplace. . it can work as a gift set. I really had fun creating this box. I used vellum for the body to create a transparent appearance. The large flowers are by Prima. . .love, love them!!

I just love the Prima flowers!! So pretty!


Here's a close up of the stockings. . .I used K&CO designer paper. . .I love the vintage look!

Anyway. . .that's it with today. I hope you all have a wonderful Wednesday!!

Tuesday, November 9, 2010

10 Minute Quicky Cards

Hi Friends! Happy Tuesday. Lately, aside from making vintage style cards, I've been working on simple cards that takes about 10 minutes to create. Do you have stamped images that you've colored or stamped but never used. . . well, I have a lot of them. For one reason or another, I just decided not to use them but stored them for future use.

Well, in this case, I was experimenting with a shimmery paint and stamped a few images image using the paint. I'm assuming I didn't like them initially and stored them away. As I was digging through my pile of scrap items, I found the images and decided to use them.
This card took about 10 minutes to make because there isn't much layering to it. I stamped the flourishes, added a bit of Scribbles Iridescent Paint to the image, stuck the already stamped motif, added a lace and cardstock, and sponged the edges. That's it. It went really quick.


Simple cards make for great gift set gifts. Create a box for them or just bundle them up and tie a ribbon around them.

I made a few more quicky cards which I'll share on another day. I'm still working on my crochet snowflake afghan. I'm about 75% done. I haven't found time to concentrate on finishing it because I've been busy making cards. It's hard to do both with the same intensity. I'm trying not to feel frustrated about it because well, I start to get annoyed that I can't finish my projects so I'm just going with the flow and creating freely when I have the opportunity and not feel pressured to finish my projects immediately.

Anyway, that's it for today. I hope you all have a wonderful Tuesday!

Monday, November 8, 2010

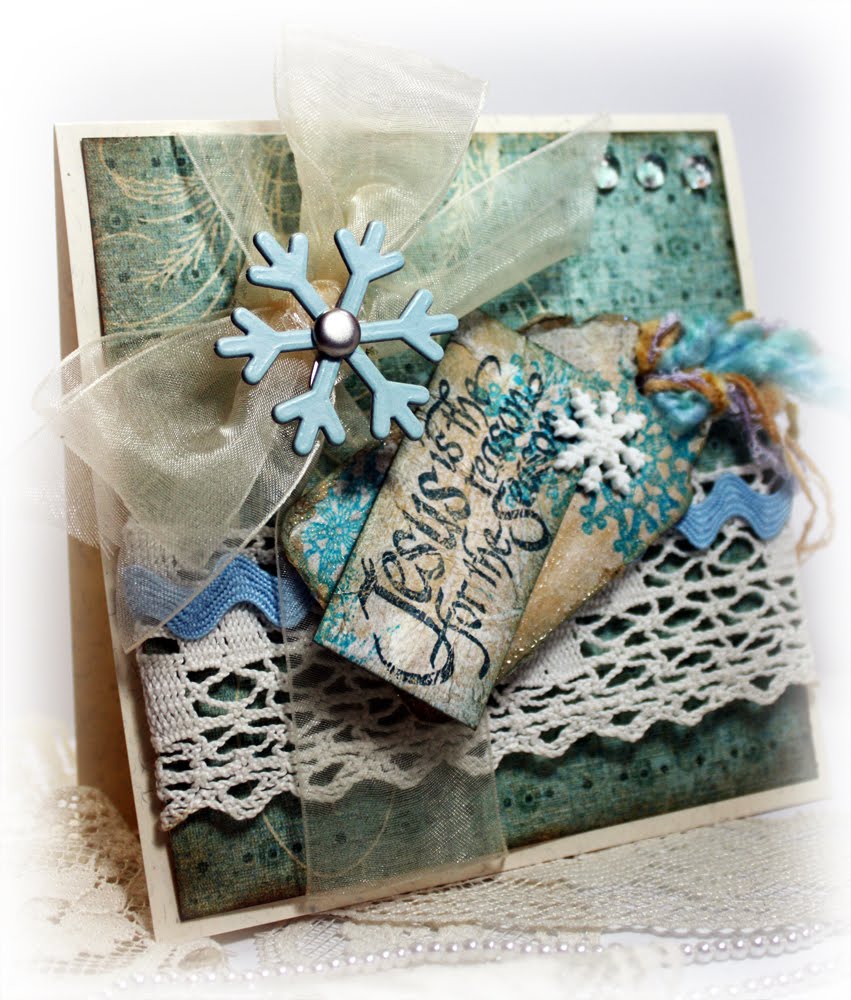
Jesus is the Reason for the Season Vintage Shabby Chic Gift Set


Hello there, Friends! It's another vintage/shabby chic style card! I'm having a blast creating them. I guess because it's new to me and well, it's fun doing something different. I have a few more that I created . . .again, I'll post them tomorrow or some other day. I stopped by Pottery Barn the other day and saw a lot of inspirations. . .gosh, aren't all the stuff on this table so pretty or what? Looking at it makes me want to create more shabby chic/vintage creations. . :)This card focal thing is the tag. . :) I again, like yesterday's project created it using a tissue paper technique to give it a shabby chic appearance. The rest of the card was basically layering different elements such as the crochet lace, organdy ribbon, and adding the snowflake buttons.

Here is a close up of the tag. When I have the chance, I'll create a tutorial on how to create it. Just a last note, the designer paper is by K&Co. Not sure the brand of sentiment stamp. . .it's an unmounted stamp that I have and I didn't note the maker of the stamp when I unmounted it.


Here is the altered tin I created using a Prima container. I basically used the same elements to alter the tin.

That's it for today! Hope you all have a blessed Monday!

Sunday, November 7, 2010

Vintage Inspired Creations

Hello there Friends! Happy Sunday to y'all!!! Last week I attended a boutique event . . .I think that's what you call them. It's where people display their home business products at various places, such as a restaurant or someone's home. Anyway, Toni of "FIVE" (her blog). .a paper-crafty buddy I met through a friend, had a display of shabby chic and vintage style stamped products such as cards, bags, etc.

Believe it or not but she is one of the only few paper crafters I know in my town. I know a few "knitters/crocheters" but not much paper crafters which is sad. LOL! Whenever I meet new people in town, the first thing I'll ask them is "do you have any hobbies?", "do you stamp or paper craft?" and most will tell me "no". . .then I'll tell them " do you want to try it. . . I love paper crafting, we can get together and I can show you what you can make and if you want I can teach you to make cards and other stuff". . .believe it or not, most are not interested. WHAT? Their biggest reason is I'm not artistic or crafty or I don't have the time. .. *sigh*. They like to eat out though. . .so I just settle with eating out with them. It's frustrating sometimes.


Anyway back to the boutique event. . .sorry. . I tend to get side-tracked when I write. Well, Toni had a lot of really cute vintage style items and they inspired me. I loved them. I've seen a lot of them on other blogs but they're more inspiring when you see them in person. They're so pretty. I fell in love with them!! Toni made such pretty stuff.

So. . .I decided to make a few cards. I actually made more but I'll share them on another day. I have a ton of lace that I bought a few months back and if you've seen my cards for the past month or so, I've included lace in most of the items I've created but none were really vintage or shabby chic in design.

This first card I made is really simple. I stamped the sentiment with "Tim Holtz distressing ink", added lace and a tied a bow with the lace, then stuck a regular sewing pin with beads added to it. That's basically it. . .not much else.
This next one is pretty busy! LOL! I started piling on stuff. . .which I tend to do! Anyway, do you see the doily? Well, it was a doily I had crochet for a table runner I'm creating but I made a mistake. I used two different colored crochet thread. . .which tend to happen when you crochet in dim lighting. Well, rather than unraveling the doily, I decided to use it for my project.


I actually created the tag using a "paper tissue" technique. I'll see if I can create a tutorial . . .it's actually pretty easy and a fun technique. All you do is cut a chipboard with a die to whatever shape you want, paint the chipboard with acrylic paint and while it is still wet, stick a tissue paper on to it. You then stamp your image and apply Versamark ink all over then heat emboss it with clear embossing powder. That's it! It looks a bit like epoxy after it dries. Again, when I have a chance I'll create a tutorial.

Sorry for the long post. . .I'll share more vintage/shabby chic stuff tomorrow.

Hope you all have a wonderful Sunday!!

Saturday, November 6, 2010

Crazy 4 Challenge C4C62 - Square Card

Hey Friends! It's Saturday and that means it's Crazy 4 Challenges time again and this week's challenge is right up my alley! Cindy came up with a great challenge this week! What is it? Well, the challenge is to make a square card!

Weeellll. . ..I make square cards all the time! I was like "yay"!! I love square cards because there's a lot of room to add embellishments and all sorts of fun stuff that you sometimes can't do with the standard sized cards. Come play along with and be sure to stop by and check out all the beautiful cards the design team created or you can stop by their individual blogs. I also want to welcome back Vicki . . .she's returning to the team . . .she was on sabbatical of sort but she is back rearing to go! Yay!


* Barbara Anders
* Cindy Haffner
* Frances Byrne
* Jessie Rone
* Joanne Grzelak
* Joycelyn Pelkey
Lynda Benden
* Angela Wood
*Silke Ledlow
* Silke Kittmann
* Tammy Hershberger
Vicki Garrett


Just a quick info about my card. . .nothing much to say but all of the designer paper including the Santa are by K&CO. . .the Santa was cut out from one of the designer paper's design. . .:) Simple stuff. The snowflake and sentiment tag chipboards are by Making Memories. . card stock by SU . . .that's basically it. This actually was a quicky card. . .:)

Okay. . .that's it for today! Be sure to play along with us this week!! Have a fun weekend folks!!

Friday, November 5, 2010

Christmas Stampin All Year Long Gift Set Challenge #7 - Altered Tin

Hello Friends! Hey, it's Christmas Stampin All Year Long Challenge time again and this week, it's a gift set challenge. The challenge is to alter a tin or container. I love altering containers! It's so fun. I especially love altering "used" tins and containers because normally, I would throw a used container but it's nice to see it turn into something beautiful after altering it.

Before I continue, don't forgot to stop by CSAYL and check out the beautiful altered tins and container the design team created.

I decided to alter a Prima container. Actually the flowers are still inside my container. LOL!

Just a quicky details about my card. The sentiment is actually a designer paper and I cut it out. It's by K&CO and the rest of the designer paper of my card and tin is by DCWV. The adhesive ribbon is by DCWV as well. This was a super quick 15 minute card. Lately I've been into making quick cards. . .:) I actually created a bunch which I'll share on another day!

Here is the altered tin. . .I don't know if you can see the Prima flowers inside. I actually have a bunch of these tins. . they make perfect gift tins. . just remove the flowers and store them elsewhere!

Anyway. . .that's it for today. I hope you all have a wonderful Friday!!

Thursday, November 4, 2010

Pink Cat Studio Digi Release and SCS Holiday Tutorial Blitz - Maria's Treat Box


Hi Friends! Gosh, I've got a lot of stuff to share today so I won't waste any time! First of all, today is the release of these super cute dino images at Pink Cat Studio! Whoohoo! They are "dino-mite". . for sure! The first card is actually a pocket card with an insert and I was going to share the tutorial with you but I have another tutorial that I needed to share! One of my tutorials is being published today as part of the SplitCoast Stampers Holiday Tutorial Blitz! I'll share more info about the treat box tutorial posted later in this post.

For now, let me talk about the PCS release. . .okay, back to the pocket card and insert. I'll post the tutorial on another day. Be sure to stop by the Pink Cat Studio blog and check out the awesome cards the design team created! Also, if you purchase a digi image today at Pink Cat Studio, you'll receive the free baby dino image so be sure to go get'em!

Here is my second card that I created! Yipee! I decided to create a girl birthday card with this image. All of the images were colored with my Copic Markers.

Now to the Holiday Tutorial Blitz tutorial. My tutorial is on this treat box. . .titled "Maria's Treat Box". Beate at SCS actually named it that because there were already a project named "treat box" so we had to improvise a little! LOL! Again, the image is by Pink Cat Studio.

For the SCS Written Tutorial of this project: Click Here

This is another of the same box using a Pink Cat Studio image. . .:) So fun! It's a simple box to create. . .really fast project and it's a nice size for treat bags or even a set of handmade cards. The box measures approximately 4 x 5 1/2" and a depth of 2". Lots of room in there. . .:) I actually created this tutorial last year and I have additional tutorials for the "Top Notes Topper" and a "Coco Packet Pocket" that is shown inside the box if you would like to try them out. Here is the link to the tutorial: Click Here

I made an additional box for the video tutorial on this project also posted on SCS. Stop by SCS. . .they have a new tutorial every day. Lots of fun stuff going on. Here is the video tutorial if you prefer video tutorials rather than written. . .:)


Don't forget to stop by Pink Cat Studio and check out all their fun digi and rubber stamp images!

That's it for today! Hope you have a fun Thursday!

Monday, November 1, 2010

Give Thanks - Unity Stamps September KOM and Halloween Stuff

Hello My Friends!! It's November. . .Yipee! It's a month of gratitude, did you know that? Well, it is!! It's a month when we look at our lives and find gratitude in what is. . .there are so many things to be grateful for. . .for one thing, just being alive is a reason to be grateful. LOL!

I'll work on my "Reflections Album/Journal" today. . .I think I'm going to focus on creating "gratitude" layouts this month. I'll post it later when I'm done.

I worked on this card yesterday. The images are from the Unity Stamps September KOM. I finally found time to actually use my Unity stamps. I've been terrible with stamping for the past months. . .I call it burn out. I've reflected and reassessed my life and wonder what direction I should head for the upcoming year. Change is difficult sometimes but well, it's inevitable. . .it happens and we do have to accept it when it does happen. I'll figure it out before the new year starts.

How the heck did my finally using my Unity Stamps turned into a discussion of change! LOL! It's funny. . .that's how my brain works apparently. Only "I" can understand it most times. Actually, when I talk about change. . .it's about my blog and stamping, card making, and paper crafting. . .because I finally used my stamps which I haven't used since buying them, it made me think about what I want to do in the next coming months or year. It made me think about how to make blogging feel new and exciting again and what I should do about it. I've been blogging for close to 4 years and basically, been doing the same thing day in and day out and maybe I need to do something different with it. I don't know. . .I'm still mulling over it. . .:) I'll figure it out!

All I did with my card is stamp the images on card stock and cut the leaves out and layered them. There really isn't much to talk about. . .other than the stamping, I added lace and epoxy sticker to dress the card up a little. That's about it

Photos of the Day

Before I go, I wanted to share a few Halloween pictures from yesterday! Did you all have a wonderful Halloween? Well, we did. . .unfortunately, there weren't too many trick or treaters last night and now I have a ton of left over candies.


I did decorate our house a little bit. . .not too much. . .just enough to be festive


I like this "Boo" sign because it lights up at night

My daughter at the very last minute decided to dress up in a costume. . .she is actually wearing her high school "homecoming dance" dress, threw on a cape that she wore for Halloween in the 8th grade, and my step-son's old Halloween Wizard hat. LOL! Whala. . .this is what she came up with. . .it a actually turned out pretty good.

Here is her costume in full form. She is actually wearing my knee-high boots. . .you can't see it in the picture.


Anyway. . .that's it. . .sorry for the super long post. Hope you all had a wonderful Halloween and that your November will be a fabulous one!! Remember. . .be thankful and find gratitude in your every day life. . .:)

Related Posts Plugin for WordPress, Blogger...
 
Share |