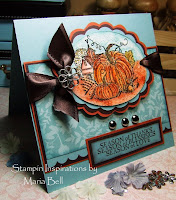
InStyle Stamps Thankful Thursday Sketch Challenge

 Hi Friends!! I created this card this evening for InStyle Stamps "Thankful Thursday Sketch Challenge". Stop by InStyle Stamps blog site for the details of this challenge. This week is Sandy's day to create a sketch!! Whoohoo! Awesome sketch Sandy! Be sure to play. . .there's a prize to be given out!!
This is going to be a short post because I need to clean up my craft room really quick before CSI starts. Today is TV night with my husband!! LOL! Every Thursday night at 9:00, I stop whatever I'm doing because this is one night we actually "schedule" time to watch TV. We watch CSI and TiVo "Supernatural" so after we watch CSI, we'll watch Supernatural.
Friday is usually "Family movie night" and Saturday or Sunday is "Bowling Day". From Monday through Wednesday, we usually do our own thing . . .my daughter does her homework, I usually craft and my husband plays his video games. It's not that we don't hang out with one another on those days but they're not "scheduled" days.
 Real quick. . .I colored Ginger using my Copic Markers and cut the circle with my Coluzzle circle template and created the scallops with my Fiskar scallop scissors! Don't you have a die, Maria? I actually have the Oval and Circle Nestabilities but I'm too lazy to bring them out and run them through the machine. To attach the ribbons, I used paper clips!!
Anyway, hope y'all have a fabulous Friday!
Card Details:
Stamps: InStyle Stamps Ginger, Heidi Grace
Paper: MME designer paper, SU Cool Caribbean, Certainly Celery
Ink: Copic Markers
Accessories: Sizzix die, Fiskar scallop scissors, 1" and 1 1/4" circle punch, Prima flowers, CB embossing folder, Satin ribbons, Paper Clips


 Well, yesterday she didn't call me at her normal time so I waited at home. While I was waiting, I decided to take photos of the flowers in my front yard.


 Hey Friends!!! It's


 Posts
Posts