Monday, December 31, 2007

Happy New Year Everyone!

Hi Everybody!! I hope all of you have a wonderful New Year! This year has been such a fun year for me. . .thank you to all of you who visit my site and the kind comments that you've left me. I've met such wonderful people through this blog site and for that, I am very grateful. I am glad that I found people who share my passion and to be able to get to know y'all better!

I have plans for the upcoming year that I'm excited about and look forward to sharing them with y'all! I hope you have a new year filled with happiness and many wonderful adventures!!

I won't be posting anything until Jan 2. . .I'll be taking a 2 day break to spend with my family. Have a safe New Year celebration and don't get too drunk! For me, my party days are over. . .we're just going to go out to dinner and a movie!

Until later!

Sunday, December 30, 2007

Simple Card and Crafting Goals for 2008

Hi Everybody! One of my crafting goals for 2008 is to make "simple" cards. . .you know. .. no designer paper, very little embellishments, no excessive layering. . .just basically straight stamping. Ooooh, it's hard.

I really admire cardmakers who make simple cards and are able to make them look beautiful. I have difficulties with simple cards because I always feel that something is missing. Well, I tried but I still couldn't avoid adding a little layer and some bling.


What are your crafting goals for 2008? I have a top 10 list. . .I would be interested in yours. Comment on this post with your top ten list and I will randomly (Random.org) choose one person to receive this card.

Here is my top 10 Crafting Goals for 2008:


1. Create at least one "simple" card a week (like the one above).
2. Create a card/project using another blogger's sketch or tutorial at least once a week.
3. Participate in SCS challenges at least once a week.
4. Try a new technique that I've never tried before.
5. Create at least one "scrappy" project a week.
6. Scrapbook one layout a week.
7. Create a tutorial once a week.
8. Unmount my wooden stamps and store them in folders (10 pages a week)
9. Use ALL of my stamps, tools, materials at least once this year.
10. Alter something once a week.


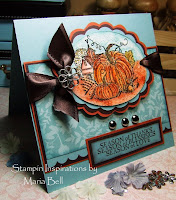
Anyway, here is the card at a side angle. I wanted to show the 3D effect of the sentiment, rhinestone, and Stickles glitter.

Card Recipe:
Stamp: SU Garden Whimsy
Paper: Card base brand unknown, SU Purely Pomegranate
Ink: Colorbox Petal Points Pinwheel Arboretum (pigment ink)
Accessories: Darice rhinestones, Stickles Glitter

Insructions:

1. Ink images using the "Rock and Roll" Technique (Click Here for SCS tutorial)

2. Glue rhinestones to butterfly image

3. Doodle the butterfly trail and add stickles to the butterfly and trail dots.

4. Mat the stamped sentiment with Purely Pomegranate cardstock then mount on to card base with foam tape.

5. Glue the rhinestone on to the matted sentimet.

This is a close up of the card. Can you see the Stickles glitter? Stickles glitter is becoming quite popular from what I've read on a few blogs. I found it interesting because Stickles glitter have been around for such a long time. I've purchased my first Stickles glitter about 4 years ago.


Here is a few tips when using Stickles. Use it for detail work meaning don't use it to cover a large area. Stickles are wet glitter so when it dries, it'll warp your cardstock and it'll look ugly. If you're going to cover a large area, it's preferable that you use something like SU Heat & Stick, clear embossing powder, or repositional glue to stick FINE glitter.

Saturday, December 29, 2007

Showing Off!! Sorry, I Just Had To. . .

Hey Everybody!!! I just had to show off my Christmas gifts. Am I being tacky for posting them? I don't mean to be. . .I'm just happy that I received them.

I'm really not a materalistic person but when it comes to crafting, I'm nuts about it. I don't buy expensive clothes, jewelry, shoes. . .as a matter of fact, I don't buy anything but craft stuff for myself.

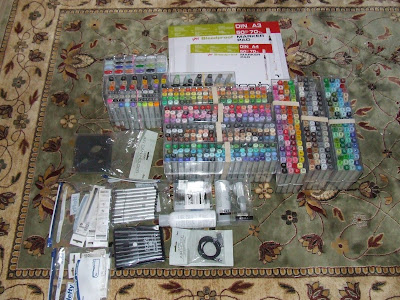
I really wanted a set of the Copic 72 sketch marker and what did my husband do? He bought me the WHOLE SHABANG! Okay. . .I actually cried when I opened the box. LOL! I was expecting one set. But no. . .he bought all of the colors and more. . .the air brush tool, multi-liners, the regular Copic markers, the broad markers, refills, non-bleed drawing pads, and extra nibs. Honestly, I really didn't need ALL of them but hey, I'm not complaining. I guess I will need to do a lot coloring before they dry up, huh!

I organized the markers by color and number. It's much easier to have them organized by number. I do recommend that you hold the containers with large rubber bands shown in the picture. Why? Well, I've picked up the containers upside down on two occasion and all the pens fell out of their slots and it's a major pain to return the markers into their slots. I also received a bunch of other stuff including a photo studio box. Here are a few of the other stuff I got for Christmas.

Here is my new flat screen TV/DVD player for my craft room and my digi video recorder. My other regular TV took up too much space. The digital video recorder is fabulous because I now can record my tutorials on a small video recorder with more memory. I previously used my digital camera which took up a lot of my memory.


Here's a picture of my new crafting table I got for Christmas. I still have my other stamping desk but this one is the tall ones. . .you know . . .the scrapbooking type of tables. The height of the table is counter height and it has two open area and shelves to the left and right of the table. It's the type of table that you stand up to craft or sit on a high stool.

I placed it smack dab in the middle of my room. I love it. When I work on the table, I stand and stamp. On the other side is my stool and I do my scrapbooking on that side. It's a big square table so I have a lot of room to do both stamping and scrapping.
I actually was going to buy the craft table myself when I saved enough money but now I don't have to! Whoohoo!


The craft table has a drawer that pulls out and the front pulls down. I store my Scor-pal in there. Under the desk is my scraps in a file folder and file where my SU cardstock used to be stored.


The left side of my craft table contains scrapbook paper and all my SU cardstock that I chose to keep upstairs in my room. The rest of my designer papers are stored in the garage gathering dust. The organizer contains my stamped images that I store for future use.

The SU cardstocks were previously in file folders and contained in a pull out filer. My scraps are now in the pull out filer.


This is the right shelving of my desk. It contains my unmounted stamps contained in folders. My goal is to put at least 50% of all my wood mounted stamps in these type of folders. I'm planning to change out the majority of my plastic containers to the large wicker baskets shown in the picture. It just looks so much prettier than the clear containers. An antique store in my neighborhood was selling the large ones for $1.00 a piece and the small ones for 20 cents. Well, I can't pass up a GOOD sale so I bought about 20 of the large baskets and about 15 of the smaller ones. Hey, it was a steal!!!

Friday, December 28, 2007

New Picture of my fat head! LOL!

Hey everyone! I changed the picture of myself located on my side bar. The other picture was taken 2 years ago when I was 20 lbs lighter! LOL! It wasn't a true depiction of how I look 2 years later and 20 lbs heavier! I got these new funky glasses recently. I really like them so I took a picture of myself with the glasses. I'm near sighted so I only need the glasses when I'm driving but I like wearing them because it makes me look smart! My goal is to lose 20 lbs this year so hopefully my fat face will be skinnier at the end of the year!!!

I also cut my hair recently into a short bob. When I was sick with the flu, I was so irritated, I asked my husband to cut about 6 inches of my hair. Now I have this short bob. I love it!!

Thursday, December 27, 2007

Christmas Projects

Here are projects I managed to create for Christmas before I got sick. Fortunately, I was able to finish them. I made them for my "Pay it Forward" recipients. . .Michelle (Come Stamp With Me), Jen (Pieces of Me) and Gabby (Confessions of A Stamper). I think all of them received their goodies.

Cocoa pocket card. Instructions below (pink version).


Envelope bag with box of coffee. Scroll down to the pink version of this project for the instructions.


An altered monogram notebook.
Materials:
Paper: DCWV Luxury paper, DCWV texutred cardstock, SU Cool Caribbean
Accessories: Grosgrain ribbon, organdy ribbon, Modge Podge
Instructions:
1. Cover the front and back of the notebook using Modge Podge
2. Tie ribbons around the spiral bind.
3. Decorate as desired.


I created this card using the "cracked glass" technique. See below (pink cards) for the instructions on the card. All the cards were made using the same materials but using different colors.


This is the gift pack I sent to my "Pay it forward recipients". This set is pink. The set included an altered monogram notebook, handmade card with a gift card, coffee pack inside an envelope baggie, coffee pocket card, pocket card with recipe.


These cocoa pocket cards were made using a regular mailing envelope.

Instructions:

1. Seal a mailing envelope (business size).
2. Measure the length of your cocoa or coffee packet.
3. Cut the envelope about 1/2" longer than the length of your cocoa or coffee packet.
4. Punch a hole at the top center (at the opening) using a slot punch. or a 1/4" or 3/8" circle punch.
5. Run a ribbon through the holes from front to the back of the envelope.
6. Insert your cocoa or coffee packet completely into the pocket.
7. Tie the ribbon at the top with the cocoa or coffee packet inside the pocket.
8. Decorate the pocket as desired.


I made these baggies using a large envelope. The Starbucks coffee fit perfectly into the "bag".

Instructions:

1. Seal an A8 size envelope (large greeting card envelope) and cut the upper right and left corner of the envelope leaving a strip of the envelope to create the handle.
2. Stamp the envelope and decorate as desired.
3. Tie a tag at the front of the handle.
4. To create the band around the box, seal an A8 size envelope.
5. Cut horizontally a strip of the envelope.
6. Cut the length of the envelope so you end up with a long strip.
7 Reseal the envelope to fit around your box.
8. Stamp and decorate the strip.
9. Insert the box into the strip to create a wrap around your box.


Card Recipe:
Stamp: SU Snowflakes, Inkadinkado sentimentPaper: SU Purely Pomegranate, Whisper White, Bravo Burgundy, DCWV Holiday Collection designer paper. glossy cardstockInk: Bravo Burgundy Craft Ink, Purely Pomegranate, VersamarkAccessories: UTEE embossing powder, Stickles glitter, 5/8" organdy ribbon

Instructions:

1. Technique used for snowflake background is "Cracked Glass". Follow the tutorial on SCS.
2. Stamp the snowflake using the SU Bravo Burgundy Craft Ink, heat emboss with clear UTEE embossing powder.
3. Apply stickles glitter to the snowflake.
4. Cut out the snowflake and mount to the decorated card base using foam tape.


Video Tutorial 5 - Mini Brag Book - Scrapbook Album and Monthly Compiled Sketches

Hi Everybody! Jus' wanted to let y'all know that I created another tutorial but it's posted on Card Inspired. It's a tutorial on a mini brag book - scrapbook album. Check it out!!

Here are my compiled monthly sketches. I was behind again but I finally caught up! Click on the links to view the compiled sketches for each month! The links of the compiled sketches are also located on my sidebar to the left. January through July sketches are located there.

Hope y'all have a nice day!!!

Sunday, December 23, 2007

Video Tutorial 4 - Shading and Coloring the Background of an Image Using a Sponge Dauber


Click Play Button to Start the Video Tutorial
Warning: Music is played with this video tutorial. Turn down your volume if you don't want to hear the music. Volume may also be modified by adjusting the volume knob on the video player.


The little things do count. . .

Here are the finished cards from the video tutorial above. As you can see, the background of the images are colored and I did it using a sponge dauber and ink. It's an easy way to color your background. It's a "no nonsense" way to shade and color your image background. If you don't know me by now. . .I love "easy". LOL! Card making and rubber stamping shouldn't be complicated.

When I say "the little things do count". . .coloring the background is a little thing that make a whole lot of difference to how your card looks overall. Check out the tutorial and try it out. It's a "basic" technique that a new stamper can use to create color to their backgrounds.

I used YouTube to upload my video tutorial because Blogger's video upload was being a pain in the butt and was giving me a hard time. I have a YouTube account if you are interested in subscribing to my video tutorials. . .Click Here. I think if you subscribe, you'll receive an email from YouTube informing you that I uploaded a video tutorial. I'll be doing more video tutorial in the upcoming year. I'll still do the regular tutorials for other projects but for techniques, the best way to explain them is through the videos.


Card Recipe:

Stamp: Unknown ( I already stored the stamp, don't want to look for it), Studio G (sentiment)
Paper: SU Bashful Blue, Wild Wasabi, K&C0 desinger paper
Ink: SU markers with aquapainter (watercoloring), SU Bashful Blue and Wild Wasabi ink pads (background)
Accessories: JoAnn Brads, Marvy Round Corner Punch, sponge dauber, JoAnn Ribbon

Instructions:

1. Color image using SU Markers and aquapainter (watercoloring)
2. Color background using a sponge dauber and ink pad (see tutorial)
3. Punch the corners with a round corner punch
4. Mat and layer the image. Mount on to background using foam tape.
5. Follow sketch and design as desired


Card Recipe:

Stamp: Unknown, Studio G (sentiment)
Paper: SU Bashful Blue, Really Rust, DCWV Value Pack, Provocraft desinger paper
Ink: SU Markers with Aquapainter (watercoloring)
Accessories: Swirl Clip (Office Max), Walmart Holiday ribbon, SU 1 1/4 and 1 3/8" ribbon, 1" circle punch, Marvy Corner Punch, Stickles glitter, Making Memories eyelet.

Instructions:

1. Follow 1st card instructions from 1 to 5.
2. Apply Stickles glitter to parts of the image.


The Start of Next Year's Christmas Cards and 2008 Resolutions

Yup, you read it correctly. I'm making next year's Christmas cards. Last year one of my resolutions for 2007 was to create 10 Christmas cards a months so I can send them out early and even sell some of them.

Well, I procrastinated and waited until November to really make them and by December, I was behind. I thought no problem, I'll spend a week busting my buns to finish up and well, I ended up with the flu. It turned out to be a DISASTER. Okay, lesson learned.

I really like the way Monika at M.A.D Stamper includes instructions to all her cards on her blog so I decided I'll try it out. We'll see how it goes. I may get lazy and stop doing it but for now I'll write the instructions. My instructions will be condensed.


Card Recipe:

Stamps: Unknown
Paper: SU Bashful Blue, Old Olive, Ballet Blue DCWV Holiday Pack, Watercolor Paper
Ink: SU Markers, Basic Black Ink
Accessories: SU Circle Punch, Scallop Punch, Crafter's Tool Kit (Paper Piercer), Snowflake brad (unknown), Walmart Holiday Ribbon, Stickles Glitter, Aquapainter

Instructions:
1. Stamp image using black ink on to watercolor paper.
2. Watercolor image using SU Markers and aquapainter (Click here for the video tutorial)
3. When dry, apply stickles glitter to parts of the image.
4. Follow the sketch and design card as desired.


Card Recipe:

Stamps: Unkown, Magenta (sentiment)
Paper: SU Purely Pomegranate, Whisper White, Garden Green, DCWV Holiday Stack
Ink: SU Markers, Basic Black
Accessories: SU Ticket Corner Punch, Stickles Glitter, 5/8" grosgrain ribbon

Instructions are the same as the first card.

Hey, I'm curious. . .have y'all created your list of resolutions already? Mine is very long. Why? Because if I make a long list, I'll more than likely fulfill one or two of my resolutions. . .LOL!

Okay. . .don't mind but this is for my personal reference . . .

My 2008 Resolutions:

1. Make 10 Christmas cards a month.
2 Use or Lose. . .meaning anything I don't use next year will need to be purged.
3. Purge and organize the garage AGAIN.
4. Meditate for at least 10 minutes every morning.
5. Start on Yoga.
6. RAK someone at least twice a month.
7. Label all my craft containers.
8. Plant one plant in my backyard twice a month.
9. Create a daily "experience" list. I'll explain later.
10. At least once a week, create a card or project with a technique that I've never tried.
11. Create a "gratitude" journal and write in it daily.
12. Resume my weight loss journey.
13. Reduce my stamping/scrapbooking expenditure.
14. If I buy a craft item, I MUST use or create something with it the week I buy it.
15. Unmount my wood stamps and create an unmounted stamp folder. Finish 3 pages a
week.
16. Send my friend Rita in Hawaii, Laurie in San Francisco, and cousin Florence a box of handmade cards or scrappy project at least once a month.
17. Make a "gourmet" type dish once a week.
18. Create one mini album/scrapbook layout or scrappy project once a week.
19. Create a new banner for my blog sites.
20. Lose weight.
21. Exercise at least 3x a week.
22. Create a blog tutorial at least once a week.
23. Reduce my scrap pile.
24. Lose 20 lbs by the end of 2008.
25. Clean my craft room once a week.
26. Organize all of my embellishment.
27. Start my Christmas shopping in September.
28. Blog daily on Journey to Skinnyville starting Jan 1st.
29. Clean out my computer.
30. Start a journal.
31. Create a bind-it-all project at least once a week.
32. Alter something once a week.
33. Don't re-buy any new craft item until I use up the ones I already have (ink pad, brads,
markers, embossing powder, etc.)
34. Read a book at least once a month.
35. Wash the laundry at least once a week.
36. Do not place anything in the hallways (craft stuff)
37. Create a more organized address book. (Write all addresses in only ONE book)
38. Compile all my favorite recipes and create a recipe box.
39. Shut off the lights and TV when I'm not in the room.
40. Make the bed daily.
41. Mop the floor once a week (wood floor)
42. Eat vegetables 3x a week.
43. Purge all my old unused clothing and bring them to the Salvation Army.
44. Bring all the old photos stored in the garage into the house before summer.
45. Clean out linen closet. Give excess items to Salvation Army.
46. BBQ in our backyard twice a month.
47. Use ALL of my rubber stamps or sell the unused ones by the end of the year.
48. NO MORE HOARDING OF MY CRAFT STUFF.
49. Transfer all of my old pictures of my cards on to a CD.
50. Search for scholarships daily for Alexis.

I'll add more as I think up of more to list. . .:)

Hey, if you've already created your resolution list, send me a link to your blog. . .I'm interested to see your resolutions for 2008.

Friday, December 21, 2007

I'm Back!! The Last of the House Mouse Cards


Hi Everybody! I'm back. . .well. . sort of. A few days after I went on my blog vacation, I ended up with the flu. Agrhhhh. I'm a little bummed out about it because I REALLY had a lot of stuff to work on and well, I was basically sidelined and was unable to finish much of anything.

I'm very disappointed about it. I had all these projects I wanted to create and send out to friends and family. . .well, it didn't happen. As a matter of fact I didn't do anything but lay down, eat a whole bunch of Recess Peanut Butter bars, and nurse my cold.

I decided to abandon all my projects and work on them throughout the year. I'll create and send out the projects throughout the year. Who said that Christmas can't be year round anyway? LOL!

Anyway. . . .

I created these House Mouse cards before I got sick. I'm only posting them now. I was asked by a customer who wanted me to create the House Mouse cards for her.

I typically don't do special orders or any sort of orders for my cards. I create cards randomly. . .you know. . .what ever I feel like doing at the moment but this customer didn't ask for anything specific. . .she just wanted the cards to be House Mouse cards so I said okay.

I made a bunch more but I won't post all of them. You're probably sick of seeing them so I won't post the rest of the cards.
I can't wait for the New Year. I have big plans. . .ha! Not really but I'm really excited about getting started on my resolutions. I have a long list of resolutions and I'm ready to tackle all of them. It's so exciting.


Today is the first day that I woke up up with a clear head. . .I still have a runny nose but other than that. . .life is good! I'm sooooo happy about it. I have not created anything for the past week and I'm itchin' to make a bunch of stuff.

I do feel bad that some of the people that I wanted to send handmade gifts to won't receive them before Christmas.

Some info on the cards.
All of the House Mouse images are by Stampabilities. The cardstocks are by Stampin Up and the designer paper by various brands such as K&CO, DCWV, Provocraft, etc. The sentiments are from various brands as well such as Stampin Up, CTMH, Inkadinkado


If want info on a specific cards, just email me and I'll provide the details. There's just too many cards to list the details. I'll resume my normal blogging in the next few days.


Anyway. . .enough of my rambling. . .
I hope y'all are having fun this Christmas season. I'll be posting some of the Christmas RAKs I received on Card Inspired. I'll post them either tonight or sometime tomorrow. Be sure to stop by Card Inspired to check them. out.


Sunday, December 9, 2007

Blog Vacation!!

Hi Everyone! The holidays are beginning to get really hectic so I decided to take a longer blog break. I'll be back blogging in about a week or so. I have a lot of catching up to do so I need to take this break. If I can spare some time, I may post something from time to time. Until then, I hope everyone is enjoying the holidays!!

See ya' all later!!

Thursday, December 6, 2007

We've Got A Winner!!!!


And the Winner is. . . .
Tracy H. of
Tracy's Happy Place!!!

Good Morning y'all! Let's congratulate Tracy! Whoohoo! She won the blog candy prize. I decided to use Random.org to pick the winner because there were so many entries. I, initially, was going to pull a name out of a bucket but I soon realized that there were too many entries for me to sit and cut up names for every entry submitted. Using Random.org #268 popped up and on the list Tracy H. was #268. It seems Tracy is a very lucky girl. . .looks like she won another blog candy recently. Gosh, I wish I was that lucky!

I want to thank every one of you who played along with my blog candy celebration challenges. I had a BLAST reading your entries, looking at your pictures, and learning a little bit more about all of you and your thoughts and opinion.

I especially had a lot of fun looking at your "chaotic space"!!! You were all very brave to take a picture of your spaces when it wasn't cleaned up! AWESOME!!!

Anyway. . .with all that being said. . .I'll be taking a blog break for a few days because I really need to get caught up on life. I'll be back next week! I hope you all are enjoying the holidays!

Again, thank you everyone for making this celebration such a fun one!!!!!!!!!!!!

Wednesday, December 5, 2007

Happy Birthday Blog!! Yay! Blog Candy Challenge Day 5!!


Happy Birthday to my blog!!! Today is the last day of my blog candy challenge! You have until 12:00 midnight to submit any of the 5 challenges I've posted for this blog site and Card Inspired.

I added not one but two more prizes to the prize bucket. I added the Stampin Up Chocolate Chip Satin Ribbon! It's 15 yards long so you'll have a lot of ribbon to play with! Whoohoo! The other prize I added is another clear stamp set by Hampton Arts "Art Warehouse Designs". The set is a tropical theme! Very cute. Okay to sum up all the prizes:
  • 1 stack of K&CO 12 x 12 double sided designer paper - 36 total (the designs are so pretty)
  • 1 Colorbox Petal Paint Pigment Ink pad great for regular stamping as well as heat embossing different colors (very versatile ink pad - love it)
  • 2 clear stamp sets by Hampton Arts. (very pretty designs - I bought each of them for myself too)
  • 1 package of 8 x 11.5" Stampin Up cardstock - last year's "In Colors". (very rare because it's retired - remember cool caribbean, cranberry crisp, true thyme? Love them)
  • 1 Stampin Up Chocolate Chip Satin Ribbon - 15 yards (lots of ribbon to decorate your card and projects)

If you haven't participated in any of the challenges. . .it's your last chance. You have at least 12 opportunities to submit your name. Scroll down for the 5 different challenges for this site and stop by Stampin Inspirations for that sites challenges.

******************************

Blog Candy Challenge Day 5

"Tell me 3 crafting or blogging goals for 2008"

My 3 crafting goals are:

  • Use ALL of my stamps and every product, tool, accessories I have at least once this year or get rid of them.
  • Expand my creativity by using different techniques, creat different projects, and experiment with various products.
  • Put more effort into my scrappy projects: scrapbooking, altered art, etc.

The challenge for today is to comment on either your 3 crafting goals or 3 blogging goals for 2008. Submit your comment by 12:00 midnight tonight!

Good luck Everyone! I really had a lot of fun with this blog candy! I hope you did too!


Tuesday, December 4, 2007

Blog Candy Challenge Day 4


Hi everybody! Thank you all for such a great response to all the challenges. It has been fun reading all your comments. Thank you especially to those who have submitted pictures and linked their site to the cards using my sketch. If I haven't visited your site yet and commented on your card. . .don't worry, I'll find time tonight to do so. I wasn't feeling well last night so I ended up sleeping early.

Today's added prize is a stack of K&CO double sided designer paper. I love K&Co. papers because they're almost as thick as cardstock so basically you can use it as a cardbase. Furthermore, the patterns are so pretty. This stack contains 36 double sided designer paper. The cover shows the different patterns of paper. This prize will be added to the prize bucket.

*****************************
Blog Candy Challenge Day 4

"Christmas Decorations"

I've been fizzling out on finishing up with decorating our house. I've lost steam for some reason and have not been in the mood. We did decorate quite a bit but we still haven't bought our tree because quite honestly, I've lost my Christmas spirit temporarily. A great way to bring it back is to see what others have done to decorate for Christmas. Click here to see what we've done so far in our home.

Today's challenge is send me a picture to my email address lbmcd66@hotmail.com or comment and link a picture from your blog site or picture gallery of your Christmas tree or a Christmas decoration that you placed inside your home. You have until December 5th 12:00 midnight to submit the picture or the link. Can't wait to see your Christmas decorations or tree.

Monday, December 3, 2007

Blog Candy Challenge Day 3


Good Morning folks! Remember you have until December 5th to play all the challenges! Today's prize addition is Stampin Up's last year "In Colors"! Remember cool Caribbean and cranberry crisp? Yup! Some die-hard Stampin' Up fans will pay double to triple the amount of the cost of these puppies. Why? Because it retired and once it's used up, it's gone forever. Hopefully, if Stampin Up will be smart about it and retire some of the current colors and add last year's "In Colors". In the meantime, it can be yours. I bought a bunch of packs before they retired and I am willing to part with one of them. It was hard but I thought it would be a great addition to the prize bucket.

****************************************

Day 3 Blog Candy Challenge

"What helpful advise would you give a person who wants to start paper crafting (rubber stamping, scrapbooking, cardmaking)?

My advise to new paper crafters is to not be sucked into purchasing the "in" products just because it's the "in" products at the moment. When I first started stamping and paper crafting, I had to have everything that was out there being "pushed or promoted". With time, I soon realized that a product was being pushed or promoted every week or so. What was popular last month no longer was popular the next month. . .on to the new and out with the old.

Okay folks, unless you are rolling in dough. . .soon enough you'll begin to realize that you're broke and that you didn't really need to buy "that" stamp, "that" paper, "that" whatever. Worse of all, you really didn't think it was all that great to begin with but EVERYBODY had it so you had to have it too. Next thing you know it, your craft room is stuffed with things you don't use or don't want.

Okay. . .so the rule for this challenge is to comment on this post with an advise you would give to a new paper crafter. If you are a new paper crafter. . .what advise have you been given from a seasoned paper crafter? All entries for this challenge is due December 5th 12:00 PST! Thanks for playing along!!

Don't forget to stop by Card Inspired for that site's challenge.

************************************************************
Just a card I made last night


I watercolored the image using SU Markers and aquapainter on watercolor paper.

The designer paper is DCWV Luxury designer paper. The color combo is SU Night of Navy and Creamy Caramel.

I added stickles to the poinsettia and the hardware is by JoAnn Essentials.


Related Posts Plugin for WordPress, Blogger...
 
Share |