Friday, November 27, 2009

Unity Stamps Cards

Hello, Friends! How did you do with your Black Friday shopping? Well, I did go shopping yesterday even when I said I wouldn't. We went out to breakfast in a town that isn't really known for it's shopping malls and such. We decided to stop by a few stores and what do you know, it was like any other day. I was a bit surprised by the lack of shoppers. We were able to shop for sales without the crazy crowds. It was wonderful! LOL!

Okay. . .I have two cards to share with you and they're non-Christmas cards. I really needed to take a break from making them. I decided to work with my Unity stamps and make a card that is different from my typical layout.

What do you think? I like the scrappy look to it. It's nice to do something different once in a while. I also did a bit of sewing too!

I stamped the image directly on to the designer paper and added the sentiment by stamping on the Nestabilities shape. I found a spool of ribbon on the dollar rack at the fabric section of JoAnns. You can sometimes find nice stuff at the fabric section. I love going to different aisles at the craft store . . .it's like going on an adventure. It's sometimes fun to step away from the card making/scrapbooking section and look for craft goodies elsewhere. Many times they are less costly than the ones found in the scrapbooking section.

Card details:

Stamps: Unity Stamps KOM Oct 09 Wherever You Go
Papers: SU Soft Sky, Creamy Caramel, DCWV designer paper
Ink: SU Night of Nave, Chocolate Chip
Accessories: Nestabilities, Round Corner Punch, Buttons, trimmings, embroidery floss


With this card, I decided to do something different again. I was inspired by Mel's box of Mel Stampz. I love how she does a lot of sewing on her cards. It's a bit more time consuming to hand sew your cards but I love the effect. Mel had added beads to her stitches but I couldn't find my beads so I decided to use my Scribbles Iridescent paint to add the faux beads. Sometimes you just need to improvise.

I also added dew drops to the ribbon. You find these cute dew drops at Little C's. What do you think of the lace? The lace is actually a garage sale find. You either think I'm cheap or resourceful. LOL! I don't know. . .card making stuff is expensive and if you can find quality stuff at dirt cheap prices, why not huh? It's more what you do with those dirt cheap stuff that counts. Well, that's my philosophy anyway.

Anyway, I need to finish up my Christmas shopping today so I'll end it here. My goal is to get it done by this weekend. Wish me luck, folks!

Hope you have a beautiful Saturday!

Card Details:

Stamps: Unity Stamps KOM Oct 09 Wherever You Go
Paper: SU designer paper, Pretty in Pink, Close to Cocoa
Ink: Copic Markers, SU Always Artichoke, Scribbles Iridescent Paint
Accessories: Nestabilities, SU Satin Ribbon, Embroidery floss, Dew Drops, lace

Pink Cat Studio Black Friday Sale

Hello Friends! It's Black Friday! Sounds pretty scary but if you shop online well, you won't run the risk of getting run over by shopping carts by crazy shoppers. I don't shop during Black Friday. There's nothing I want that badly that I'll take the risk of getting run over. LOL!

Well, guess what! When there's Black Friday, there's a sale and Pink Cat Studio has something for you! If you spend $3.00 or more in the digital or rubber stamp stores today then you will receive this new Sugar Plum Fairy digital stamp for free! This special offer will end at midnight EST Fri. Nov. 27.


Although the image isn't necessarily a Christmas image. . .I thought it was perfect for a Christmas card. I love using non-Christmas images and making Christmas cards with them. Most times, they usually work out fine.

I colored the image with my Copic Markers and basically layered the rest. Do you see the flowers? They're actually flowers for floral arrangements. They're much cheaper than scrapbook flowers or primas and I think they're perfect for embellishing cards.

Anyway be sure to stop by the Pink Cat Studio Digi store. Hope you have a wonderful Black Friday shopping day!

Card Details:

Stamps: Pink Cat Studio Plumb fairy
Paper: SU Buckaroo Blue, Real Red, SU DSP
Ink: Copic Markers
Accessories: Nestabilities, Fiskar scallop scissors, satin ribbon, button, hemp cord, floral embellishment

Thursday, November 26, 2009

Thanksgiving Acetate Window Pocket w/Recipe Insert

Happy Thanksgiving Friends!! What are you all doing for Thanksgiving? Well, we're heading off to the winery for Thanksgiving. No family dinner at home. We actually don't have any family near where I live. In previous years since moving to California 4 1/2 years ago, we spent it with my husband's family, once in Las Vegas and on another year in Orange County about a 2 hours drive from where we live. Last year we decided to stay at home and cook Thanksgiving dinner and I think less than one third was eaten. I recently found a vacuum sealed bag of last year's Prime rib. LOL! We decided that a no fuss Thanksgiving will be better for us! So the winery it is!

Before I discuss my project, I want to say that I am so extremely blessed. . .beyond what I could ever imagine for myself. Growing up as a child was a difficult period for me for various reasons. Quite frankly, most were of my creation and how I viewed life. It's funny how your perspective of your life can really make a difference. You can live in the same condition and with the right attitude and optimism, your life can be seen as beautiful. I am so glad that I've realized that many times happiness is a result of how you perceive your life rather than your actually life condition.

I'm blessed with a wonderful husband and daughter. I live in a comfortable home and am able to pursue the things I love to do like crafting, blogging, and many other things. I have friends and family that care for me. I may not have all the materialistic things that many others do but what I have is beautiful and I really don't care to have more. . . .well, except for craft stuff. LOL! Too funny, I did have to add that. I'm healthy, I'm becoming more physically fit, I have more energy, and gosh, life is darn good.

I want to wish you all a blessed day filled with love, happiness, and lots of food!

Okay. . .now to my project. I created a tutorial for this project yesterday if you want to try it out. It was such an easy project to create, I had to try it out again. If you want to try it out:

Click Here
.

Yesterday I created the pocket with insert in a Christmas theme. Today, I decided on making one with a Thanksgiving theme. Rather than just a card insert, I decided to create a recipe card as the insert.

I heat embossed the image onto acetate and printed the recipe on to vellum. I attached the vellum on to card stock that was stamped with the leaf design. To top the project off, I added a satin ribbon and a floral embellishment.

Anyway. .I hope you all have a wonderful day and happy Black Friday shopping tomorrow. I wish I had more money to shop but well, that's okay. . .I may shop a few places but I have to stick to a small budget. Are you going to do any major shopping tomorrow? I'm just going to shop online and not deal with the craziness at the shopping mall. Ugggh! I can't deal with the zoo. . .besides, I usually end up shopping for stuff I normally wouldn't buy just because it's on sale and that. . .is not a good thing.

Happy Thanksgiving, everyone!!

Project Details:

Stamps: Autumn Splendor
Paper: SU Real Rust, More Mustard, acetate, vellum
Ink: Versamark ink, Real Rust, Close to Cocoa, Buckaroo Blue
Accessories: SU Chocolate Chip satin ribbon, Floral stems, Nestabilities

Wednesday, November 25, 2009

Vellum/Acetate Window Pocket with Insert Tutorial

Good Morning, Friends! Are you all excited for Thanksgiving? Thanksgiving is like the kick off to the holidays and for me, it's very exciting. I've been creating Christmas cards all year but I still need to finish up a bunch of gift items and I am sorely behind on those. I'm actually quite disappointed that I won't have enough time to create all the Christmas gift items that I wanted to create. I think next year I'll start creating both cards and gift items early.

I have so many things to be thankful for. Everyday I am thankful that I have the opportunity to pursue my hobbies. I have so many things I want to do and I'm always wishing I had more time to do them. I have all these ideas but at the same time I think I lack ambition. I think if you really want something and you have the drive to do it, the possibilities are endless. I'm so impressed by many people in blog land and how talented and ambitious they are. If I had to wish for something, I would ask for more energy and drive. I sometimes lack them.

One of my goals next year as far as crafting is to start creating video tutorials again. I had stopped making them because I was upset that YouTube deleted a bunch of my tutorials because of the music copyright issue. My husband recently bought me the Sony Vegas Movie Maker which is pretty expensive so I have to use it for something. LOL! I just won't create tutorials with music on it. I have to also improve on my public speaking abilities. LOL! I'm terrible. I hate listening to myself on my videos.

Another goal of mine is to focus more on fitness and nutrition and living a much healthier lifestyle. I won't tell you what I really want to do with it because I don't want to jinx myself or embarrass myself if I can't accomplish it.

I have other ambitious goals but again, I don't want to jinx myself. I have a real problem starting off something and not quite following through. Usually, the time factor is an issue and my lack of energy. I think as I get more involved in physical exercise, I'll gain more energy. I am so wishing for it. I want to be full of energy to keep up with the demands I have of myself.

Life is short and you have to live like today is your last. I try to live by that concept on a daily basis. . .if only I had the energy to do all the things I want to do. Extra time would also help.

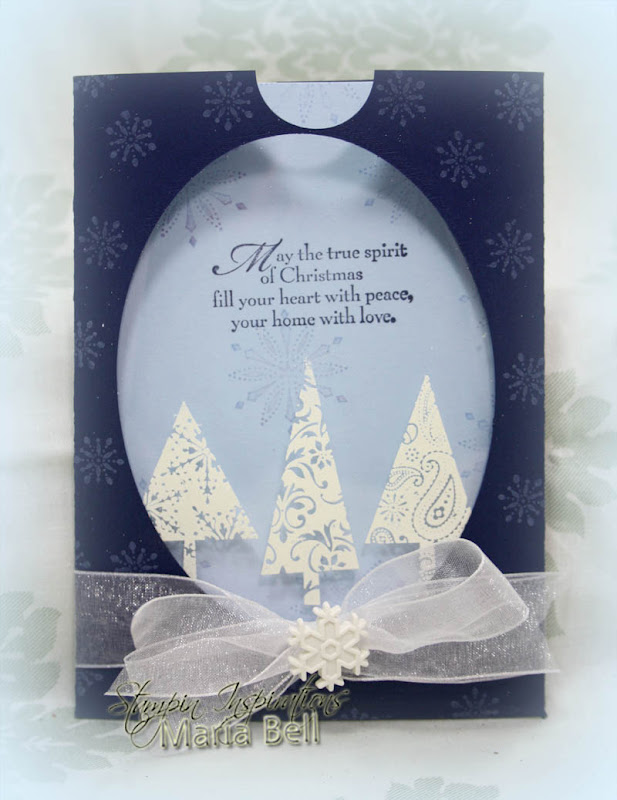
Enough of my yapping. I can sure say a lot, huh? LOL! Okay, now to my project. I actually created the tutorial for this project (Vellum/Acetate Window Pocket with Insert) 2 years ago but I've never published it publicly. I re-edited it and decided to create a Christmas project for it. For my Christmas project, I decided to use Acetate (overhead projector sheet). I heat embossed the image on to acetate. I love the Stampin Up "Patterned Pines" stamp set. It's a perfect set for heat embossing.

I also stamped the insert with snowflakes but you can't really see it in the picture. It's a very simple project and you can easily create a bunch of them quite quickly.


Some of you have been telling me that the tutorial don't print properly. I suggest that you change the margin of your printer to .5 inches on either side. I sometimes extend the margins to the Word document when I create my tutorials because I try to minimize the amount of pages to the tutorial. You may also need to subscribe to Scribd in order to print or download the tutorial. You can download the tutorial in PDF or Word format. There's a drop menu that gives you the choice on what format you want to download the tutorial. Click on the link below and it will bring you to my Scribd account.

Anyway, try out the tutorial. I think I'm going to spend the day crafting. I have so many things I need to do but I really need to work on my Christmas projects first before I work on other things!

Well I hope you have a wonderful Wednesday!!

Project Details:

Stamp: SU Patterned Pines, Snow Swirled
Paper: SU Night of Navy, Soft Sky and Bashful Blue
Ink: Versamark Ink, Colorbox White pigment ink
Accessories: White embossing powder, Nestabilities, Organdy ribbon, Dress Me Up Button

Vellum/Acetate Window Pocket With Insert


Tuesday, November 24, 2009

Little C's Stamp n' Scrap Hawaii JJ Kidz Jaz w/Plumeria Card

Hi Friends!! I'm in the middle of creating Christmas projects but I needed to take a break and make a card for Little C's Stamp n' Scrap Hawaii. It's nice to take a break from all the Christmas cards and projects so I really had fun making this card.

It's going to be a short post today because I really am a bit behind right now. If I don't respond to your emails right away . . .I'll get to them in a few days or when I have the time to sit at my computer. I've been trying to stay away from my computer for two reasons, I get sucked into blurfing and Facebook and I don't have the leisure time right now to do that and I think I pulled a muscle on my right hip and back about a year ago and from time to time, it's so painful to sit for very long periods of time. Ugggh! I really need to get it checked but I've been too lazy to visit the doctor. There are days when it doesn't hurt but some days it bothers me a lot and today is one of my bad days.

This cutie's name is Little C's JJ Kidz Jaz w/Plumeria and you can find her at Little C's. I colored the image with my Copic Markers and added dew drops to the sentiment. You can find the dew drops at Little C's as well. If you want information on the materials I used on my card, please email me at cardinspired@gmail.com

Hope you all have a beautiful Tuesday!!!

Monday, November 23, 2009

Angels Landing Blog Candy Winner

Hey Friends!!!! I've have a winner for the Angels Landing Blog Candy!

I want to congratulate Monique of Monique's Weblog! Whoohoo!!!

I used random.org and the number that was generated was #49! Thank you to all of you who commented and played along in the Angels Landing blog hop! Monique can you please contact me at cardinspired@gmail.com!

I have no cards or project to post today. I'm busy with a few Christmas gift stuff. I'll see you all tomorrow!! Hope you all have a wonderful evening!


Sunday, November 22, 2009

The Character Cafe Christmas Scamp and SU Patterned Pines

Happy Sunday, Friends! I was busy last night creating a few cards! I'm getting myself prepared to be crazy busy this week finishing up ALL of my Christmas creations and such. Hopefully, I'll be able to remain focused and not go off and do other things which I tend to do!!

I decided to work on using this cute "The Character Cafe" image. Isn't this litle pup the cutest or what? He just melts your heart. . .he is also a naughty little puppy because he is playing with the Christmas lights! LOL! This cutie's name is "Christmas Scamp". I colored the image with my Copic Markers, added a bit of puff paint to the cap, and a bit of glitter to parts of the snowflake background.

Card Details:

Stamps: The Character Cafe Christmas Scamp
Paper: DCWV designer paper, SU Certainly Celery, Brilliant Blue
Ink: Copic Markers, Scribbles Iridescent Paint, Tulip Puffy Paint
Accessories: Nestabilities, Fiskar Scallop Scissors, Dress Me Up button, SU Grosgrain ribbon


Okay, I was a little ambitious on this set. I not only made one card but 3 cards and to me, that's being ambitious. Actually, not really. . .the cards are very simple in design but I had fun making them. I embossed the images with white embossing powder on to a silver metallic card stock and added a bit of Scribbles paint to the Christmas tress to create the dots. That's about it.


Metallic card stock really can make a world of difference by making your card look very elegant. I bought a package of metallic card stock which by the way were on the clearance rack at Michaels. Do you know, before I head anywhere else at Michaels, I always check the clearance rack first. With a little imagination, you can really find some really good stuff. You just have to be able to imagine what you can make with them while you're there. Sometimes it's fun to find bargain stuff and create something really nice with them.


As you can see I embossed the Christmas trees on to the metallic card stock. Simple stuff so these cards were actually quite fast to create. . .that's the reason why I created 3 of them. .. :) The simpler the better.

To create the snowflake, I embossed the image using white embossing powder and cut the image out. I then punched two holes and tied a bow at the center to dress up the snowflake.

Anyway. . .I'm not gonna chit-chat much today because I really need to get started on my Christmas projects and cards so I can get them done by the end of the week. I am hoping I can get them finished so I can concentrate on perhaps relaxing a bit during the holidays. . .:)

Before I go. . .stop by my organization blog "Project Organization 365 Days of the Year" and check out today's challenge. It focuses on your craft room today!

Hope you all have a beautiful Sunday!

Card Details:

Stamps: SU Patterned Pines, Snow Swirl (sentiment)
Paper: AC Metallic card stock, SU Real Red
Ink: Versamark ink
Accessories: White embossing powder, organdy ribbon, SU Ticket Corner Punch, DCWV adhesive ribbon

Saturday, November 21, 2009

Little C's Stamp n' Scrap Hawaii Aloha Friday Challenge - Stitches and JJ Kidz Digi Image

Hello Friends! Hope you all are having a wonderful Saturday!! Hey, I forgot to post my card for Little C's Stamp n Scrap Hawaii Aloha Friday Challenge. Oops! Well, that's okay because you have 2 weeks (Dec. 3) to participate and submit your card at Stamp n' Scrap Hawaii!!! Why don't you play along. . .you'll have a chance to win a Christmas stamp of your choice from Little C's up to a value of $10. Whoohoo!

Well this week's challenge is to create a card or project incorporating stitches! Faux stitching is acceptable too. I love stitches. It's basically the only time I have a chance to use my sewing machine! LOL! And boy, did I go all out or what?

Check out the stitches around the image. I can't believe my stitches came out evenly considering I've never tried to sew around a round shape. It wasn't difficult. . .you just need to sew very slowly. LOL! I decided to use the super cute JJ Kidz digital image "Jaz Holding Balloons". You can find the JJ Kidz digi images at Little C's. The JJ Kidz images are so adorable.

I colored the image with my Copic Markers and that's basically it. Nothing much else to my card other than the stitchings. Hey. . .be sure to stop by Little C's Stamp n Scrap Hawaii and check out the pretty cards created by the design team!!!

Lately, I just can't seem to focus on things I need to do especially on my Christmas stuff. I think I'm on "shut down" mode right now! LOL! I just can't seem to get going. Ugggh! It's difficult because there's always something non-crafting that requires my attention. How are you all doing with your Christmas creations? Are you all on the ball?

Well, I better stop here so I can get my butt going. . .time is ticking. . .

Hope you all have a wonderful weekend!!

Friday, November 20, 2009

The Character Cafe Feature Friday Sketch Challenge #6 and Guest Designer

Hello Friends! Happy Friday to all of you!! Guess what! I'm this week's "The Character Cafe" guest designer! Whoohoo! How fun is that? Very fun, I must say! Well as a guest designer I'm hosting this week's challenge! Yup! I created a sketch for you to play with and if you play along you may have a chance to win a cool prize!!!

Here are the details:

The Winner will receive Pax Penguin and Santa's List images, a 15% off Discount Coupon for your entire purchase at The Cafe Store, your card featured on our blog (and in the winners section of the store!), as well as a winner's badge for your blog.

Hop on to the Character Cafe blog and submit your beautiful card using my sketch below. I would love you to play along. . .make my week as a guest designer a fun one!! The more submissions, the more fun it'll be!!!

Here is the sketch to follow!


Oh my gosh, the Character Cafe is a digital stamp store with so many cute, cute images. You need to check it out. I decided to use the "Gift Giver Kitt-E" image. This image is very versatile because it can be used for any occasion. I colored the image with my Copic Markers and layered the card with designer paper and card stock following the sketch!!

Be sure to stop by the Character Cafe blog and check out all the awesome cards created by the design team!!


Card Details:

Stamps: the Character Cafe Gift Giver Kitt-E
Paper: SU Designer paper, SU Shara Sand, True Thyme
Ink: Copic Markers
Accessories: JoAnn Brads, Organdy Ribbon, Nestabilities, Marvy 1 3/4" punch, Fiskar Scallop Scissors, Jolee's Boutique Snow Flake


How are you all doing with your Holiday creations! OMG! I feel like I'm behind despite the fact that I have been creating Christmas cards all year long. It's the "gift" creations that I'm behind on. I REALLY need to focus on creating them this week but ugggh, I am so ill focused. I'm the type of person that needs to have a lot of things going on. LOL! I like being ubber busy. . .my day goes by really quickly and I really have fun doing different things.

Anyway, I better get my butt off this computer before I end up on Facebook again. That place is a bad place for someone who has a lot of things to do. LOL! It's so fun that's why. You get to chat and be entertained by what people post. You also get to know the people that you see on blog land a little better. If you're on Facebook, add me as a friend: Click Here

Well, I hope you all have a beautiful Friday!!

Thursday, November 19, 2009

Pink Cat Studio Digi Stamp Release and Mini Kleenex Package Holder Tutorial

Hello Friends!!! Today is Thursday and Thursday is Pink Cat Studio's Digi Stamps release. Yay! The images are perfect for this time of the year with everyone catching the cold. I decided to create a "Mini Kleenex Package Holder" and posted the tutorial below. It's funny because I had bought a bulk pack of travel Kleenex packages about a year ago with the intention of creating something with them. It's one of those times when I walk into a store and think "I can make a fun creation with that" and when I get home, it sort of just sit there. . .no fun projects created. As I was going through my container of "stuff", I found the package of Kleenex and I thought "perfect"!!!!


Okay. . .be sure to check out the beautiful cards/projects created by the Pink Cat Studio Design Team:

Alicia Weiman
Emily Leiphart
Inge Groot
Kerry Donovan-Casey
Kristen Catalano
MacKenzie Bruckler
Maria Bell
Suzanne J Dean
Tracey Cuccia
Tori Hemmingway
Vicki Garret

Be sure to stop by the Pink Cat Studio blog as well. . .check out what is going on over there!


As you can see the Kleenex package slips into the holder. It's perfect for kids or for your desk! So fun, don't you think? I colored the image with my Copic Markers and basically created a simple design for the holder. I've been a little overwhelmed lately. I have so many things I need to do before December rolls around. We'll be heading to Europe in a few weeks and I really need to get all my Christmas shopping done, projects completed, and all the gifts sent out the first week of December. I'm a little more organized than last year but at the same time, I feel I'm already behind. Uggh!


Anyway. . try out the tutorial. It's a super easy project. I always say that but honestly, I don't like complicated projects so I try to come up with projects that can be made with minimal components and materials. I mean, who wants to spend hours creating one project? Not me! LOL!

Well, I hope you all have a beautiful day!

Project Details:

Stamps: Pink Cat Studio digi stamp Sick Lily, Free sentiments
Paper: DCWV designer paper, SU Cool Caribbean (I think)
Ink: Copic Markers
Accessories: Nestabilities, JoAnns brads


Mini Kleenex Package Holder

Wednesday, November 18, 2009

Angels Landing November Blog Hop, Blog Candy, and Candy Bar/ Cocoa Packet Holder Tutorial!!!


Welcome to the November Angels Landing Blog Hop. If you missed the beginning, head over to Judi's digital stamps blog and follow the links. Today the Design Team is introducing two new digital image sets for November, Polar Bear Cubs and Button Bugs.

To celebrate the new releases, I'm offering some Blog Candy. One lucky winner will receive free download links for both of this month's new releases, Polar Bear Cubs and Button Bugs. To be eligible to win, leave a comment on my Blog Hop post before Sunday November 22, 2009, at 11:00 PM Eastern USA time. I'll use random.org to pick a winner on Monday November 23. Please remember to check back again then to see whether you've won.

Be sure to visit the other designers in today's Blog Hop, since there are more Blog Candy offers. Good luck. Your next stop on today's Blog Hop is Broni Holcombe

If you get lost along the way, check the master list on Judi's digital stamps blog. Thanks for visiting, and I hope you'll enjoy the rest of the hop.

Okay. . ..you're like Holy Cow, you were busy! Actually other than coloring the images, it wasn't so bad. On Saturday I went to several garage sales and I got a super awesome deal on greeting card size envelopes! A shoe size box full of envelopes for a $1. Seriously! Just a dollar. . .but now, I have a ton of A9 size envelopes that I don't typically use. LOL! I had created a tutorial in the past using greeting card size envelopes so I decided to work on this project and use up some of the envelopes. The original tutorial was a holder for a candy bar but for this project, rather than inserting a candy bar, I decided a cocoa packet was more appropriate. Scroll down for the tutorial.


I decided to create 3 sets of 3 cocoa packet holders using the super cute Angels Landing "Polar Bear Cubs" images. I colored the images with my Copic Markers, decorated the envelopes, and inserted cocoa packets in the pockets.

I also decided to create an altered heart box and the Button Bugs images were perfect for this box. I printed the butterfly images on to vellum paper and designer paper, cut the images out and mounted them on to one another. I then added dew drops to the butterflies. The button border around the box was created by using one of the button images from the Button Bug digi set, lining them in a row and printing them on to designer paper.

Anyway, don't forget to comment for the chance to win the 2 sets of Angels Landing digi images. Try out the tutorial below. It's a super easy project. If you want the recipe for the projects I created, please email me at cardinsired@gmail.com.

Don't forget to hop on to Broni's blog to follow the blog hop trail. . :)

Hope y'all have a wonderful Wednesday!!!

Candy Bar-Cocoa Packet Holder

Related Posts Plugin for WordPress, Blogger...
 
Share |