Monday, May 17, 2010

My Scrap Chick Gift Sets and Handmade Flowers


Hello Friends!! Hey. . .I haven't posted for two days! Sorry about that but I was busy. . . .doing what you ask? Well, first of all I cleaned up my craft room a little. Nothing major but it was such a mess that it was sucking up my creative mojo. I, initially, was going to do a complete overhaul of my room but decided against it. I've done an overhaul three times already and with time it just returns back to where I started before I overhauled it. It's a losing battle! LOL! So. . .what I'm going to do is organize one section at a time.

Okay. . .I have a lot of projects to talk about so let me get started!! First of all. . .all the cutting files for the cards, gift bag and box, and flowers were all created using myscrapchick.com files. For those who are not familiar with myscrapchick.com, they sell cutting files for various machines (Cricut, Craft Robo, etc.) such as SVG, DSD, AI, KNK, etc. . For those who don't have a cutting machine, templates are provided in PDF so you won't be left out in all the fun. . :)

Each Friday, myscrapchick.com sends out a newsletter via email and if you sign up, each week they give out free files so hey, I would sign up if I were you. . .:) They also have a Facebook Fan Page. . .become a fan and share your projects with others.
The two boxes I created that coordinate with my card were created using the "Bigger Bags" file. The files allow you to cut on two sheets of card stock or designer paper so that you can create a bigger bag then you normally can if you were to cut on one sheet. My cards measure 5.25 x 5.25" and if you look at the photo, my card is much smaller than the bag and box. You can fit a nice gift in the bags. There are 12 different patterns of bags/boxes you can create and I'll be creating a bunch of them this week to share with you. My card above was created using the "30 Boxes and More" file set. . .this set is awesome because there's so many files in this set that you can create a variety of box shapes, card shapes, and different frames that go along with them. The variety is endless.

The flowers on my card and boxes were created using the "$1 Cut Flower" File. I made a whole bunch of different flowers using a "handmade flower" technique. If I can find the time, I'm hoping to create a tutorial on how to create the flowers this week.

I created 2 sentiments for my cards/bags. If you want to use them for your projects, you can download it by clicking on the photo. Don't "save image" by right clicking on the image because the size will be too small and the when you try to make it bigger when printing, it will appear fuzzy looking so click on the photo and go through the download process from the 4shared.com download.

To download the jpeg file, click on the image
To download the png file, click here


Here is another gift set I created using the same files for my first gift set. I also used the "$1 Floral Frames" file to create the floral label on my card and box.

I created a sentiment for my card and box. The sentiments are lyrics from one of my favorite Christian song "Open Hands" by Matt Papa. Because I'm planning to donate the gift sets to my church, I wanted to add sentiments that would have a worship meaning to them.

Again, to download the sentiment, click on the image and download the sentiment from 4shared.com rather than right clicking and saving the image.

To download the jpeg file, click on the image
To download the png file, click here


Here are all the different flowers I created using the different flower files from myscrapchick.com. I'll see if I can create the tutorial on how to create these pretty handmade flowers.

Okay. . .this post is way long so I'll end it here! I hope you all have a wonderful Monday!


Friday, May 14, 2010

Christmas Stampin All Year Long Challenge #50


Hello Friends! It's Friday!! Awesome! Friday is such a wonderful day. . .:) One reason why it's wonderful is it's Christmas Stampin All Year Long Challenge time! Yup. . .it's a fun day of Christmas card creations!! This week's challenge is hosted by Patty of Mis Creaciones and the challenge is to "create a card" following a recipe. Stop by CSAYL and check out the card recipe!
This week Lacy of Hand Stamped by Lacey is our fabulous guest designer!! Yay! The design team created some fabulous cards this week. . .be sure to check them out!

I decided to create 2 cards this week. My cards are rather simple because I had to follow a recipe with specific dimensions, embellishments, and colors. I decided to use my SU designer paper and scrappy embellishments because they can make a simple card look like you worked harder on it than you really did! LOL!

Again, the papers and stickers are by SU. I just love the designer paper. . .it's so pretty.

I'm pre-scheduling this post and it's rather late so I'm going to cut this short! Sorry. . my brain is in sleep mode! LOL!

Hope you all have a beautiful Friday!!

Thursday, May 13, 2010

Pink Cat Studio Digi Release and SVG, SCUT Congrats Buckle Card File


Hello Friends! It's Thursday! Yay! That means one more day and it'll be Friday! Friday is my favorite day. Today is the release of Pink Cat Studio's digi stamps! It's all about the graduate this week! I don't know any graduates this year so I'll be donating these cards to my church. . .maybe they'll know a graduate they can give the cards to.
Do you see the owl graduate? You get it free with your purchase but it's only free today!!!

Be sure to stop by the Pink Cat Studio blog to check out all the fabulous cards created by the design team!!


Okay. . .I provided a SVG and SCUT file for you to use if you want to. It's similar to the flower file I created the other day. To create the liner for the card, please follow the the tutorial I provided: Click Here

The flap is inserted into the slot and when it's opened, it opens similar to a gate fold with an inner liner. I decided to add an image on the inside of the flap as you can see in the photo. It's just a fun way to decorate your card.

I created a Lily version of the Congrats card. I colored all the images with my Copic Marker and added Scribbles Iridescent Paint.

Below is the file that you can use to create this buckle card. Do you want me to create more of them? Different types? I'll see if I can create something different. . .I like the buckle cards. . .they're just fun to open up. LOL!


To download the SCUT file, Click on the Image
or
To download the SVG file, Click Here

Click here for instructions on how to create the inner liner

That's it for today!! Hope you all have a beautiful Thursday!!

Wednesday, May 12, 2010

My Scrap Chick Dad Word Album and Bear Camp Out

Hello Friends!! Hey. . ..I created a project way in advance of the actual event!! I'm so proud of myself. I'm usually behind and do everything at the last minute. I decided that I'll start working on projects a month in advance. This is a "Dad" word album that I created for my husband for Father's Day.

I used the myscrapchick.com "Dad Word Album" and "Bear Camp Out" files to create this project. Stop by myscrapchick.com and check out all the cute files they carry. . . maybe you can start on your Father's Day projects early too!

I didn't have any camping photos so I just used random photos. Do you see the bear roasting marshmallows and the bear with the hot dog in my first photo? Well, it's a cutting file from the "Bear Camp Out" file by myscrapchick.com. I think my next project is to create a card with that file set. Isn't it perfect for Father's Day?


Again, here is the bear from the "Bear Camp Out File". If you're wondering how I created the shading on the bear? Well, I cut the bear in a lighter color and using my sponge dauber, I rubbed ink on to the image to give the image a bit of definition rather than a flat look.


This is a photo of my daughter and my husband. My daughter and my husband are best buds. . .they are video game buddies! LOL! My daughter hangs out with him more than she does with me because my daughter don't like to craft!! This photo was taken on my husband's birthday.

Last but not least, this is a photo of my husband and his son (my step-son). this photo was taken when we visited Muir Woods in Northern California.

Anyway. . be sure to stop by myscrapchick.com and check out all the fabulous files they carry!!!

Hope you all have a wonderful Wednesday!!


Tuesday, May 11, 2010

Little C's Challenge - 2 Layers or More

Hello Friends!! Happy Tuesday to all of you! Today is Little C's challenge and the challenge is to create a card with 2 or more layers. Simple enough for me because most of my cards are usually 2 layers or more. . :) Stop by the Little C's challenge site to check out the details. There is a prize given out so be sure to play along!! Stop by Jen's and Mackenzie's blog to check out their take on this challenge.

I decided to use the Greeting Farm image. . .you can get them now at Little C's at 40% off! Little C's will stop selling all of their rubber stamps so get them now before they are all gone!! Please use this code when checking out "GoodBuy40".

I colored my image using my Copic Markers and I cut the image out and remounted it on to the oval panel. I like doing that because I like having different backgrounds for my images and it allows me to place my image off centered like I did with my card. I added the dew drops to my card. . .you can also find them at Little C's!

I have a lot of stuff to do today. .. doing a bit of catch up. OMG! That reminds me I need to dry my laundry. . .I washed it yesterday and forgot to transfer the clothes into the dryer. Oops. .. gotta run!

Card Details:

Stamps: The Greeting Farm, SU
Paper: K&Co, SU Cool Caribbean, DCWV textured card stock
Ink: Copic Markers
Accessories: SU Key Tag Punch, Nestabilities, Basic Basic ribbon, Martha Stewart Punch, Dew Drops


Pink Cat Studio Contest


Pink Cat Studio has a fun contest idea that will be a weekly event. It’s called “Pink Kitty’s Choice”. Each Tuesday, Pink Cat will secretly select a digital stamp based on a theme. This week’s theme is “Pink Kitty’s All-time Favorite Digi”. It’s your job to guess which digi she picked.

Leave a comment on the Pink Cat Studio blog and in your comment write the title of the digi stamp that you think she picked. This contest will end next Monday at 5pm EST. You may only enter the contest once.

Everyone who guesses correctly will win one free digi stamp of their choice. If no one guesses correctly then I will do a random draw and two winners will be chosen. The winners will be announced on the Pink Cat Studio blog next Tuesday and then the next contest will begin.

Head on over to the PCS blog for all of the contest details.

Monday, May 10, 2010

Flower Buckle Card and Label SVG and SCUT File and Tutorial

Hi Friends!! I was hoping to post this project this morning but life got a bit busy!! I finally found the time to post it now. . .:) How was your Mother's Day? I hope all of you mothers had a beautiful day filled with love and appreciation. I had a wonderful day. . I spent the day crafting and later had a Mother's Day dinner at the casino resort near our home. I did play the slot machines. . wow, there were a lot of moms there last night! LOL!! I lost $10 but while playing I won a little bit then lost them all. . . when I was down $10 I decided to stop playing. I was okay with the $10 loss. . .it was just fun winning and playing even if I lost whatever I did win. I'm good at cutting it short once I realize I'm spending my own money on the game.

Okay. . .enough of the chit-chat. . .I decided to create a svg file for a buckle card. It took forever to create the flower because I kept getting confused on the negative/positive cut of the flower. When creating files, you need to understand what will be cut out with your cutting machine. Colors are identified as either the cut-out part and what will remain after it cuts the image. Well, I kept using the wrong colors and the inner flower kept getting cut out completely. After I figured it out, I was able to create the file with the inner flower still intact.

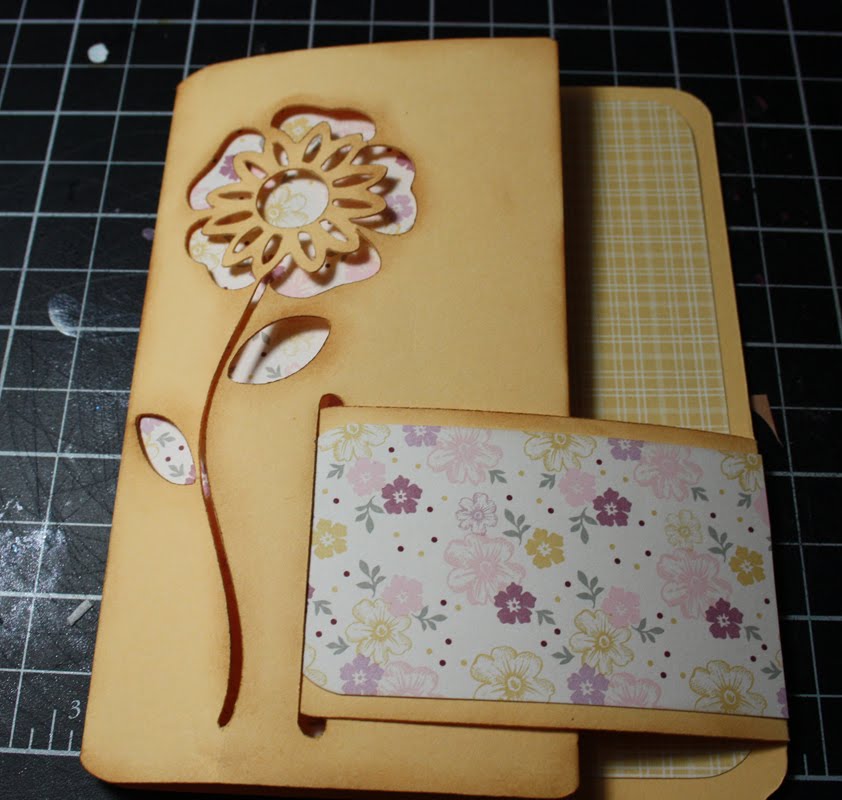
This is a simple buckle card with a flower silhouette and a liner. I also created a file for the label in front of my card. A tutorial is provided on how to create the liner. I didn't provide a file for the liner so you will need to follow the instructions provided.

The flap, as you can see, inserts into the lot like a belt buckle.

When opened up, the card is like a 3 part card. I didn't decorate the inside of the card. I may do so with future cards. I just wanted to get the card done. The liner is not attached to the front of the card. You can, if you want, decorate the front flap of the liner further. Maybe I'll create another card in the next few days showing how you can design the front flap of the liner.

Here is another sample. It's basically similar to the first card but the difference with this card is that I cut a designer paper instead of card stock and I only did a partial liner for the inner part of the card.

As you can see, the inner liner don't have the front flap as in my first card. When you create the card, you want the liner to show through the flower silhouette and when the card base itself already has a design, using a solid inner liner is best and vice versa. When the card base is a solid color then using a designer paper for the liner is best. It allows more definition of the flower cut.

If you are downloading the svg file, be sure to adjust the size with a height of "5.5" and keep the proportion (meaning the width is adjusted accordingly when the height is adjusted). The SCUT file is already adjusted with the height at 5.5".


To download the SCUT file, click on the image

or

To download the SVG file: Click Here


To download the SCUT file, click on the image

or

To download the SVG file: Click Here

**********************************************************

Flower Buckle Card Liner Tutorial

Materials:

7 x 5 1/4" designer paper or card stock
3 x 1 3/4" designer paper or card stock
Round Corner Punch
Double stick tape, transfer tape, or glue
Scorer

Punch the 7 x 5 1/4" designer paper or card stock at all 4 corners using a round corner punch

Adhere the designer paper or card stock to the back panel of the inner aspect of the card base.
Do not adhere to the front panel (it'll make sense with the next photo)

Score the liner using the card fold as your guide

As you can see, the designer paper is not adhered to the front panel, just the back panel.
Fold the liner at the score line


Punch only the left or right corners of the 3 x 1 3/4" designer paper or card stock using the round corner punch. Keep one side with a straight edge.

Adhere the 3 x 1 3/4" designer paper or card stock with the straight side flushed at the edge of the flap fold.

If the rounded corners of the flap don't quite match up with the rounded edge of the designer paper, you may punch the corners of the panel with your round corner punch so the rounded corners appear more cohesive.


(optional) To give the flower silhouette more definition, shade the edge of the flower with ink using a sponge dauber


When completing the liner, the liner appears through the flower silhouette.

Photo of the Day

I want to share the photo of the pretty flower bouquet that my husband got me for Mother's Day! Isn't it pretty? My husband is fabulous. . .he is the type of person that NEVER forgets special occasions. He always buy me flowers, plan events, and tries to make everything special. I am truly blessed to have a husband that cares for me that way.

I also want to share the beautiful gift my daughter gave to me for Mother's Day. She made this wonderful video for me and wrote a beautiful note at the end of the video. She is also very thoughtful and I am extremely blessed to have such a wonderful child. I cannot express how appreciative I am. Check out the video she created.

Just a note. . .I asked my daughter "why did you use only my "party girl" photos?" LOL! She said "that's the only ones I could find of you before you had me". OMG!! That's hilarious!!! You'll see what I'm talking about if you watch the video!! I had a good laugh at the photos!


Hope y'all have a wonderful Monday evening!!

Saturday, May 8, 2010

Scrap Pile Saturday Challenge #11 and Little C's HUGE Sale

Hello Friends!! I'm sorry I didn't post the Scrap Pile Saturday challenge earlier today. I actually just made my cards! LOL! Slacker! Yeah. . .I know! I've been crafty lazy the past few days. . .why? Well, my family and I have been busy watching the TV show "Lost". We had to start from the beginning because we've never watched the show until my husband purchased the DVD for all 5 past seasons a few weeks ago and we've been doing a bit of catch up. We've been doing marathon sessions and it's been so much fun! We're on Season 4 right now. I know. . .for Lost fans. . the season's finale is in 2 weeks! LOL! I love the show and I'll be sad that the show will be ending.

Anyway. . .before I start the challenge I want to let you know about a HUGE sale going on at Little C's. Little C's will no longer sell rubber stamps; therefore, Jen is selling ALL her rubber stamps at 40% off! There's quite a few more stamps available so go get them now before they're all gone. Please use this discount code when checking out: ""GoodBuy40"

Last week, there wwere only two players for last week's challenge and they did a hell of a job stamping on designer paper:

Michelle of Creative Treasures
Tracey of My Creative Place

Thank you Michelle and Tracey for playing along!! Hey, what happened to all my weekly players? I thought more people would play along . . .I'm sad. LOL! Just kidding. . .that's okay. . .I forgive ya' all for not playing along because I know you will play along this week, right?

Now to this week's challenge

Follow the sketch below. . .yup, that's it. . .simple huh? Hope you'll play along this week!!


Okay, here are the rules:

1. Other than your card/project base, the face of your card MUST be created using ONLY designer paper and card stock from your scrap pile. Do not cut up any new card stock or designer paper. This rule also applies to 3D projects such boxes, bags, etc.

2. Embellishments added to your card MUST be from "opened" packages. Do not open up a new package or roll of ribbon, brads, buttons, etc.


I decided to create two cards using the Greeting Farm stamps that you can find at Little C's!! Fun, fun, fun! Wow, I had a grand time coloring the images. I colored the image with my Copic Markers, the designer paper is a piece of scrap that I've had for a while now. . .I think it's by DCWV.


If you need the recipe for my two cards, just email me. I need to finish cooking dinnerand I'm trying to get this post out pronto . . . so I won't list the card details, okay!! Sorry!

This is another TGF image that you can find at Little C's. Again, I colored the image with my Copic Markers and rubbed a bit of pastel to color the background. The paper and card stocks are from my scrap pile. . :) The paper I think is by DCWV.


Okay. . .I'll end it here! Busy, busy, busy! Gotta run! Dinner is waiting. . .Hope you all have a beautiful Mother's Day tomorrow!!


Related Posts Plugin for WordPress, Blogger...
 
Share |