Wednesday, April 21, 2010

Sketch Saturday Challenge and Scallop Box SCUT, SVG and Hand Cut Tempalte


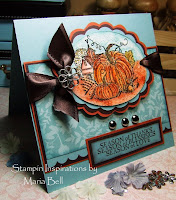
Hello Friends! Happy Wednesday! Hey. . I decided to play in a challenge today. I saw the challenge on Sketch Saturday and decided to play along! It's a pretty wild sketch! LOL! Check it out and you'll understand why my card looks so busy!

I'm not very good at making super busy cards so this was a challenge for me. The other type of cards I'm not very good at is making very simple cards. Do you like super busy looking cards? They look so pretty with other people's cards but I don't like it when I look at my own cards. I don't know. . it could be my own execution. . .I just don't know where to place all the embellishments.

I decided to create a matching box so I went and worked on a template to share. I created an SCUT file, SVG file, as well as a hand cut template. Scroll down below. Please keep in mind that I'm still learning how to create my own box templates so if it's not perfect looking, please forgive me. . .LOL! But I do test them out first and they cut fine. If you have any questions about them or if there's something "off" about them, please email me and let me know.

I decided to use my TGF stamp to create the card. You can find this cutie at Little C's along with the other cute TGF stamps. I colored the image with my Copic Markers and just basically followed the sketch using different shapes and embellishments.

Do you see the white streaks on the hair? I was playing around with my Prismacolor Pencils and created the streaks with a white colored pencil. What do you think? Does it look okay? I was sort of experimenting around with the pencils. . .just wanting to create something different.


Okay here is the box. . .just a little info if you are planning to cut the image with the SVG file rather than the SCUT file.

  • When uploading to your program, scale the height to 11.25" and keep the proportion.
  • When cutting the liner, be sure to scale the width at 4" and keep the proportion.

Click on the image to download the SCUT file
or
Click here for the SVG file


Click on the image for the SCUT file
or
Click here for the SVG file


Click on the images for the hand cut template - click "save image"

  • When hand cutting the template, if you use Photoshope Elements . . the file should be already scaled to size for printing.

Card Details:

Stamps:

Anyway. . .not much else to talk about today! Hope you all have a beautiful Wednesday!

Tuesday, April 20, 2010

Little C's Challenge - Prima Flowers and Leaves


Hello Friends!! How is your Tuesday morning? Hope it's going well! Today is a fun day because it's Little C's Challenge Day again! How fun is that? Rather than chatting away, I'll just get down to business!

This week's challenge is to create a card using Prima Flowers and Leaves somewhere on your card! Be sure to link your card at Jen's blog Pieces of Me

Here are the rules for the weekly challenges:
  • Deadline will always be on the following Sunday @ 6 pm, Hawaii Time
  • Winner(s) will be announced on Mondays
  • Little C's product are NOT necessary to play (unless noted), just as long you stick to the challenges' "theme".
  • 2 RULES to absolutely be qualified for a chance to win:
1) You must post a comment on all of the designer's blogs
2) You must post your card or project somewhere on the Internet such as your blog,
photo gallery, SCS gallery, PCP gallery, or an online forum, etc.
  • A prize will be awarded to the challenge winner
  • The three designers for Little C's are:
1) Jen (owner) at Pieces of Me
2) Mackenzie at Midnight Scramper
3) Maria at Stampin Inspirations (me)


For this week's challenge, I decided to create a flap card. I created a template for this project.

Click Here for the SVG, SCUT or Hand Cut template and Tutorial

I used Prima flower and leaves for the front of the card and a CC Design image on the inside of the card. You can find both the Primas and the CC Design stamps at Little C's. Be sure to stop by and check out all the fun stuff you can find there.

Just a bit of info about my card. As you can see, the flap of the front inserts into a slot to keep the flaps in a closed position. It opens up to the inside of the card. It's just a fun way to present a card. I love creating different shaped cards and doing different things to them. I colored the image with my Copic Markers and that's about it.

Hope you'll play along in the challenge!!

Card Details:

Stamps: CC Designs (Little C's)
Paper: SU Pretty in Pink, Prima Inc. Designer Paper
Ink: Copic Markers
Accessories: K&CO tag, Prima Flowers and Leaves (Little C's)

Hope you all have a beautiful day!!

Monday, April 19, 2010

Paper Craft Blog Hop

Paper Crafts blog hop!
1. Add your blog!
2. Copy the script below and paste it on your blog post while in HTML view.


This will make the thumbnail collection appear on your post as well and be available for your readers too.

3. Provide the above code on your blog for others to grab. Just mention to paste it on HTML view when blogging.

4. Ask your readers to add their blogs on the list and also copy and paste the script on their blog as well!

This will make a thumbnail collection that will grow on everyone's blog and we can meet each other! I’ll be moderating it so no worries. It will be updated on everyone's blog when someone enters a new link.

Sunday, April 18, 2010

Gift Sets - Decorative Edge Card and Purse SCUT File and Hand Cut Templates


Hello Friends!! I hope you all are having a glorious Sunday! It's a beautiful day today. I was going to post this earlier this morning but I didn't have time to do it before heading out to church. Yesterday I created two gift sets and even a template for the purse and a decorative edge card base. Yay!

I wanted a tropical look to my gift set so I added the large Prima flowers and a flower made from dried palm leaf. I didn't make it. . .I bought it like that. Don't ask me where I bought it because it's something I bought 4 years ago and recently found in my stash pile! LOL!


Here is the purse I created. I created the template on my SCAL 2 program using the shapes provided on the program. The template isn't perfect but it works. . .:) Try it out! It's a cute purse. The size is dependent on the height and width that you adjust your file on your SCAL 2 program.

Just to let you know, I created the template on the Sure Cuts A Lot 2 program so I'm not sure if you can upload it if you use the original SCAL. I'm sure you can but just warning you if for whatever reason you can't upload it. . that may be the reason.


Click on the image to download the SCUT file for your SCAL2

For those hand cutting the template, I cleaned up the SCUT file image to create the jpeg outline file (meaning, I removed all the background grid and such from the SCAL image), therefore the image isn't exactly perfect looking . . .you'll know what I mean when you print it out (the lines are sort of messy looking in some areas). BUT if you follow the template, you should be able to create a cute purse. Try it out anyway. The second image is the handle of the purse.


Hand cut template - Click on the photo and "save image"


Purse Handle
Hand cut template - Click on the photo and "save image"

Card and Box details:

Stamps: SU Kind & Caring Thoughts
Paper: CTMH card stock (not sure what color), K&Co Designer paper
Accessories: Buttons, embroidery floss, Prima flowers, dry leaf flower, beaded trim, decorative trimming


Here is the second set I created. I created a gift set with the same purse template above as well as a decorative fold card (template and instructions below) To create the butterfly, I used the myscrapchick.com "Layered Butterfly" file. I love this butterfly image. . .stop by myscrapchick.com and check out all the cool files they have. I LOVE all of them! They have a lot $1 files. . .so they are very economical.


I love "romantic" looking cards. . .but I don't create them too often. I usually create cards with "cute" images. I decided I should work on cards and projects that are a little whimsical and romantic looking just to change things up a bit.

Quickie Tutorial for the Decorative Edge Card


  • The score line is dependent on how large you scaled the file on your Sure Cuts A Lot 2 program. I saved the file as a SCUT2. . .so I'm not sure if it works on the original SCAL. You may create any size you want but my card sample is 5.25 x 5.25". Follow the rest of the directions if you want to create that size of a card.
  • I scaled the file to a height of "5.25" and kept the proportion. .. the width adjusted to 7.13".
  • To create a 5.25 x 5.25" card base, I scored the cut shape at 5.25", creating a short fold on the decorative side.
  • To create the liner, cut a designer paper at 5 x 8", adhere the liner to the decorative card base and fold the designer paper following the decorative base score line. This creates the inner fold as shown in my sample.
  • Decorate as desired.


Click on the image to download the SCUT file for your SCAL2 or
Click Here for the SVG file download


Hand Cut template - click on the image and "save image"

  • Before printing, adjust the size as desired. To create a 5.25 x 5.25" card, follow the directions above but adjust the height of image on your photo editor to 5.25" and keep the proportions (meaning when the height is adjusted, the width will adjust accordingly).
  • Follow the rest of the directions above.


Card and Box Details:

Stamps: SU Kind & Caring Thoughts
Paper: SU designer paper, Cool Caribbean
Ink: SU Baja Breeze, Night of Navy
Accessories: Beaded trimming, lace, myscrapchick.com Layered Butterfly file, Cricut Expression, Nestabilities, Dew Drops


If you need more information about my cards/projects, feel free to email me. . .it's hard to explain everything without making my post too long.

Anyway. . .try out the projects . . .although they may not seem like it sometimes, they are really simple to create.

Before I go. . .I'm not sure if I posted this video before, if I did. ..sorry, but I just LOOOOOVE this song. It's a song called "Inside Out" by Seventh Day Slumber. Hillsong originally recorded the song but Seventh Day Slumber version is beautiful too. When they sing this song at church, I don't know, it almost brings me to tears singing and listening to it. . . I can listen to it all day. . .:)

Is there a song that gives you the same feeling? I mean it don't have to be a Christian song. . .any song. Another song that does this to me is the song "Just my Imagination". . .by the Temptations. I don't know, it reminds me of when I was little and my grandparents were still alive. . .it brings back good memories.

Anyway check out the video. . .:) Hope you all have a glorious and blessed Sunday!!


Saturday, April 17, 2010

Scrap Pile Saturday Challenge #8


Hello Friends!! Happy Saturday to all of you!! It's that time again! Yup, it's time to dig through your scrap pile and play along in this week's Scrap Pile Saturday challenge. Come on. . .you need to get with the program and start using up your scraps. Isn't it piling up? Well, it's time you use them!!!

Do you see all the flowers on my card? Well about a year ago, I stamped TONS of them in a moment of craziness! I had this grand plan to create a bunch of cards with them so one day I stamped away and colored them with my watercolors. Because water coloring is a quick and easy way to color images, it wasn't much of a problem. The problem was after I stamped the images. . .I didn't do anything with them! Absolutely nothing. Isn't that funny or what?

Anyway. . .I decided to use some of the flowers on my cards for this week's challenge. . .I still have a ton of them but that's okay. . .I'll find some use for them one day.

Before I discuss the challenge, I would like to highlight a few determined and motivated crafters:


Now to this week's challenge


Something Orange! What does that mean? Simple. . .use something orange on your card. It can be your designer paper, your ribbon, the card base, embellishments. This week's challenge was inspired by the fact that I have a pile of scrap "orange" card stock. I think the only time I really use my orange card stock and embellishments is during Halloween and Thanksgiving. Unfortunately, they only come around once a year and during the rest of the year, the scrap card stock and embellishments just sit in the pile until the holidays roll around again!!

Okay, here are the rules:

1. Other than your card/project base, the face of your card MUST be created using ONLY designer paper and card stock from your scrap pile. Do not cut up any new card stock or designer paper. This rule also applies to 3D projects such boxes, bags, etc.

2. Embellishments added to your card MUST be from "opened" packages. Do not open up a new package or roll of ribbon, brads, buttons, etc.I added a bit of Scribbles Iridescent Paint to the center of the flower and used my SU Hodge Podge hardware. Oh, that's another thing that I hoard away. . . .I have a TON of SU Hodge Podge hardware. . . I can't seem to use them because they're too "precious" to use! LOL!


Anyway, that's it. Hope you'll play along this week. Together we can decrease the size of our scrap pile. .. you just need to keep at it and when it becomes a habit to use your scraps, you'll see your pile become less and less.

Be sure to link your card below by clicking on the blue "add a link" button!!

Before I go, I want to share a music video. . .:) I don't only listen to Christian music. . .I love listening to different genre. . .alternative rock, reggae, Hawaiian contemporary, etc. I love Sean Kingston because his music has a Hawaiian Contemporary style to his music. I don't know if you've ever listened to this genre but I think it's really pretty. Although Sean Kingston's genre isn't Hawaiian Contemporary. . .his style is more reggae/R&B but I love this video. . .it's such a cute video and I love the song too. Check it out:


Hope you all have a wonderful and blessed Saturday!!


Friday, April 16, 2010

Christmas Stampin All Year Long Challenge #47


Hello Friends! Wow, it's Friday already!! I can't believe how fast time has flown! Well, Friday is my favorite day. . .mainly because I can stay up late. It's the only day I don't have to get up early for anything the next day. Ahhhh, Fridays are LOVELY!!! Actually, there is another reason that it's a good day. . .today is challenge day at Christmas Stampin All Year Long! Yay!

Debbie of the Paper Garden is our host this week and she came up with an awesome challenge! The challenge is to create a card using "die cuts"!! She must have been reading my mind because well. . .me and my Cricut are best friends and I really wanted to create a Christmas card using my Cricut. This challenge is perfect and oh, so fun!!!

Be sure to stop by Christmas Stampin All Year Long and check out all the FABULOUS cards the design team created!!! Hope y'all will play along this week!!


The other day Michaels had a sale on their Cricut and I bought the "Wild Card" cartridge. Oh. . .I LOVE, LOVE this cartridge. It's the perfect cartridge for a card maker because the files focus primarily on card shapes and fancy envelopes. It also has tags and other fun shapes that compliment your card.

I cut the scallop shaped card base using the Wild Card cartridge and the snowman/Christmas tree design was cut using myscrapchick.com file "My Snowman Collection". I love this set! It has a lot of cute snowman files as well as different card frames. . .perfect for Christmas cards!!!


All I did was stamp the background with snowflakes, shaded the edge of the snowman image and the white background. and paper pieced the images together. That's about it! Be sure to check out the awesome cutting files at myscrapchick.com! I love them all!!!

Anyway. . .I think I'll cut my post short. . .lately, my posts seem to be getting longer and longer! LOL! Okay. . .stop by Christmas Stampin All Year Long and say "hello"!! We'd love to hear from you!!

Hope you all have a beautiful Friday!!

Thursday, April 15, 2010

Pink Cat Studio Digi Release and Ipu Card and Box , Envelope Purse, and Flower Card Templates


Hi Friends!! Guess what today is? Today is the release of Pink Cat Studio digital images and with this release PCS is going Hawaiian! Yay!!!! Aren't the images the cutest images or what. Before I begin, Pink Cat Studio has new members to the design team. I would like to welcome Jane of Whoopsie Daisy, Marley of Marley Scrapcards, Piali of Touch of Creation, and Rachel of the Paper Crafting Place Be sure to stop by the Pink Cat Studio blog to check out the beautiful cards the design team created.

I'm from Hawaii so I had a BLAST creating these cards and the templates/files! My first project is an "Ipu Card" and "Ipu Box"!! What is an Ipu? It's a hula instrument that hula dancers use as shown in the picture.


I created an Ipu Card template as well as an Ipu Box. I provided the SVG file for your Sure Cuts A Lot for those who want to cut the template with your Cricut Expression. I also provided a "hand cut" template for those who don't have a Cricut.

Just to let you know. . .I extended the width and height of my Ipu to create a wider shape when uploading to SCAL. If you're cutting the template by hand. . .adjust the width and height of the card and box as desired. Unfortunately, because you can only print on an 8 x 11 1/2" paper, your box will be smaller than my sample. It's better reason why you should buy a Cricut Expression and Sure Cuts A Lot 2 program! LOL!

For SCAL users, if you adjust the width too widely, you will need to cut off a bit of the side of the box so it won't extend above the top curve of the box.


Click on the photo for the SVG file for the "Ipu Card"


Click on the photo for the SVG file for the "Ipu Box"


Hand cut template - card and box (click on photos and save image)


My purse is actually an envelope that I added a handle to make it look like a purse. I provided the template and SVG file below. Again, I adjusted the width and height of the file to create a larger sized envelope.

Just to let you know, I colored all my images with my Copic Markers. I won't go into detail about the cards and projects because my post will be too long.

To close the envelope purse, you slip it through the slot in the front.


Click on the photo to download the SVG file


Hand cut template (Click on photo and save image)


I created this flower card using a template I created. I actually posted this template last week but I had to fix it because I noticed it wasn't cutting with both petals attached to the circle base. I didn't provide a hand cut template for this card because I think it's too complicated to cut by hand.

When the card cuts on your Cricut, a circle window will be cut out because I originally created this template with a circle window. To cover the center window, just cut a circle designer paper and glue it to the front of the card to cover up the window. That is what I did with my card.

Click on the photo to download the SVG file


Sorry for the long post but I had a lot of stuff to share. I'm so happy now that I'm able to upload SVG files. If you have any problems with the files, can you let me know. Please credit my blog if you're planning to use the files or templates. I'm sharing the files for your personal use.

Anyway. . .that's it! Hope you all have a beautiful Thursday!!

Wednesday, April 14, 2010

My Scrap Chick Java Gift Set


Good Morning Friends!! Well, it's an allergy free day so far! Gosh, it feels awesome to start my day without a runny nose and sneezing!! Yay! Well, I created a bunch of gift sets. I didn't fill in the rest of the boxes because I'll be donating these gift sets to my church. Honestly, I don't know what they are going to do with my projects. I didn't ask. I hope they'll find good use for them.

I used the myscrapchick digital image that were free for those who are fans of the myscrapchick.com Facebook fan page. If you have a Facebook account, be a fan of myscrapchick. . .there's a bunch of free digital images for the taking: Click Here. Myscrapchick.com also provides free files each Friday by signing up for their newsletter: Click Here


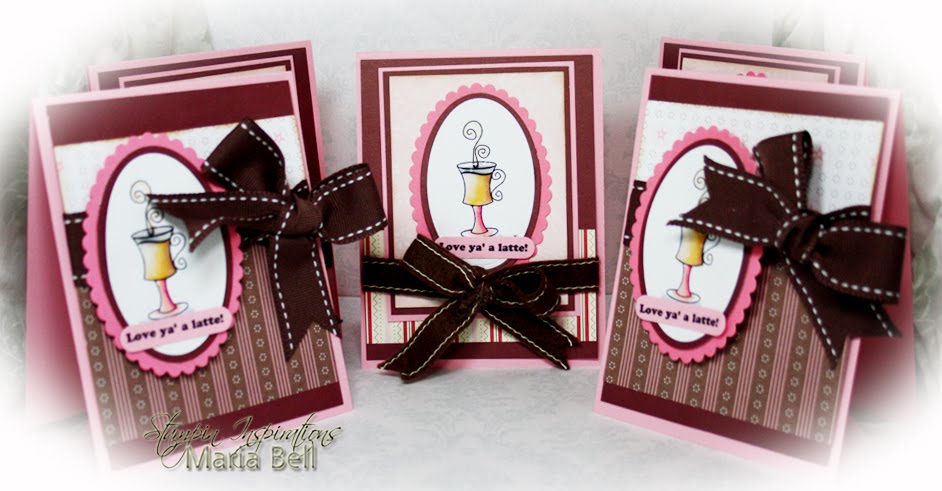
Here's the set of cards that matches the boxes. The design is very simple but I think the bow really makes the cards look like more work went into them. You gotta love pretty ribbons, huh?

I messed up on the sets. . .I created 3 boxes with this design, but only created two cards with the same designer paper and I created 2 boxes with another design but only three cards with that design! Ugggh! Oh well. It's okay. . .the designer paper designs are different but the image are the same so they'll still work.


I colored the images with my Copic Markers and added SU Crystal Effects to the image to give the coffee mugs a glassy appearance! I used the myscrapchick.com "30 Boxes and More" file set to create the boxes and cut them on my Cricut Expression. It was actually really quick to create the gift sets . . .assembly style creations are the easiest to create because the designs are similar. .it's a matter of cutting the designer papers and coloring the images. The best thing to do is to keep the design simple.

Cards and Project Details:

Stamps: myscrapchick.com digital image (Facebook Fan Page)
Papers: Stampin Up designer paper and card stock (Pretty in Pink, Bravo Burgundy - I think)
Ink: Copic Markers
Accessories: myscrapchick.com "30 Boxes and More" files, Cricut Expression, SU Crystal Effects, SU ribbons, Nestabilities, SU Word Window Punch


Before I go, I'd like to share this inspirational song by Britt Nicole. She doesn't have an official video for this song. . .a lot of Christian Bands don't have video's for their songs. I think I'll create my own. . :) It's been something I've been meaning to do. I have the Sony Vegas Movie Studio. . .such an awesome program and I should use it more often . Anyway, listen to the song. . .I think it'll make you smile. . .:)


Hope y'all have a wonderful Wedensday!!

Related Posts Plugin for WordPress, Blogger...
 
Share |