Friday, February 5, 2010

Little C's Stamp n' Scrap Hawaii CC Designs Card and European Trip - St. Paul's Cathedral, London

Hi Friends! Happy Friday! Gosh, I can't believe it's Friday! Time seem to fly so quickly. . . I was thinking that maybe it's because I'm older so I asked my daughter if time seems to go by quickly for her and she said "too quickly"! Hmmm. . .I found that interesting because when I was her age, I thought that time moved way too slow. I wonder what it is that makes time feel like it's going by quickly. Do you think being happy is a factor or living a productive life doing things you like to do has something to do with it? For those who feel that life is going by quickly, why do you think it feels that way?

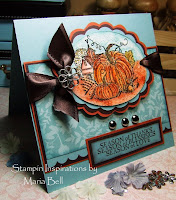
I had a very productive morning. . .I found time to finish a card for Stamp n' Scrap Hawaii using this cute CC Designs image. You can find a whole bunch of them at Little C's! They are so darn cute, I tell ya'!! I also found the time to head out to a lovely cafe for breakfast with my husband. There's a nice European style cafe near where we live that serves great coffee, fancy pastries and yummy breakfast and sandwiches. I love hanging out at cafes.


I colored the CC Design image using my Copic Markers and added a bit of sparkle using my Sakura glitter pen. I'm really into using lace lately! I just love it! Do you like using lace on your cards? I have a ton of them that I found at a garage sale and a sale at JoAnns. Whenever there's a sale on lace, I usually grab a few even if I'm not going to use them right away. They're always useful for paper crafting, altered projects and sewing so they're very versatile.


To color the background a little, I used Pebbles Inc. shimmery pastel. It's a real easy way to color the background and it's much faster than coloring it with Prismacolor pencils or Copics.

Anyway. .. stop by Little C's and check out all the goodies that they sell! You'll definitely find something fun there!

Card Details:

Stamps: CC Design, SU (sentiment)
Paper: K&CO designer paper, SU Creamy Caramel, Regal Rose
Ink: Copic Markers, Sakura Glitter pen, Tim Holtz Distressing Ink, Pebbles Inc. Pastels
Accessories: Lace, floral embellishment, Heidi Grace Chipboard Heart, Nestabilities, Fiskar Scallop Scissors, SU Small Oval Punch


European Trip - St. Paul's Cathedral, London

You must be wondering why I haven't been posting the photos of my trip to Europe. First of all, the past weeks I've been in such a downer mood; secondly, I've been trying to catch up on life and third, I've been in desperate search for my mojo! LOL! I finally found time to resize some of my European photos so that it uploads faster on Blogger.

Anyway. . .today's photos will focus on St. Paul's Cathedral. St. Paul's Cathedral, unlike St. Peter's Basilica in Rome, is not a Catholic church. It's an Angelican Church meaning it's not connected to the Roman Catholic Church but is Episcopalian which practices many of the traditions of the Roman Catholic Church but they are not under the Roman Catholic Diocese. St. Paul's Cathedral has one of the highest dome in the world, second to St. Peter's Basilica. This is also the church that Prince Charles and Princess Diana were married in.

Unfortunately, we weren't allowed to take photos of the inside of the church and were not allowed to enter the gallery of the dome because of the snow the previous night. They didn't feel it was safe for people to be up in the dome area. I just realized that I did not take any photos of the dome. Hmmmm. . .well, if you want to see it and more photos of the church, you may Click Here. St. Paul's Cathedral is much larger than what my photos depict. I only took photos of the front of the building. We wanted to explore the inside before it closed so I didn't have much time to walk around the outside of the building.

I felt St. Paul's Cathedral was just as beautiful as St. Peter's Basilica but in a different way. The inside of the church sparkled, especially the dome and the ceiling. It's just spectacular to look at. Click Here for a glimpse of inside of the church. Below the main floor is where the crypts are located and although, I really didn't see any famous people that I knew of buried there, there is a monument of Florence Nightingale. Because I'm an RN, I was very interested in her monument. It's a nice tribute to her. The people buried at the crypt gallery appeared to be local artists, architects, engineers, and heads of state and their wives.

Here is a photo of St Paul's in the early evening. By the time we left the cathedral, it was already dark outside. If you visit London, you MUST visit St. Paul's Cathedral. You won't be disappointed!!

Anyway. . .I'll see if I can find some time to resize a few more photos of Europe and will post them in the next few days! Hope y'all have a beautiful Friday!!!
Thursday, February 4, 2010

Pink Cat Studio Digi Release, Butterfly Template and Purse Box Tutorial


Hello Friends!!! Happy Thursday to all of you! Well, today is Thursday and the release of Pink Cat Studio's digi stamps! Yay! As you can see the images are just so darn cute!!

I really had a lot of fun creating my cards and purse box below. If you scroll down to the bottom, I provided a template for the butterfly and the link to the tutorial to create the purse box posted below.


To add the glitter on the monkey, I used Stickles glitter. Just a little warning when using Stickles on digital images. . . .don't add Stickles to the black print or it'll smear and bleed. When applying the Stickles stick within the lines and don't add too much of it.

Card Details:

Stamp: Pink Cat Studio Monkey Valentines
Paper: K&Co Designer paper, SU Creamy Caramel, Pretty in Pink
Ink: Copic Markers
Accessories: Pebbles Inc. ribbon, ric rac, Nestabilities, EK Success border punch, Stickles Glitter, buttons


I decided to create a gift set for my next project. Last week I had created a tutorial for the purse box. The tutorial shows a heart shaped shaker front but instead of a heart, I used a butterfly for this purse box. I used my Cricut Expression and Sure Cuts Alot 2 program to cut the butterfly. If you have SCAL2 program, I provided the template so you can cut it using your Cricut machine. If you don't have a Cricut, I provided an outline version as well so you can cut the template using scissors.
Template Instructions:

To print the template, click on the photo and right click on the image then click "save image as". Save the photo as a picture file. If you have SCAL2 program, use the trace feature to upload to the program. Resize as desired. The template measures approximately 5.25 x 5.25" which fits nicely on the box.

If you don't have a SCAL2 program, save the outline image as instructed above, to print, open up your Word program and insert the picture file, resize as desired and print from your Word Program. You may also print it from photo editing program.

Click Here for the Purse Box tutorial
. Rather than adhering the heart, adhere the butterfly to the purse box.

Sure Cuts Alot 2 template


Template if cutting with scissors


Last but not least, here is the matching card. To color the image, I used my Copic Markers. Nothing much else to the card.

Be sure to stop by the Pink Cat Studio Blog or click on the links below to check out all the beautiful cards/projects that the Pink Cat Studio design team created:

Alicia Weiman
Emily Leiphart
Inge Groot
Kerry Donovan-Casey
Kristen Catalano
MacKenzie Bruckler
Maria Bell
Suzanne J Dean
Tracey Cuccia
Tori Hemmingway
Vicki Garret
Mariska van der Veer

Thank you for tolerating my long post! LOL!! I hope you all have a beautiful day!!!


Monday, February 1, 2010

UR Beyond Perfection Gift Set

Hello Friends!! Well, today was a good day for crafting! I love good crafting days! Do you see the jar? Well, it's an artichoke jar that I saved. It was sitting in my garage in a container. I wanted to alter a candle but I couldn't find the container that stored my candles. As I was going through containers, I found the jar. Isn't it a pretty shaped jar?

It's funny because there was a time when I would save jars or tin cans just for the purpose of altering them but I saved so many of them and I did not create anything with them so I threw them out. I'm glad I saved the artichoke jar!!

I decided to create a scrappy card today! I love scrappy cards because it's a great way to use up left over scrap pieces. I have a lot alpha chipboards that don't match because I've already used up some of the alphabets so I can't form complete words. I'm glad I found the U and the R. . .it worked out perfectly to complete the sentiment on this card.


Card Details:

Paper: K&CO designer paper, SU Cool Caribbean
Ink: Tim Holtz distressing ink, Scribbles Iridescent Paint
Accessories: K&CO Alpha Chipboards, Martha Stewart Corner Punch, Nestabilities, Lace, trimmings, metal embellishment, Marvy butterfly punch, Making Memories Definitions Sticker


Here is the matching jar created using an artichoke jar. I may just buy more marinated artichokes just for the jar! LOL! All I did basically was adhere the lace and trimming around the jar and stuck the prima flower and butterflies over the lace. I covered the top of the cover with designer paper and adhered the ribbon to side of the cover. Pretty simple!!


I just posted a "fitness challenge" on my fitness blog. Stop by "Fitness Towards Healthiness" to check out the challenge. Come on, let's all get healthy this year! I would love if you would play along!!

I've been in such a mojo slump the past month, I'm just trying to get some of my mojo back. Honestly, everything I do. . .crafting, blogging, taking photos, chores, exercising and even just talking have to come from a positive place or I have difficulties getting anything done. Are you that way? Well, I'm doing a bit of catching up and I think my mojo is slowly returning. It's a new month and I'm feeling enthusiastic and optimistic. Yay!!!

Anyway, hope you all have a beautiful Monday!!!

Sunday, January 31, 2010

Valentines Card and Card Pattern Challenge

Hello Friends! My goal right now is to use up some of my scrap papers and embellishments. I have so many of them. They're all over the place! Many times, I'll punch a shape several times then don't need to use all of them. I gather all of them up in a container and look through them on another day to see if I can use any of them on my card.

Well, I found the two hearts, one is a chipboard piece and the other a punched heart. I also found 3 pink mini hearts. I decided to play in this week's "Card Patterns Sketch #49" challenge and my scrap pieces came in handy with this challenge. The sketch was a fun one!


On my last post I mentioned that I finally got my "fitness" blog started up and have been posting recipes, videos, and challenges. I'm hoping to build it up with time so there will be a lot of recipes and articles to help you with your fitness and healthy diet goals. Stop by and check it out: Fitness Towards Healthiness

There's really not much to talk about this card. All I did was follow the sketch.

I'm not very chatty today. . .sorry about that! I hope all of you are having a wonderful Sunday!

Card Details:

Stamps: SU A Happy Heart
Paper: GCD Studios, SU Pretty in Pink, Regal Rose
Ink: SU Real Red
Accessories: Heidi Grace Chip Board, SU Word Window Punch, Martha Stewart Punch, Stickles Glitter, Heart to Heart Punch, Pebbles Ink Ribbon

Friday, January 29, 2010

Valentines Gift Set - Mini Heart Album, Card, and Treats

Hi Friends!! Gosh, it's been days since my last post. You're not going to believe this but it took me 3 days to finish the mini album. Obviously, not 3 complete days but I worked on it off and on for 3 days. I am so not a scrapbooker. .. it takes me 3x as long to create a mini album than it is to create a card. It's not that scrapbooking is difficult but I always feel everything has to match. I end up going through containers of scrappy stuff looking for a "matching" color or embellishment. I have so many open packages for this reason. After awhile I got tired of looking through the containers that I decided to use hodge podge pieces of embellishments instead.

I like the idea of a gift set. . .I'm planning to give this set to my husband for Valentines day. He actually saw me working on it. . .he had walked into my craft room while I was creating one of the pages. . .oh well!

Hey. . .before I continue discussing the gift set, I finally finished up putting together my "health & fitness" blog called "Fitness Towards Healthiness". Stop by and check it out. I'll be posting healthy recipes, fitness and healthy diet challenges, articles, and work out videos to try out. Keep in mind, the information on this blog will be compiled based on various articles, recipe books, etc. I'm not a fitness coach. . .I'm just a regular person wanting a lifestyle change so come join me in the journey!!!


Here is the card I created. No rubber stamping on this card. All I did was use embellishments from opened packages.

I've had this tin basket for some time now but like a lot of the craft items I purchase, I don't use them immediately but it's nice that I did have it in my stash . .craft stuff never gets outdated. All I did was adhere a lace around the tin basket and added the treat bag.

Here is the album I created!! I used my Cricut Expression to cut a heart shape using thin chipboards. You can't see it in the photo but the photo on the front of the mini album is protected by acetate and the heart shape appears like a frame. The photo is actually recessed. I finally used my "bind-it-all" to bind the album together. I think this was only the second time in the past two years that I actually used my bind-it-all. I'm going to start using my BIA more often!! It was actually quite fun to create this album!

I used various pieces of scrapbook stickers and embellishments from various brands.

Here is a photo of my husband. . .I believe on his birthday.

This is a photo of my daughter with our dog Phoenix. The mini album has a total of 6 pages.

Anyway. . .that's it for today! I really had fun creating this gift set. I think I'm going to make more of them!

Hope you all have a wonderful Friday!!

Monday, January 25, 2010

Heart Shaker 5 x 5" Box Purse Tutorial, Card Pattern Sketch #48 Challenge and Pink Cat Studio

Hi Friends! I was meaning to post this yesterday but yesterday was a bit busy and I didn't have the time to finish the tutorial. I really had fun creating this project. I always admired stampers who create coordinating sets of projects so I've been putting efforts into creating gift sets.

Just to let you know, I'm emerging from my "blue" phase . . .I don't know what was going on with me for the past 3 weeks. My crafting mojo was in hibernation and I've been hoping that it would emerge soon and it did! Yay!

Honestly, I think a reinvention is in order. I've been sort of doing the same thing for the past 2 years and quite frankly, I've been slowly putting my self to sleep. Seriously! One of the things that blogging has helped me to do, other than sharing my projects and tutorials, is that it pushes me do things that I may not want to do out of pure laziness.

One of the things that I want to do is to start cooking healthy meals. Last year, I had wanted to start a fitness blog but haven't really had the inspiration to get it going. I did start it but I never made the blog public because I wanted to add a few postings before I did. Unfortunately, with the holidays and my trip to Europe well, I haven't gone back to adding any more posts. I think I'll work on getting it going. What do you think? I think it'll help me to stick to my workout routine and help me to focus on cooking healthier meals or cooking, period. I don't know, we'll see.


Anyway, enough of the chatter. Yesterday I decided to create a "shaker box purse" tutorial which I posted below. I am going to create a video version of this tutorials because I had promised that I was going to do it but for now, I posted a written version of it.

It's a simple box with a shaker feature adhered to the front of the box. The back of the box also has the heart shape. I thought the cute Pink Cat Studio "Lily in Heart Pile" image was perfect for a shaker card because Lily is already covered with hearts and I also had a container of heart confetti.

The box measures 5 x 5". I could have made it a bigger box but I wanted to stick to using an 8 1/2 x 11" card stock and the largest box I could create was 5 x 5". The depth of the box is 1" so if you want you could probably fit a few square cards, maybe 4.5 x 4.5" in size. I don't have square envelopes that fits that size cards so I didn't create any card set for this box purse. I'll probably add a few crafting goodies or maybe a bag of candy to place in the box.

Here is the shaker portion of the box. As you can see Lily is covered with hearts.

I created this card for the "Card Patterns Sketch 48 Challenge". I really liked the layout so I decided to play along. One of my goals is to start playing in more card challenges just to keep me motivated. I colored Lily with my Copic Markers and added Crystal Effects to part of the image to give it a shiny 3D appearance.

The punched hearts were created using my Sizzix die which by the way, I had "lost" and recently rediscovered in time for Valentines. One of the things that drive me crazy when I reorganize or clean up craft room is that after I'm done, I can't remember where I put everything. LOL!


Anyway...try out the tutorial. It's fairly easy if you've created shaker projects or it may be a bit complicated for those who have never made one. If you prefer, you don't need to add the shaker component and just add the heart shapes to the box.

Well, I hope you all have a beautiful Tuesday!!!

Card/Box Details:

Stamps: Pink Cat Studio Lily in Heart Pile digi image, SU (senitment)
Paper: SU Pretty in Pink, Rose Red, GCD Studios designer paper
Ink: Copic Markers, SU Rose Red
Accessories: Basic Basic Ribbon, Deja View Brads, Heart Confetti, Crystal Effects, Sizzix Heart Die, Coluzzle Circle Template, Fiskar Scallop Scissors


Heart Shaker 5 x 5 Box Purse

Saturday, January 23, 2010

3.75 x 6" Keepsake Box Tutorial and Coordinating Cards and the Happiness Project

Hello Friends! Do you know ...when I post a card or project, it's a good indicator of my level of happiness? When I first started paper crafting and stamping, I found it was a great stress reliever and when I was unhappy or feeling a little down, I would step into my craft room and create something and it made me feel better.

Fast forward to about 2 years ago, I've noticed a change in my behavior when it came to crafting. Rather than crafting to feel happier, it changed to my having to feel happy in order to craft. As time went on, it became more pronounced. I don't know why the shift occurred. One of the factors could be that the "novelty" wore off

I'm sure you're thinking that I'm taking this all too seriously but the truth is, I'm the type of person that comes alive when I'm doing something new and different. I love the feeling of starting on an adventure, starting a new project, anything new and different. . .I've always been this way. Well, the past week or so, I've been wanting to start on a new hobby which is crazy. I already have too many of them already.

Recently, I've been fascinated by the subject of happiness. I found this interesting website a few days ago. It's called "The Happiness Project". The author of this website/blog post happiness challenges each week and after reading a few of her articles, it got me really excited. I thought "what a brilliant idea!!". Well, I signed up immediately and I'm excited to get started. Why don't you check out the website and tell me what you think about it. If you decide to join in, let me know. . . .I'd love to go on this journey with you.


I created this card to match my coordinating "Keepsake Box". I posted a tutorial for the keepsake box if you're interested in trying it out. The box measures 3.75 x 6" inches. You can use it as a true keepsake box or it can be used as a treat box. Scroll down to the bottom of this post to check out the tutorial.

I was wondering, would you like tutorials on only "more involved" projects and techniques or would you like that I add tutorials for simple techniques as well. The reason I ask is that I always feel that I need to create tutorials that are a bit more involved but I know there's a lot of new stampers out there that are just learning the basics of paper crafting and stamping and probably find the complicated projects a bit overwhelming. Do you think I should post tutorials that are less involved along with the more complicated projects? Let me know. . .

To create the punched border on both the box and card, I used a large Martha Stewart punch and layered the border so it looks the way it does on my card. I'll create a quick tutorial tomorrow on how I did it. I heat embossed the sentiment and layered it on to the Nestabilities Scallop Circle.

I found this decorative pin at the bead aisle at JoAnns. I added the white beads to decorate it a bit.

Here is the "3.75 x 6" Keepsake Box" that I created. It's a very simple box to create. This box in particular stays in the closed position using a ribbon. I created a second box which I posted below using Velcro to keep the box in a closed position.

Here is the box opened up. You can decorate the inside of the box as well for a better presentation but I wanted to get it done and have it posted so I didn't work on the inside of the box. It's not necessary but it's just an idea.

Card/Box Details:

Stamps: SU (Not sure which one)
Paper: SU designer paper, SU Blue Bayou, Soft Sky, ACE Foil card stock
Ink: Versamark Ink
Accessories: Silver embossing powder, Nestabilities, Martha Steward Punch, Grosgrain Ribbon, Decorative pin, beads


Here is the second coordinating card and project I created. To color the flowers I used a technique that I posted about a week. Click Here for that Tutorial. With this project I decided to incorporate some lace to give it a femine look. I love lace.

Here is the box opened up. I decided to add a bag of treats. This box remains closed using Velcro. The tutorial shows you both options.

Here is the coordination card. Not much to say about this card.

Anyway, try out the tutorial. It's fairly easy to create so it won't take you very long to create it.

I'm going to spend some time crafting tonight. Hopefully, I'll be able to finish something so I have something to post tomorrow. I'll see if I can finish resizing some of my European trip photos so I can post a few of them in the next day or so.

Hope you all have a beautiful Saturday evening!!

Card/Box Details:

Stamps: SU Flower Fancy, Sentiment(?)
Paper: SU designer paper, Regal Rose, Kiwi Kiss, Blue Bayou
Ink: Scribbles Iridescent Paint, SU Cameo Coral, Pink Passion
Accessories: Nestabilities, Lace, Sizzix Leaf Die, Martha Steward Border Punch


3.75 x 6" Keepsake Box


Related Posts Plugin for WordPress, Blogger...
 
Share |