Saturday, May 28, 2011

Free Happy Birthday Flower Word Art Digital Image


Hi Friends! I had created this digi word art image a year ago but it had the sentiment "Happy Mother's Day". By request I created a "Happy Birthday" version of it. Just add a flower at the top of the stem to create your design as shown in the picture above!

I created 3 versions of the image.
Click on each image, then right click your mouse and click "save image as". Upload the file in your photo editor as you would any digital image or you may use Microsoft Word clicking on "insert" then click "picture".


Enjoy! Hope you all have a wonderful Saturday!

Crazy 4 Challenges C4C89

Hi Friends! It's Crazy 4 Challenges time again! Yay! This week, Joanne's challenge is to create a card with a favorite vacation or activity. Oh boy, this is going to be a long post. . .:) Hehe!

Be sure to play along with us this week and stop by C4C and check out the fabulous cards the design team created or stop by their individual blogs:

* Barbara Anders
* Cindy Haffner
* Frances Byrne
* Jessie Rone
* Joanne Grzelak
* Joycelyn Pelkey
Lynda Benden
*Silke Ledlow
* Silke Kittmann
* Tammy Hershberger
Vicki Garrett


One my most memorable trips was our trip to Europe in the winter of 2009. We were there for 21 days. We traveled to 7 different countries: England, the Netherlands, Austria, Germany, Italy, Switzerland, and France. I loved each an every country we visited. I decided to focus my card on Paris. I just love the vintage shabby chic look of French design.

I collaged the images in Photoshop. I downloaded all the images from the Graphic Fairy blog. She has a ton of free vintage images and ephemera! I just love her blog! Go check it out!

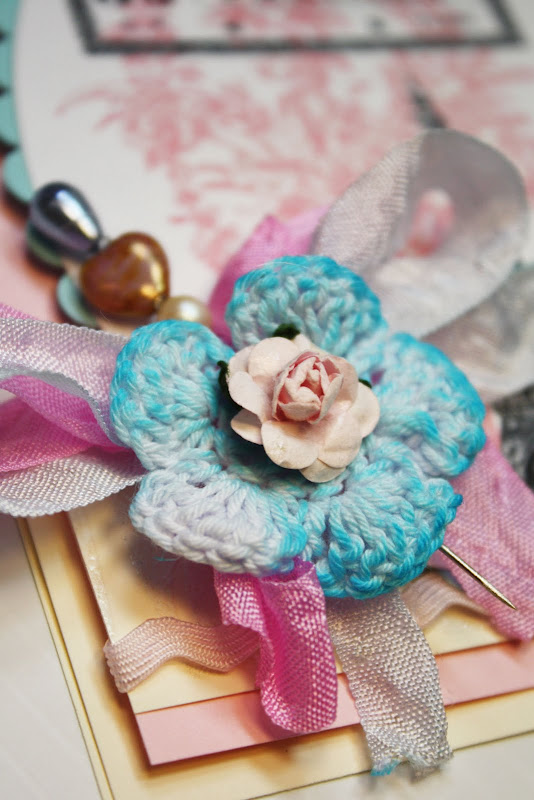
Are you getting tired of my crochet flowers? LOL! I think I've used one on every card or project I've created for the past week. I had dyed the crochet flower using SU Tempting Turquoise and I also dyed the seam binding bow with the same color as well as Melon Mambo. I also stuck a pin adorned with jewelry beads through the bow.


Because this week's challenge at C4C was to focus on a favorite vaction, I decided to show a few pictures of our trip to Paris. This photo is of my daughter in front of the Eiffel Tower.


We rode the elevator to the 2nd tier of the Eiffel Tower. The view was spectacular but it was an overcast day so my photos of the city from the top of the Eiffel Tower was a bit "gray" looking. It was beautiful regardless. Paris is such a beautiful city.


At night the Eiffel Tower is lighted up. Well, actually most of Paris is lighted up at night. We spent New Year's Eve in Paris and it was a zoo. Did you know that they close down the streets entering Paris during New Year's Eve? You can exit but you can't enter. People ride the train in and out of Paris and I was told that on New Year's Eve public transportation is free so you can party all you want and don't have to worry about driving.

This is a photo of the Arc de Triomph. There is an underground tunnel under the streets so you can cross the street safely. It's much cleaner and prettier than the underground tunnel in London. There are, I believe, 12 streets that converge at a round about with the Arc de Triomph at the center.

Under the Arc de Triomphe is the tomb of the unkown soldier.

OMG! I had a blast walking through the streets of Paris. There were so many stores, cafes and restaurants.

Of course, there was a McDonalds! See my daughter's happy face. She was like "ooooh, McDonalds!" LOL! She bought french fries there. She wanted to say she ate at McDonalds in Paris! We ate at a really yummy restaurant but I can't remember the name of the restaurant. It had the BEST shrimp pasta I've ever eaten. I'm not kidding!


All of Paris is lighted up at night It was so pretty! I thought the drivers were a bit crazy. See that little car to the left of the photo trying to turn left. I don't think I could survive driving through the streets of Paris or anywhere in Europe. I would definitely get into car accident. No one drives in lanes it seems. It's just wherever you can fit I suppose. I took this photo while in our tour bus.

This is the La Grande Roue . . .basically, this is the Ferris Wheel at the end of the street. It's temporary. . .it's taken down I believe after the New Year celebrations.


This is inside the Palace of Versailles right outside of Paris where King Louis XIV lived. I took a gazillion photos of the palace. This photo is of the Hall of Mirrors. The room is famous for its crystal chandeliers. Remember the story of the Hope Diamond? Well, the Hope Diamond was cut from the French Blue diamond owned by King Louis XIV and it was stolen while the diamond was at the Palace of Versailles. It later reappeared but it was cut into a smaller size now known as the Hope Diamond.

This is my daughter standing in the courtyard of the Palace of Versailles. This is only one section of the Palace. The Palace is humongous and so beautiful. There is a huge garden on the other side of the Palace. My daughter and my husband walked through the garden but I didn't. It was so cold the day we were there, I just stood at the balcony near the palace that overlooked the garden. Oh well. . .I'll return to France one day and next time, I'll be sure to walk through the beautiful garden.

Sorry for the long post but I wanted to share my photos. I have such wonderful memories of Europe. I took so many photos because I didn't want to forget anything. I've shared a few of them throughout the past year or so but I have a ton more to share. I'll post them one day. . .:)

Anyway. . .that's it for today! Hope you all have a wonderful Saturday!!!


Thursday, May 26, 2011

Set of Angel Shabby Chic Vintage Inspired Tags

Hi Friends! It's me again!! Just another set of shabby chic vintage inspired tags that I made and listed on Etsy. I've been working on tags a lot because they're more versatile as far as selling them goes. They have multi-purpose use so I'm hoping they'll sell better than my handmade cards. I haven't had much luck selling my cards. I haven't been listing too many of my cards on Etsy. I will one day but right now I'm concentrating on selling "supply" items.

Again, I collaged various images in Photoshop then printed the images on to an off-white card stock. The rest of the tags mainly were about embellishing them with lace and crochet flowers.

I don't know. . .what do you think of the fan design? I wanted to do something different. I cut up a paper doily in 4 pieces and created a fan design.

I collaged various images in Photoshop. I altered the frame image that I downloaded from the Graphic Fairy. She has a ton of pretty vintage images! I changed the hue of the image to a teal color then collaged the angel and flower image. Fun stuff!

Here are the crochet flowers that I used for my tags. I dyed my white crochet flowers using Stampin Up Melon Mambo ink. I have a few listed in my Etsy Shop: Inspired & Unscripted. If you want to dye your own crochet flowers, I have a bunch of white crochet flowers listed. Stop by my shop. . .:)

Okay, this will be the last post for the day! Hope you all have a wonderful Thursday evening!

Cherub Rose Collage Tags and More Crochet Flowers

Hello Friends! Gosh, I've been really busy the past few days. Creating of course but not any finished projects. I did create these cherub collaged style tags this morning. I've been meaning to create a few cards but lately I've been really enjoying creating tags. They're fun because tags can be used for various purposes such as card fronts for cards, scrapbooking embellishments, gift tags, book marks and even as Christmas ornaments. You can use it as a stand alone note card to send to someone too!

I collaged the images in Photoshop, cut the card stock, punched the corners with a round corner punch, then embellished the tags with lace, crochet flowers, dew drops, organza ribbon, seam binding bow and distressed the edge by rubbing ink around the tag.

Aren't the lace and rose trimming so pretty? I've also been having a lot of fun collaging images. I found the cherub image at Magic Moonlight. There are a lot of pretty vintage images on this site.

Again, I had to add a crochet flower to the tag! LOL! I love crocheting the flowers and adding them to my projects. I really love how they give a card, tag, or project a shabby chic vintage look!

I did crochet a bunch of flowers the past few days to include using a metallic embedded thread. They have a sparkly appearance.

These crochet flowers were made with embroidery thread rather than crochet cotton threads. They're a little bigger measuring 1.75 x 1.75" and the texture a little thicker than the crochet flowers which measures 1.5 x 1.5". I'll be crocheting a few more flowers in different colors using embroidery thread and will be listing them on Etsy.

All three items pictured in this post are listed in my Etsy shop: Inspired & Unscripted. I'm working on listing different items. .. I just need to find time to actually make them. I wish there were more time in a day to make all the things I want to make. I have so many ideas but well, I lack the time to be able to work on all of them.

Well, that's it for today! Hope you all are having a wonderful Thursday!

Monday, May 23, 2011

Heart Shaped Shabby Chic Tags

Hi Friends! Just a quick post on this shabby chic heart tag set that I just finished creating and listed on Etsy. I think my next project will be a set of handmade cards but I wanted to work on one more tag set.

I cut my card stock with a heart die then stamped the heart image using my Unity Stamp. I rubbed ink around the heart shape to give it a bit of a distressed look then embellished the tags with lace, seam binding, crochet flowers, and faux pearls.

I listed a bunch of these crochet flowers in my Etsy Shop. I had dyed the crochet flowers with Stampin Up Pink Pirouette ink and I did the same with the seam binding so they match.

I stamped the image on to the heart shaped tag then just added all the embellishments.


I also worked on this set of lace flowers. It takes a lot of lace to create the flowers and I had enough lace to only make one set of these flowers. I wish I had purchased more of this lace. . .I think it's pretty.

Honestly, part of the reason why I'm making these lace and fabric flowers is that I have such an abundance of materials. I had this ambitious idea that I could create cards and projects with them but the truth is there isn't enough time in the day to create projects that would allow me to use up all the lace, ribbons, and buttons that I have. I thought that making embellishments will give me somewhat of the satisfaction of actually creating something with them. . . .:)

Okay, that's it for today. Stop by my Etsy store and check out the items I've listed: Inspired & Unscripted

Sunday, May 22, 2011

Shabby Chic Vintage Inspired Gift Tags

Hello Friends! I decided to work on a set of tags this morning! I'm really having fun making these tags that can be used as gift tags, card fronts, or scrapbook embellishments. Just to let you know I listed this set of tags in my Etsy Shop: Inspired & Unscripted.

I collaged the images in Photoshop then I embellished the tags with crochet flowers, lace, brads, and glitter.

I worked on a bunch of new crochet flowers this weekend. I decided to use a few of them on my tags. I layered two colored crochet flowers and attached them with a heart brad.

I normally don't add sentiments to my tags so that they are more versatile for multi-purpose use but I decided to add a sentiment to this set. The sentiment is pretty generic and can be applied towards various purposes. To give the sentiment a shabby look, I distressed the edge to give it a somewhat aged appearance.

Here is a new set of 10 crochet flowers that I listed recently in my Etsy Shop. I had crochet the flowers using an antique white colored crochet thread. I have a few sets listed.

Stop by my Etsy Shop for more crochet flowers and other handmade items: Inspired & Unscripted .

Saturday, May 21, 2011

Crazy 4 Challenges - C4C88

Hello Friends! Hey it's Crazy 4 Challenges time again! Yay! This week our sponsor is Stampalicious and their stamps are definitely stampalicious! LOL! Joanne challenged us this week with a fun challenge. . .create a humorous card. Well, there's something humorous about my card, for sure. It's not a Totally Stampalicious image. . .oops! I think I missed the boat again this month. I forgot to request a stamp! Yikes!

But the good news is you can see all the cards the DT created on C4C using the cute Totally Stampalicious images. . .and they are definitely humorous for sure. If you want you can also stop by the designers' individual blogs and check out what they created:

* Barbara Anders
* Cindy Haffner
* Frances Byrne
* Jessie Rone
* Joanne Grzelak
* Joycelyn Pelkey
Lynda Benden
*Silke Ledlow
* Silke Kittmann
* Tammy Hershberger
Vicki Garrett


Okay for my humorous card, I used this little bug image by SU. It's a very simple stamp design. . .but with a big statement. Hey. . .it's not a shabby chic card design this week. . .it's a nice change from all my shabby chic'ish projects that I've been creating lately.


Honestly. . .there's not much to say about my card. . .all I did was color the image with my Copic Markers, punched the card stock using my Nestabilities and added the multi-ribbon bow.


Because I have so many ribbons, I've decided to start using more of my ribbons. I'm not kidding. . .I'm not only a designer paper, rubber stamp, card stock, and embellishment hoarder, I'm also a ribbon hoarder. I haven't bought any new ribbons for nearly 6 months and I haven't even scratched the surface of all the ribbons I possess. It's sort of ridiculous!! LOL!

Anyway. . .that's it for today! Hope to see you playing along with us this week! Have a fabulous Saturday!!!
>

Related Posts Plugin for WordPress, Blogger...
 
Share |