Tuesday, February 27, 2007

Sketch Challenges for February - Check it Out!!

I've compiled all the sketch challenges I've posted since January. I decided that I'll compile all of the sketch challenges on one page at the end of each month for you to view. I really have a lot of fun creating these challenges! The challenges are collected from both of my blog sites - Card Inspired and Stampin' Inspirations!

Click Here for February's Sketch Challenges!!

Monday, February 26, 2007

Daily Special - Retired Stamp Set Revival - Words by Wanda

Wanda's Back! I decided to revive Wanda from storage. I haven't stamped this girl for such a long time. I believe "Words by Wanda" was retired in 2005. I like this stamp set because the stamps work well for an adult birthday card.

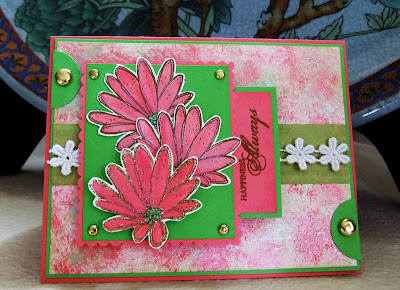
I know. . .the card is a bit colorful but I haven't been feeling well - been suffering a terrible cold and I made this card hoping I could forget how miserable I was feeling. Well, it didn't work. In the middle of blowing my nose, wiping my eyes, sneezing, etc. . ., I did my best to finish this card as quick as possible. I picked up any material sitting on my desk and slapped the card together. I, actually like all the bright colors. . .it's exactly the opposite of how I'm feeling right now.


Card Detail:

Stamp Set: Words by Wanda
Paper: Pink Passion, Ballet Bue, Green Galore
Ink: Stazon Jet Black, Pastels, Versamark ink, Prismacolor pencils and Mineral Spirits
Accessorries: Dot organdy ribbon, slot punch, scalloped scissors
Technique: Poppin' Pastels, Prismacolor pencils and Gamsol

Try this sketch challenge and have fun doing it!


Until later. . .

Friday, February 23, 2007

Random Card - Sketch Challenge

I didn't know where I was going with this card initially but I like how it turned out. It's rather busy but I started and kept going. What do you think?


I feel better right now. I still have a runny nose but other than that, I feel fine. Like I said on my previous post, I have a cold and I'm not much in the mood to make any cards. It's very annoying. I hope my cold goes away soon.


Anyway, enjoy the sketch challenge! It's simple but you can do a lot with it by adding different elements to the design.


Card Detail:

Stamp set: Sweet Treats, Small Sayings
Paper: Bordering Blue, Ballet Blue, Chocolate Chip, DCWV scrapbook paper
Ink: Prismacolor Pencils with Mineral Spirits, Not Quite Navy, Bordering Blue, Stazon Jet Black
Accessories: Designer Ribbons, 1 inch circle punch

Daily Special - Anything but Cards

Just a few boxes that I made yesterday. The majority of the day I spent watching the Anna Nicole Smith case on Court TV. I know. . .it's silly of me but man, the situation surrounding her death is so intriguing. . .I just can't help myself. My husband actually sat down and watched the court hearing with me and he absolutely hates celebrity gossip but he was actually interested in watching all the drama unfold! Anybody else watched the hearing on Court TV? If you did, isn't all of the things happening nuts?

Back to rubber stamping, I wanted to use my Stampin' Around Wheels which I rarely ever use for one reason or another. I have so many wheels but I can't remember the last time I used any of them.

I didn't want to spend too much time with the creation of these boxes (I was making them in between the Anna Nicole Smith case proceedings) so all I did was ran the wheel around the box, randomly rubber stamped the top of the box and attached a ribbon and a tag. Each box took about 15 minutes to create.

Anyway, I woke up with a cold this morning. Yuck. . .hopefully, I'll feel better tomorrow.

Until later. . .

Thursday, February 22, 2007

Daily Special - Technique Day - SCS Version of Prismacolor Pencil and Gamsol

The last few cards I made was colored using the "Prismacolor Pencils and Gamsol" technique. I did a tutorial on this technique a few days ago and I just wanted to add another tutorial of the same technique. This tutorial is linked to the SCS version of the technique. It's the same basic concept. Click here for the SCS version of this technique. Click here for my tutorial. Have fun stamping!

Until later. . .

Wednesday, February 21, 2007

Random Card - Sketch Challenge for the Day!

It was a very uneventful day! I didn't really work on any cards today. I did this one yesterday but did not post it. I'm on a creative block. . .or more like laziness. It's one of those days when I just didn't want to do anything but lounge around which, by the way, is very rare for me. I don't like being unproductive but I guess it's okay to do nothing once in awhile. Hopefully, when I wake up tomorrow I'll be over this slump I'm in. . .

In the meantime, have fun with this sketch challenge!!


Tuesday, February 20, 2007

Daily Special - Technique Day - Prismacolor Pencils and Gamsol Tutorial

Today's Daily Special is Technique Day. Today's tutorial will be on Prismacolor Pencils and Gamsol. For those who don't know what Gamsol is. . .basically, it's a brand name of an odorless mineral spirits.

The tutorial is not necessarily on Gamsol but mineral spirits. I titled the technique using Gamsol because that is what everyone seem to be familiar with.

Mineral Spirits is a paint thinner like turpentine but is petroleum based. It comes in the odorless or non-odorless form. They come in various different brands in which Gamsol is one of them.

It can be sold under different labels, "Paint Thinner", "Odorless Thinner", "Mineral Spirits". . .and can found in arts and craft stores. I heard hardware, home improvement, and paint stores sell them as well.


It is used as a blending agent when used with colored pencils or other oil based mediums.

Click here for the tutorial or click on the title of this post.

The result of this technique is the stroke lines that you would normally see when coloring with colored pencils disappear. The mineral spirit helps blending the colors more effortless and the results are beautiful. Scroll below for another sample of an image colored with Prismacolor Pencils and Gamsol. Also, included are sketch challenges of the cards! Try it out and have fun doing it!

Daily Special - Retired Stamp Set Revival - Sweet Treats

Today's Daily Special is "Retired Stamp Set Revival". I'm reviving "Sweet Treats" which I believe was retired in 2005. This is a great stamp set. The set comes with 3 medium size stamps. . .I still have to create cards for the other two stamps which I will post later. Try out the sketch challenge as well! The first card's sketch is a little more busy than my other sketches. I wanted to add a little more challenging sketch. The second card is a little more simple.

As a bonus: Try out this color combo challenge - True Thyme, Cool Caribbean and Creamy Caramel


Card #1 Detail:

Stamp sets: Sweet Treats, Birthday Greetings, Riveting
Paper: Cool Caribbean, True Thyme, Creamy Caramel
Ink: Cool Caribbean, True Thyme, Prismacolor Pencils with Gamsol
Accessories: Cuttlebug Happy Birthday embossing folder, 1 1/4" and 1 3/8" punch, Dots, Dash & Checks ribbon


Card #2 Detail:

Stamp sets: Sweet Treats, Words by Wanda
Paper: Positively Pink, Pretty in Pink, DCWV Scrapbook Paper
Ink: Positively Pink, Stazon Jet Black, Prismacolor Pencils with Gamsol


Until later. . .

Sunday, February 18, 2007

Family Sunday - Keiki Cards Day

As a family we decided to spend our time making cards every Sunday to donate to Keiki Cards. Each get-together I would teach a technique and my kids and husband each create a card. Last week's technique was Prismacolor Pencils and Gamsol. I decided it was best to use the same image to teach this technique. I think they did a wonderful job! Because they are absolute newbies, I needed to make the cards as simple as possible. We used patterned paper for the background and attached ribbons as embellishments.


From left to right: My card, my husband's, my son's, and my daughter's cards.

Below are pictures of today's Family Sunday and the cards we made. The technique I taught was "Resist Embossing". I had my husband and my kids choose a color theme and choose the stamps they wanted to use. Again, the cards had to be simple because like I said, they are still newbies. I told them when they've learned enough techniques they can begin creating cards using what ever technique and style they want.


My card is on the left and my husband's to the right.


My daughter created the card on the left and my son on the right.
Here are pictures of my family each making their cards. We had a lot of fun and they are really enjoying making the cards. My daughter was so proud of her card that she was smiling from ear to ear when she completed it. I'm glad the cards are going to a great cause but also, that we all are doing something together and having fun doing it.


Until later. . .

Friday, February 16, 2007

Random Card - A New Little Someone - Colored with Prismacolor and Gamsol

Just a random card I made. I just realized that I've been forgetting to add the card details on my last few posts. I'll remember to do it from now. Does it matter? I wonder if anyone reads the card details.

I colored the bunny using Prismacolor pencils and Gamsol. Isn't the colors rich and very pretty? Is using Gamsol worth it. . .I think it is but not necessary. It's just makes blending much easier. You can achieve the same effect but it takes a lot of blending in with your pencil and you need to understand the mechanics of strokes and pressure when coloring. Gamsol eliminates that process.

I'll do a tutorial sometime soon. I just need to be motivated to do it. I will do it though. . .I promise. The next time I color with pencils, I'll take pictures of the process so I can create a tutorial.

I snuck in the sentiment stamp which is not a stamp by Stampin' Up. I'm bad. I was too lazy to get up and look for a Stampin' Up stamp to fit the image and the "Congratulations" stamp was on my desk so I decided to use it instead. Oh well, it happens. Don't forget to scroll down for the sketch challenge!!

Card Detail:

Stamp Set: A New Little Someone, Hero Arts sentiment stamp
Paper: Pixie Pink, Whisper White, DCWV Scrapbook Paper
Ink: Pixie Pink, Stazon jet black, Prismacolor Pencils with Gamsol
Accesories: Dashes, Dots & Checks ribbon, Marvy Scallop tag punch, Silver metallic cord, Dimensionals

Sketch Challenge

Daily Special - Anything But Cards - Altered Notebook

Check out my Card Inspired blog site for the tutorial on the altered notebook. I'll alter another notebook using Stampin Up products and post it on this blog site. In the meantime, check out my tutorial on this project.

Click Here to be directed to the post which will link you to the tutorial or click on the title of this post.

I'll update this blog when I complete the altered notebook.


**Update**

As promised, I created an altered notebook for this post. All the materials used to create the notebook, aside from the notebook and ribbons, was from the Sell-a-bration Simply Scrappin' "Just Delightful" set. Try it out and see how easy it is to create an altered notebook.


Until later. . .

Thursday, February 15, 2007

Daily Special - Sketch Challenge

It's a sketch challenge again! Actually two of them. I made a bunch of cards using the "Heartfelt Thanks" set. The technique I used to create this card is "masking". I'm sure most of you know this technique but for those who don't, I'll do a tutorial sometime soon.

I drew my own leaves. It looked rather plain without leaves and unfortunately, there were no leaves on the stamp so once again, I needed to improvise.

I embossed the background with the Cuttlebug Embossing Folder and rubbed dye ink over it. I can't remember what color combo I used to make this card. I believe it was Always Artichoke, Close to Cocoa, and Pumpkin Pie. I used the same Classic inks to ink the image. Don't forget to scroll down for the second card. Enjoy the sketch challenges!


Again, I used "Heartfelt Thanks" to create this card. This time I used the color combo Lavender Lace, Old Olive and Eggplant Envy. I used the same technique as the previous card. . .which is "masking". As much as I love the image, I sometimes don't like dealing with the two-step rubber stamps. It can be annoying when the images don't line up exact.

I like this rubber stamp set. I think the images are very elegant. Don't you think so?

Anyway. . . try out the sketches when you have the chance. I do them because I think they are helpful. I love sketches. The sketches on my blog site are my own unless otherwise stated.

Wednesday, February 14, 2007

Daily Special - Technique Day - Stippled Background with Acrylic Paint and Pearl Ex

Today's Daily Special is actually on my Card Inspired blog site but I just wanted to add a note on this end that I did a tutorial on my other blog site. A few days ago I did a tutorial on Lumiere and Classic Ink.

Well . . .here is another tutorial, similar but different. The difference between the two is Acrylic paint when stippled results in a textured consistency as opposed to dye inks which dry smooth with no texture. When combined with Pearl Ex or if you want, you can use Lumiere, the result is a stippled background that is shimmery but textured all at the same time.

Try both out and see which you like better. In this tutorial, I used Jacquard Acrylic Paint but any acrylic paint will do. I used Pearly white Pearl Ex or any white colored Pearl Ex will do.

When I have the time, I'll make a card using Stampin' Up stamps to post on to this site but in the meantime, check out the tutorial by . . .

Clicking Here or click on the title of this post.

Until later. . .

Daily Special - Sketch Challenge

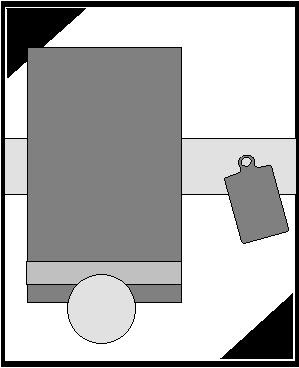
Today's Daily Special is Sketch Challenge. Actually, everyday is Sketch Challenge day because I've decided to do a sketch for every card I post. All the sketch challenge I post is my own unless otherwise stated - although I may unknowingly create a sketch that someone else may have already created. There's only so many ways to layout a design.

This sketch is a sketch I created on my Card Inspired Blog site but I used a non-Stampin up stamp to create the card, therefore, could not post it on to this site. I wanted to use the same sketch to post on to this site so I used the same layout. Check out my Card Inspired Blog Site to view the card I created using this same sketch. I modified the two strips on the right of the sketch and tied a bow at center although still following the sketch layout.

When looking at sketches, the sketch is just a basic layout and embellishment of the sketches are encouraged as long as the original sketch remains intact. By tying the bow at the center, the original layout remains the same but adding an element so the layout looks different is how sketches should be used. You can create countless cards that look very different from one another and still use the same layout.

Try it out when you have a chance. I'll add the card details when I have the time.


Until later. . .

Tuesday, February 13, 2007

Daily Special - Technique and Sketch Challenge Day - Shaving Cream Technique


Today's Daily Special is Technique Day. I chose to do a tutorial on the "Shaving Cream" technique. It's a bit messy but oh so fun! This is a technique that your kids will love. The results are a swirl of colors that makes your card stand out!

I suggest using a glove but if you're not afraid of a little ink, then gloves are not necessary. When I do this technique, I usually make a whole bunch of them and store them for future use. I really love this technique because of the cool swirls and the beautiful mix of colors. When choosing colors to use, stick to 2 to 3 colors. More than 3 tends to become a bit messy looking.

Click here to be linked to the tutorial.


Have fun creating! Until later. . .

Monday, February 12, 2007

Daily Special - Sketch Challenge and Retired Set Revival

There's two Daily Special today - one is "Sketch Challenge" and the other "Stamp Set Revival".

Today's featured retired stamp set is "Tickled Pink" and I've been tickled pink using this set. I rarely ever used this stamp set in the past. I think I've used it once before. I just never had the time to get around to using it. It's a really cute stamp set and unfortunately, this set is now retired.

When time permits, I'll post a sketch along with every card that I post on to this blog site. I know y'all love sketches so I think this would be a great feature to add to my blog site. What do you think? Would you like something like that?

Anyway, when you have the chance, try out the sketches. They are very simple layouts but there's a lot you can do with them.


Until later. . .hope y'all have a fund day!!

Keiki Cards

Please visit Keiki Cards by clicking here. Be inspired to support this worthwhile organization.

"Keiki Cards is a nonprofit under the laws of Hawaii and the IRS code. We are a 501 (c) (3) nonprofit organization. Keiki Cards' mission is to send out handmade greeting cards to children who have life threatening illnesses. Our goal is give the child support through the mail and to let the child know that someone is thinking of them. Children range in age from infant to eighteen. These cards are sent out every week to approximately 200 children (the number of children can change weekly from the addition of new children to children who have passed) in Hawaii, across the USA, and Canada but Keiki Cards is not limited to sending to these areas. Keiki Cards will also send monthly birthday gifts and holiday gifts. Children are referred to Keiki Cards by friends, family, school teachers, social workers, churches and families also find us on the Internet."

Along with my husband and kids, we decided to make Sunday our Keiki Cards day. We each make a card to send to Keiki Cards. I'll post a picture tomorrow of the cards we made this afternoon. We had a great time making cards knowing they are going to a worthwhile organization. I taught my husband and my kids the Gamsol and Prismacolor Pencil technique. Each week I'll teach them a technique and the cards that we make will go to the kids at Keiki Cards. What a great way to spend a Sunday afternoon together.

Until later. . .

Friday, February 9, 2007

Daily Special - Technique Day - Lumiere and Classic Ink

Today's Daily Special is Technique Day. As promised yesterday, today's technique is Lumiere and Classic Ink. I'm sure there's an official name for this technique and I'm not the first to do this but if someone could enlighten me as to the name of it, I'd appreciate it.


The other day, I stopped by JoAnn's and I stumbled across a section of metallic acrylics that came in a refill bottle in sets of 12.

These acrylic paints are made by Jacquard and are called Lumiere acrylics. They also come in larger jars but I decided to buy 3 sets of smaller bottles in sets of 12 various colors. Each set comes in 12 refill bottle sizes and cost $12.99.

Stampin' Up sells Lumiere Pearl White in 2.25 fl oz. jar but don't carry the other colors.
The result of mixing Lumiere Pearl White and Classic Inks is pearlized shimmery color that can be used to color in your images or create pretty backgrounds. There are other ways to create this shimmery effect but that will be covered on another tutorial.

Click Here to view the Tutorial or click on the title of this post.

Try it out and have fun stamping!

Until later


Thursday, February 8, 2007

Lumiere Ink and Classic Ink - Flowers and Background

I, recently, bought 3 sets of 12 Lumiere ink bottles because they looked pretty. Yes, sometimes I purchase things just because I think they look nice whether it's useful or not. Well, Jacquard sells collections of various metallic acrylic paint in very, very pretty colors. Anyway, I mixed Stampin Up Classic ink from the refill bottle and Pearl White Lumiere together and created a palette to color in my stamped images and to stipple the background. I'll do a tutorial on this technique tomorrow.

This is the result of my little experiment:


Card Detail:


Stamp set: All Year Cheer I, In Full Bloom

Paper: White Glossy Cardstock, Green Galore, Royal Rose, Provocraft Scrapbook Paper

Ink: Royal Rose mixed with Lumiere Pearl White Metallic Acrylic, Green Galore, Basic Black

Accessories: Word Window Punch, Gold Brads, Gold Organdy ribbon, Dimensionals


Check back tomorrow for the tutorial. I promise I'll post it. I know I've been rather flakey on the tutorials but my heart wants to do them but I just don't have the time sometimes to work on them. I'll fit in the time tomorrow to do the tutorial.


Until later. . .

Tuesday, February 6, 2007

Daily Special - Anything But Cards - Card/Memo Folder Tutorial

Yheepee~ I finally created a tutorial, although not the one I said I would. Today's Daily Special is Anything But Cards, again. The tutorial is on how to create a Card/Memo Folder ~ nothing new but it's my version.

Instead of cards, I inserted rubber stamped memo sheets into the folder pockets. This folder can hold up to 3 flat cards meaning non-3D type cards and 3 envelopes.


Click Here to be linked to the tutorial or click on the title of this post.

Card Details:

Stamp Set: In Full Bloom, Friends Are Like Flowers, Garden Annuals Wheel
Paper: Close to Cocoa, Cool Caribbean, Whisper White, DCWV scrapbook Paper
Ink: Stazon jet black, Color pencils
Accessories: Slot punch, Ticket Corner punch, Crafter's Tool Kit (paper piercer), Scalloped Scissors, 5/8" organdy ribbon, Snail adhesive, small silver brads


Monday, February 5, 2007

Sorry No Tutorial Today

I'm sorry I didn't post the tutorial on the boxes today. Life got a little busy again and I just didn't have the time to take the pictures. If possible, I'll work on it tonight but if I can't finish it up today, I'll post it some time tomorrow.

Tutorials take a lot work because not only do I have to create the project, I need to take the pictures, download them, then upload the pictures to blogger (which takes sooooo long), then write the tutorial. Depending on how long the tutorial, it can take a good chunck of my day to do.

Anyway, I just wanted to let you folks know that the tutorial won't be posted today.

Until later. . .

Sunday, February 4, 2007

Daily Special - Anything But Cards - Valentine Box

Lately I've been creating a lot of "Anything but Cards" items because I've been experimenting with different designs. Today's Daily Special is a Valentines box.

All three of the boxes are a little different from one another. The first one is my final modified version. The middle box was the first one that I made and my husband suggested that I change the window to a heart shape. The third box, after looking at it I felt the white scalloped edge need to be less wider and closer to the pink one. So. . .the first one is the best one in my opinion.

I'm making these boxes for my kids to give out to their friends for Valentines. I need to make 10 more of them. I'll do a tutorial on this box tomorrow. I did not follow a template or used an example. I came up with a formula to create boxes at any size as long as it can be accommodated by an 81/2 x 11 cardstock. I'll do the tutorial using the formula so you can also create these boxes at any size without ever having to use a template. It's easy. . .don't worry about it. You just need to know how to measure and add.

Box details:

Stamp Set: Loving Hearts
Paper: Chocolate Chip, Positively Pink, Whisper White
Ink: Bravo Burgundy, Positively Pink
Accessories: Coluzzule Cutting System in Oval and Heart Shape, Fiskar's large scallop edge template, Floral organdy ribbon, Hemp cord, Stampin Up small tag punch

Until later. . .

Post-it Note Cover Again

Another Post-it Notes cover that I made this morning. I'm having sooooooooo much fun making it. Like my previous post, this is a cover for a 3x5" inch Post-it Notes. I bought the larger pad because it was less costly than the smaller ones. Isn't that weird? I guess because this size is not as popular.

To close the front cover, I looped a ribbon around the inner flap and extended it to the outer flap and tied the ribbon. The ribbon is adhered to the inner flap so it can be retied when not in use.

I'm going to make more of these! I just having a blast creating them.

Card details:

Stamp set: Friends are Like Flowers, Happy Harmony
Paper: Brocade Blue, Pink Passion, White Whisper
Ink: Stazon jet black, Bordering Blue, Colored Pencils
Accessories: 3x5 Post-it Notes, Organdy Ribbon, small round eyelets, dimensionals

Saturday, February 3, 2007

Daily Special - Anything but Cards - Post-it Note Cover

I bought a stack of 3 x 5" post-it notes and decided to create a cover for them. This is my sampler cover. I just wanted to finish it as quickly as possible. I did not use a template or followed a tutorial. I just measured the post-it note and scored and folded the cardstock to create a match book type of cover. I'm pretty happy with how it turned out, therefore, I'm going to make more of them and decorate them a little bit more than this sampler. I'll post a tutorial on this Post-it cover tomorrow.

Post-it notes detail:

Stamp set: Burst Into Bloom
Paper: Pink Passion, DCWV scrapbook paper
Ink: Pixie Pink, Pink Passion
Accessories: American Craft Element Ribbon, Slit Punch


Friday, February 2, 2007

Didn't Make a Card All Day

Things got extremely busy today and I had to run a lot of errands. My craft room is a mess and I didn't have a chance to stamp all day. Can you believe it. . .I feel like I neglected my child and now, feel guilty about it. Anyway, once I'm done cleaning my room, I'll work on a few projects. I received my chipboard coasters today and I'll see what projects I can come up with.

I'll probably post it late at night. . .**sigh**

Until later. . .

Thursday, February 1, 2007

Simple Card Design

Last night I was thinking about the design of my cards and realized that I seem to gravitate towards very busy looking designs and really haven't made a really simple card for quite some time without a lot of cutting, coloring, layering, embellishments etc., etc.

I really like the look of many of the simple card designs that I see with other stampers and decided to minimize my card design a little.

I really like the simplicity of this card and it took me less than 15 minutes to create! I love that part of it especially.

I think I'm going to make a lot more simple cards. What do you think? Should I scale down a little? I really need an opinion. If someone could comment and give me a bit of your input, it would really be helpful to me.

Card Detail:

Stamp set: Sketch It, Swirls and Blossoms
Paper: Pink Passion (may be substituted for any pink color cardstock), Old Olive, Whisper White
Ink: Pink Passion (sub for any other pink desired), Old Olive
Accessories: Off White large brad, dot grosrain ribbon

Until later. . .

Daily Special - Dollar Days - Candle Cover


Today's Daily Special is Dollar Days - Candle Cover. Like I said on one of my previous post, I had bought a bunch of $1 items with the purpose of using them for projects.
One of the items was a $1 candle and I removed the original plastic cover and decided to create my own.
This is what I came up with. I'm not sure if the paper would be a safe thing to have near a candle, therefore, this candle is basically a decorative piece. I would advise anyone planning to light the candle, to remove the cover.
I really had fun making this candle cover. I only bought one candle because I didn't want to commit myself to a bunch of them without testing out how it would turn out.
After creating the cover, I decided I'm going to go back to the dollar store and buy more of them. To create this really do not involve any real technique but I'll provide the step by step instructions in the case there's any confusion as to how it was created.
Candle Cover instructions:
Materials are dependent on the size of your candle so I won't give measurements:
Candle
Scrapbook paper
Cardstock
Ribbon
Adhesive
Rubber stamps of your choice
Instructions:
  • Measure the height and diameter of your candle.
  • Cut your scrapbook paper based on the height and diameter of the candle and add 1/2 inch to the diameter
  • Wrap the scrapbook paper around the candle and apply adhesive to the 1/2 inch extra length of the diameter of the candle
  • Cut a 1/2 inch strip height of cardstock and the same length of the scrapbook paper
  • Wrap it around the top area of the candle and line the end piece with the end piece of the scrapbook paper so that it appears that the line is uniformed with the scrapbook paper.
  • Wrap a ribbon around the cardstock.
  • Stamp your chosen images on to regular white cardstock and color in your images as desired
  • Glue the images on to the wrapped scrapbook paper
I didn't add a sentiment because if I were to give this away, I would wrap it in a cellophane bag and tie a ribbon and tag on the bag instead.
Candle details:
Stamp set: In Full Bloom
Paper: Pretty in pink cardstock, white glossy cardstock, Provocraft scrapbook paper
Ink: Stazon jet black, pastel, markers
Accessories: Making Memories flower ribbon
Try it out and see how much fun you'll have creating this candle cover.
Until later. . .

Related Posts Plugin for WordPress, Blogger...
 
Share |