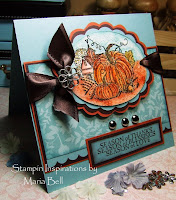
Pearl Ex Magic Tutorial
Hey Everyone, I was going to post this tomorrow but decided to do it tonight. I'm going to be busy tomorrow and I may not have time to post this tutorial.
The pictures don't really reflect how the card looks in person. It's actually very shimmery and pretty. The colors are nicer in person but my camera can't seem to capture the true essence of the card.
Anyway, I created a tutorial for the Pearl Ex Magic technique. For those who have never used Pearl Ex. . .this is a basic tutorial for beginners. It's a great way to play with the product so be sure to check it out. You'll really love the results in person.
I really need to clean up my stamping studio. I can't deal with my clutter right now. I have so many stuff piled everywhere and it's driving me batty! Seriously!! I can't stand it. I tidy up daily but there's just not enough space to put everything I want in my room. My problem is I want everything to be accessible. If I don't see it, I don't use it. Unfortunately, my floor is becoming a maze and have on several occasion stepped on stamps and ribbons that I've set on the floor. One day I'm going to trip over something and really hurt myself.

Anyway, this is basically the same as my first card but the layout is a little different. As always, my brads are crooked again. Annoying. I don't know what's the deal with that. . .
If I have time tomorrow, I'll post a few cards I made for Angel's (Angelosity) Challenge/Blog Candy. Be sure to drop by her site. . .she has a huge prize to give away. . .
Until later, folks!!


8 comments:
Maria, thank you for the tutorial! Your instructions are very clear to me. And the cards are very pretty (BTW, my brads seem to "jump" before I place them too!!) :)
Thanks again!!
I'm sure these are beautiful in real life...I was disappointed with SU discontinued selling Pearl Ex...it is such a fun medium to use!
Tip I tell my customers on keeping a row of brads straight. Use your piercing tool and piercing mat to line up the row and pierce the holes (about every 3-4 holes seems to work), then place the brads. Perfect lineup every time and works going across or up and down!
Connie
http://INKspiredtreasures.blogspot.com
Beautiful cards!
Thank you for the tutorial. I really like Pearl Ex and lately I have been wanting to do a card with Pearl Ex. Now I am inspired to get started. I really enjoy your blog and am continually amazed at your designs and creativity. Thank you for sharing with us.
Sharon
Maria, thank you so much for the tutorial! I luv this technique & can't wait to try it. Where do you get the Pearl Ex & the Fixative spray? I luv your card & the color combo for fall is great, thanks for sharing.
Very pretty Maria!
malieta:)
Wonderful tutorial, Maria. I learned something new today. It never occurred to me to use pearlex that way. I tend to add water and paint with it. Now I must try your tutorial. TFS.
Great tutorial! I always wondered how to use my pearl ex. Thanks!
Cheryl
Post a Comment