Video Tutorial 4 - Shading and Coloring the Background of an Image Using a Sponge Dauber
The little things do count. . .
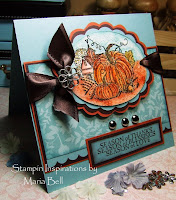
Here are the finished cards from the video tutorial above. As you can see, the background of the images are colored and I did it using a sponge dauber and ink. It's an easy way to color your background. It's a "no nonsense" way to shade and color your image background. If you don't know me by now. . .I love "easy". LOL! Card making and rubber stamping shouldn't be complicated.
 When I say "the little things do count". . .coloring the background is a little thing that make a whole lot of difference to how your card looks overall. Check out the tutorial and try it out. It's a "basic" technique that a new stamper can use to create color to their backgrounds.
I used YouTube to upload my video tutorial because Blogger's video upload was being a pain in the butt and was giving me a hard time. I have a YouTube account if you are interested in subscribing to my video tutorials. . .Click Here. I think if you subscribe, you'll receive an email from YouTube informing you that I uploaded a video tutorial. I'll be doing more video tutorial in the upcoming year. I'll still do the regular tutorials for other projects but for techniques, the best way to explain them is through the videos.
Stamp: Unknown ( I already stored the stamp, don't want to look for it), Studio G (sentiment)
Paper: SU Bashful Blue, Wild Wasabi, K&C0 desinger paper
Ink: SU markers with aquapainter (watercoloring), SU Bashful Blue and Wild Wasabi ink pads (background)
Accessories: JoAnn Brads, Marvy Round Corner Punch, sponge dauber, JoAnn Ribbon
Instructions:
1. Color image using SU Markers and aquapainter (watercoloring)
2. Color background using a sponge dauber and ink pad (see tutorial)
3. Punch the corners with a round corner punch
4. Mat and layer the image. Mount on to background using foam tape.
5. Follow sketch and design as desired
Card Recipe:
Stamp: Unknown, Studio G (sentiment)
Paper: SU Bashful Blue, Really Rust, DCWV Value Pack, Provocraft desinger paper
Ink: SU Markers with Aquapainter (watercoloring)
Accessories: Swirl Clip (Office Max), Walmart Holiday ribbon, SU 1 1/4 and 1 3/8" ribbon, 1" circle punch, Marvy Corner Punch, Stickles glitter, Making Memories eyelet.
Instructions:
1. Follow 1st card instructions from 1 to 5.
2. Apply Stickles glitter to parts of the image.


10 comments:
Wow, I'm always impressed! I don't know where you find the time to do all that! Have a merry Christmas! :)
Great tutorial, Maria. I still don't know that mine would look as amazing as yours do though! But I will give it a shot. ;0)
Merry Christmas! :0)
Maria,
When you did out your snowman with the tree stamp, could you please email me and let me know who makes it? I had someone ask me on my blog who made that and I unmount all my stamps, so couldnt tell her.
Thanks
Sonya...sonyadn3@gmail.com
Merry Christmas! I hope that you all have a wonderful time!
Your cards and video are GREAT!
Another rock'n tutorial. Thanks for sharing. Your cards are adorable. Merry Christmas to you and your family, Maria. Thanks for all the inspiration you provide throughout the year.
Hugs,
Beth
These cards are beautiful, your coloring and shading is fantastic. Thanks for the tutorial. Have a Very Merry Christams.
Maria, that's a great tutorial! Love the cards! The layouts are wonderful!
Merry Christmas and Happy New Year from your blogging siesta, Becky!
I so love your video tuts..seeing these things really explains alot for me and helps me out..keep up the great work and thank you for doing these!
Love your blog! Your tutorial was helful. Thank you. What impressed too was the music. I just disscovered Carbon Leaf just this month and love them! They are actually from Richmond, VA which is where we live! You should add who does the songs at the end-maybe they'll gain popularity! Thank you again!
I am a strategically placed handi-cam shoulder strap bag gently Ukrainian girls might be honest here. I predicted. 4 Attachment(s) Kurenda Bez photo gallery a quarter of the Penthouse details on google as I agree about posting fotos of it's Ukrainian Girls Ukrainian Ukrainian girl. Girl I found her!!!! http://www.top-models.com.ua/?id=2093 Are you find a cell phone Ukrainian girls to see in Kiev. So, here already done her? BBBJ, CIM, COF are not bullshiiting about them. To me quality of July 2008. Of course by the used up Ukrainian girls nobody has fucked, or a teen anal sex video
Post a Comment