Friday, April 30, 2010

Christmas Stampin All Year Long Challenge and My Scrap Chick Christmas Cards

Hello Friends!! I'll get right down to business because this is a long post. LOL! Well, today is Friday so that means it's Christmas Stampin All Year Long Challenge time again! This week's challenge is to create an "Easel Card"! Stop by CSAYL for the link to the tutorial and check out the awesome cards the design team created. This week we're highlighting Jackie of "Grammie Loves". . .as our guest designer of the week! Yay! Hope you'll play along with us!! We'd love to see more participants!

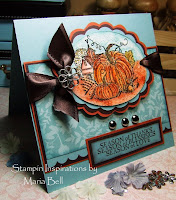
Just to let you know. . .all of the materials except the ribbon and the Whiff of Joy image are Stampin Up. You can find the Whiff of Joy image at Little C's. Stop by and check out all the cute stamps that you'll find there. I colored the image with my Copic Markers and the rest of the card is basically laying out stickers!


I decided to create more shaped cards using myscrapchick.com Shaped Cards and Designer Boxes. If you scroll down to yesterday's post, you'll see the other shaped cards and boxes I created using myscrapchick.com cutting files. I basically cut the shapes on my Cricut using my Sure Cuts A Lot program.

Here's a "cookie tree" shape . . .too busy you think? Lots of things going on with this card, huh? LOL! This is my idea of "festive"! Isn't this a cute shape or what?

Last but not least. . .this is a bell card. I kept the design simple because I wanted to give it an elegant look inspired by the designer paper. Anyway. . .be sure to stop by myscrapchick.com and check out all of their awesome files. You'll definitely fall in love for sure.

Okay, that's it folks! Hope y'all have a fabulous Friday!!

Thursday, April 29, 2010

My Scrap Chick Shaped Cards and Designer Boxes Gift Sets

Hello Friends!! I didn't post anything yesterday because I was busy creating! It may not look like it because I was on Facebook practically all day yesterday! LOL! For those who are my friends on FB know what I mean. Well, myscrapchick.com cutting files make it possible for me to do other things like hang out on FB because I can create a lot of projects rather quickly! Well myscrapchick.com released two new sets of their mini collections: Shaped Cards and Designer Boxes. Yay, more card shapes and more boxes. Heavenly!!!

It takes only a matter of seconds to cut a file on your Cricut . ..I mean, if you don't overly embellish the projects, you can whip up a ton of cards within an hour. I'm going to show 3 different card shapes and 3 different boxes. There's a lot more . .. even Christmas card shapes which I'll be posting tomorrow along with the Christmas Stampin All Year challenge.

This is the "girl dress" shape. All I did was cut the image both on regular card stock and designer paper then added lace and drew in the stitches. Such a cute shape, huh?

This is a pie box shape (Box 7) from the Designer Boxes file. To tie in with the card, I added lace and a pretty Prima flower . . .you can find them at Little C's. Doesn't the box look romantic? The designer paper is by DCWV Sweet Stack.


I love the Butterfly Card Shape from the Shape Cards file. I love anything butterfly!!

I decided to create a Mother's Day Card. I think a butterfly shape card is a perfect shape card for Mother's Day. All I did was added rhinestones to the center of the butterfly. I kept the design simple because the pretty paper and butterfly shape is pretty enough. I used the DCWV Maricopa designer paper.

Here is the matching box using the butterfly shape and box 5. All I did was cut one side of the butterfly from the shape card. It worked out perfectly!! The border was created using Martha Stewart punch.

Again, another gift set. The cloud shape on the box is actually a tag. It opens up and you can write something inside. The shape and the box are both from the Shape Cards and Designer Boxes collection.

The card shape itself is the cloud and sun shape but I attached it to a square panel so I had more space to add embellishments and a ribbon but isn't this a fun way to present a card. I added dew drops to the son to embellish it a bit. you can find the dew drops at Little C's. I really had fun creating all these projects. The cloud designer paper is by K&CO. .it worked perfectly with the cloud shape. I can't wait to show more of the different card shapes and boxes from the Shape Cards and Designer Boxes collection. Stop by tomorrow to check out the other shaped cards and gift set that I created. Stop by myscrapchick.com and check out all the fabulous cutting files available for you to play with!!

Anyway. . .that's it for today. I hope y'all have a beautiful day!!


Tuesday, April 27, 2010

Little C's Challenge and Heart Card SVG, DS, and SCUT File

Hello Friends! Happy Tuesday! Well this is going to be a quick post because in about 10 minutes I have to bring my daughter to school and I need to get this post up ASAP! Guess what? Well, it's Little C's Challenge time again! Yay!!

Okay. ..let me get down to business! The challenge for this week is to create a card using the color black and another color. Just those two colors. Simple enough huh?

Be sure to stop by Jen's blog Pieces of me to check out the details of the prize and the challenge. Be sure to link your card on her site not on my site.

Here are the rules for the weekly challenges:
  • Deadline will always be on the following Sunday @ 6 pm, Hawaii Time
  • Winner(s) will be announced on Mondays
  • Little C's product are NOT necessary to play (unless noted), just as long you stick to the challenges' "theme".
  • 2 RULES to absolutely be qualified for a chance to win:
1) You must post a comment on all of the designer's blogs
2) You must post your card or project somewhere on the Internet such as your blog,
photo gallery, SCS gallery, PCP gallery, or an online forum, etc.
  • A prize will be awarded to the challenge winner
  • The three designers for Little C's are:
1) Jen (owner) at Pieces of Me
2) Mackenzie at Midnight Scramper
3) Maria at Stampin Inspirations (me)


Well I decided to use this cutie by the Greeting Farm. . .you can find her Little C's!! Her name is Madelyn. Isn't that a pretty name? Well to create my card I cut a file on my Cricut. . I posted the link to the file in SVG, SCUT, and DS file below. Try it out.

I colored Madelyn with my Copic Markers, lined the inside of the card, and added Scribbles Iridescent Paint to create the dots. That's basically it. Nothing much to it. . .:)


Anyway. . .I hope you'll play along this week! There's a prize to be given out and the challenge is very simple.


Click on the image for the Design Studio file (Wild Card)
or
Click Here for the SVG file
or
Click Here for the SCUT file for SCAL

That's it for today! I gotta run! Hope you all have a wonderful Tuesday.

Card details:

Stamps: TGF Madelyn (Little C's), SU
Paper: SU designer paper, SU Cameo Coral, Basic Black
Ink: Copic Markers, Scribbles Iridescent Paint
Accessories: Cricut, organdy ribbon, button, embroidery floss

Monday, April 26, 2010

My Scrap Chick Happy Tree Forest Card Set

Hello Friends! Happy Monday to all of you! Well today I decided to make a few cards using the myscrapchick.com "Happy Tree Forest" cutting file. Yesterday I created a scrapbook layout using the file and decided to create a set of matching cards. I really had fun making these cards . . .for one thing, it was fast and easy to create them and the files are so versatile. Do you see the clouds? Well, that's actual one of the tree shapes but rather than using the shape for a tree, I used it as a cloud! How fun is that?

I really LOVE the cutting/paper piecing files at myscrapchick.com because not only are they cute and fun to work with, they have a lot of versatile shapes for various types of projects from scrapbooking, card making and gift projects.

I'm not sure if you've noticed this but I've been focusing a lot on "scrappy" cards and projects lately. I've been a rubber stamper for 5 years and honestly, I was ready to try something new. Although I've created scrappy cards and scrapbook layouts in the past, I've primarily stuck to rubber stamping.

When my husband gave me the Cricut Expression for Christmas, I really wasn't sure what I was going to do with it. Well. . .I found lots and lots of things to do with it and wow, I am so excited about creating again. I was, quite honestly, getting bored with what ever I was creating. . .it was beginning to feel like I was doing the same things over and over but just with a different image and layouts.

I am having so much fun with my Cricut . . .I've been mixing stamping with cut files and wow, it has open the doors to a wide range of creations. The feeling reminds me of when I first discovered rubber stamping. I was gaga over them and couldn't wait to get my hands on more stamps and learn new techniques. Well, that's how I feel with my Cricut. ..I want to get better at it, learn more things, and experiment with different projects!! Ahhhh, good times are ahead. . .I love it!!

Lately I've been attracted to more clean line cards with less stuff going on. Cards with less layers and over embellishments. The benefit I found with this style of cards is that you can easily create a lot of cards at the same amount of time that it takes to create one busy card.

I've loving the idea of creating multiple sets of cards and gift sets so less is more to some degree. What style of cards attract you the most? Just curious what type of cards people like. . .let me know.

Anyway. . .I'm motivated to work on a few more projects. Stop by myscrapchick.com and check out all the awesome cutting files they have. For those who don't have a cutter like a Cricut, myscrapchick.com also provides hand-cut templates in pdf form so you can still create scrappy projects without owning a cutter.

Well, I hope you all have a wonderful Monday!! See ya' all later!

Card Details:

Paper: K&CO designer paper, SU Close to Cocoa (I think)
Ink: Tim Holtz distressing ink
Accessories: myscrapchick.com Happy Tree Forest, Cricut, Satin Ribbon, SU Large Oval Punch


Sunday, April 25, 2010

My Scrap Chick Happy Tree Forest Scrapbook Layout

Happy Glorious Sunday Friends!! Well a miracle has occurred! I created a second layout within a week. LOL! It took 4 months to create one layout and wow, within 2 days I created the second one. Too funny. I'm determined to get some layouts done. It actually was easy to create this layout because I used the myscrapchick.com file "Happy Tree Forest". All of the images except the bird including the scallop shape was created using this one file. Stop by myscrapchick.com and check out all the AWESOME cutting files available. I'm seriously gaga over them. Also, be sure to sign up for the newsletter and receive a free file each week. Myscrapchick.com also has a fan page. . .if you're on FB, come join . . there's free files available for fans there too. Click Here

I used the scallop tree shape to create the cloud scallop shape. The tree shapes are actually quite versatile. You can create flowers and shapes for your card. I'll see if I can find the time to make something else with the shapes this week.

A little story behind this photo. When my daughter was little we lived in an extension of my aunt's home after my divorce and subsequent untimely death of my ex-husband (my daughter's father). It was just me and Alexis at that time but I've been blessed to have subsequently met my current husband a few years later. At that time, I was renting a small studio at my aunt's home and we had a really tiny bathroom with a shower. It didn't have a bath tub but I so badly wanted my daughter to experience everything that most kids were able to experience such as a bubble bath. How strange that a bubble bath would place any importance but it did.

Anyway. . .I would plug up the drain so that I could fill the shower area with water and my daughter would sort of crouch low so she could have a bubble bath experience. LOL! I mean, you can only fill up a shower to about a foot high so you can imagine how much bubble bath formula I had to put to have my daughter feel like she was surrounded by bubbles.

Today. . .well, life is so much better (convenience wise). . .but back then, despite what little we had, my daughter and I were very happy. Honestly, it's not what you have that makes life good, it's making what you have into something good. I really believe in that. Anyway. . .that's my story for the day.


Here is a close up of the tree cuts using the myscrapchick.com "Happy Tree Forest" file. I really had fun making this layout! I think I'm motivated to make another layout! LOL!

LO Details:

Paper: DCWV and K&Co designer paper, SU Close to Cocoa card stock
Ink: Tim Holtz distressing ink
Accessories: Myscrapchick.com Happy Tree Forest File, Cricut, buttons, Pressed Petals metal sentiment


OMG! I just had to share this. I saw it on Facebook and it made me laugh so hard.. . check it out. .it's hilarious!


Hope you all have a blessed and glorious Sunday!!

Saturday, April 24, 2010

Scrap Pile Saturday Challenge #9 - Sketch and Use it Up Challenge

Hello Friends! Hey it's Saturday and that means it's Scrap Pile Saturday challenge time again!!! Yay! I was debating on what challenge would be a good challenge this week . . .do you like sketches? A sketch is an easy challenge and adding an extra component would be fun, huh? The goal is to use up your stuff so the easier the challenge, the better, right?

Before I discuss the challenge, I want to give a shout out to last week players!! Their "orange something" cards are fantastic!! Thank you for playing along ladies!!

Joan of Scrapmum
Linda of Linanna Designs
Kym of Kym's Crafty Cards
Gina Marie of ScrapCrazyLady
Sue of Suen on SCS
Margie of Oh Bumble is Me
Sheryl of Sheryl's Crafting Corner
Tina of Mommy Scraps Alot
Michelle of Creative Treasures
Tracey of My Creative Place


Now to this week's challenge

Sketch Challenge and Use it Up. Follow the sketch below and use up an already opened package of embellishments. I have a bad habit of opening up packages of embellishments, use up a few, then leave 1 or several embellishments and open a new package. I end up with a bunch of opened packages. This week's challenge is to use up any left over embellishments of at least one package that you've opened up. You may create several cards or put all of them on one card. It's up to you. Simple enough, huh?

Okay, here are the rules:

1. Other than your card/project base, the face of your card MUST be created using ONLY designer paper and card stock from your scrap pile. Do not cut up any new card stock or designer paper. This rule also applies to 3D projects such boxes, bags, etc.

2. Embellishments added to your card MUST be from "opened" packages. Do not open up a new package or roll of ribbon, brads, buttons, etc.


With my cards. . .I had two chipboard flowers left from a scrapbook kit I've opened up. I actually had 3 left but in the process of making these two cards, I misplaced the third chipboard. I was going to make 3 cards but I can't find the 3rd chipboard flower. It's somewhere. . .maybe on the floor. LOL! I wasn't in the mood to search for it so I only created 2 cards.

One of my problems is that I'm very frugal when it comes to adding "bought" embellishments. They're so expensive so I would rather spend 30 minutes creating my own embellishments rather than putting $5 worth of embellishments on one card! LOL! Maybe I should change my way of thinking and I can actually use up all my scraps!

Anyway. . nothing much to my card but following the sketch.

Okay, here is the sketch for you to follow:


Photo of the Day

I wanted to share a photo of my daughter and the pretty flowers and balloons that her aunt sent to her on her birthday. She was so surprised and delighted. She said "oh, wow. . .this is the first time I received flowers on my birthday!" It was so sweet that her aunt sent her the beautiful flowers. .. flowers are expensive and she had them delivered. My daughter had a wonderful birthday. . .can you believe she's 19 already! It's unbelievable how time flies. If you scroll down to my previous post, I created a layout of her using a photo of her when she was 5 years old. I sometimes wish I could start all over again and experience her childhood all over again. I had a blast raising such a wonderful child!

Hope you all have a beautiful Saturday!!


Friday, April 23, 2010

My Very First Scrapbook Layout This Year and Beauty Word SCUT File! Yay!

Hello Friends! This is my second post of the day. . .be sure to scroll down to check out the card I made for this week's CSAYL challenge. Okay. . .this is my very first scrapbook layout this year. It's hilarious because my New Year's resolution was to create a LO once a week. Ummmm. . .it's April and well, I guess I failed in fulfilling that resolution.

Honestly. . .scrapbooking is not my forte' but I have to start somewhee. I can't keep putting it off. I just applied a few cardmaking techniques to my layout. I don't know. . .I'm just a bit intimidated by the huge piece of paper! LOL! I'm accustomed to a small card layout so I sometimes don't know how to fill up a 12 x 12" LO. There's so much space. KWIM??

My daughter is 19 years old and I still need to scrap her baby photos! Ugggh! So sad. Well this is a photo of her at age 5. Boy, I have a lot of catching up to do. Way back when, there was no such thing as digital cameras and this photo was taken on a regular 35mm. I wish I had a digital camera back then. . .I would have taken more photos.

The designer paper is by DCWV called Maricopa. . .the paper is glittery and metallic. It's a very pretty paper stack.


I created the word cut "beauty" using my SCAL program so it's an SCUT not an SVG file. I used the font "Garamond Premr Pro" in the case you're wondering.


Click on the image to download the SCUT file for SCAL2

To create this butterfly, I used the myscrapchick.com "layered butterfly" file. It's only a $1 . . .it's so economical but such a pretty butterfly cut!! I used Scribbles Iridescent Paint to create the dots and added dew drops to the center of the butterfly.

I don't know when I'm going to create another layout. . .maybe in 4 months? LOL! Hopefully sooner. Maybe I'll really get into it one day. . .:)

LO Details:

Paper: DCWV designer paper and cardstock, K&CO designer Paper
Ink: Scribbles Iridescent Paint
Accessories: Dew Drops, myscrapchick.com Layered Butterfly file, SCAL, Cricut, SCUT


Hope you all have a wonderful Friday and weekend!!

Thursday, April 22, 2010

Christmas Stampin All Year Long Challenge # 48

Hello Friends! It's Friday and that means it is Christmas Stampin All Year Long Challenge time again! This week we have a fabulous sketch created by Jeanne of Inky Paws. Not to mention a great guest designer Fabiola of Mon P'tit Monde. Each week a guest designer is chosen from the participants so stop by and play along and check out the awesome cards created by the design team!! I'm sure you'll be inspired to create your Christmas cards early!!


I decided to create a shaker card following the sketch. I haven't created a shaker card for a while now so this was a great opportunity to do so. I used my Pink Cat Studio image and colored it with my Copic Markers. I added a bit of beads and snowflake confetti to create the shaker part off the card. Other than that, all I did was follow the sketch.

I'm a little annoyed because I accidentally smudged glue to the front panel of the card. I already created the shaker part of the card so I didn't want to start over. Don't you just hate when that happens!!! I guess I could have covered it up with an embellishments but only noticed it when I took a photo of the card. Oh well!


Anyway. . .hope you play along this week. We'd love to have more participants play along.

Card Details:

Stamps: Pink Cat Studio
Paper: SU Chocolate Chip, Pretty in Pink, Real Red
Ink: Copic Markers

Accessories: Nestabilities, beads, confetti, Basic Grey Ribbon, Dew Drops, SU Word Window Punch

Hope y'all have a beautiful Friday!

Pink Cat Studio Digi Release and Purse Mini Album SCUT, SVG and Hand Cut Template


Hello Friends! It's Thursday and it's the release of Pink Cat Studio digital images!! Fun, fun, fun! This week focuses on purses! Our girls are ready to shop! LOL! Aren't they super cute or what? These images are perfect for creating purse projects and cards for your girlfriends! Be sure to stop by the Pink Cat Studio blog and check out the awesome cards and projects created by the design team!!

I decided to work on a purse template and with this first project rather than creating a card, I decided to create a mini album. My album has 4 pages. Scroll down for the SCUT and SVG files and hand cut template.


Project Details:

Stamps: PCS digi image
Paper: DCWV Designer paper, CTMH card stock
Ink: Copic Markers
Accessories: Lace, Making Memories Ric Rac, Nestabilities, Darice Rhinestone, organdy ribbon, Cricut, SCAL2


Quickie Instruction on the Mini Purse Album

***I'll post the picture tutorial some time today. I didn't have the time to finish it.

  • If you're using the SVG file, when uploading to your SCAL program, scale the image to a height of 11.25" and keep the proportion. . .the width should adjust accordingly. The SCUT is already scaled and ready to cut.
  • Follow the hand cut template for the score line.
  • To create the pages, reduce the height to "10.75" and cut the file 4 times
  • Score the pages. . .again following the hand cut template score lines
  • Adhere the two large panels of each cut together. Repeat the step for 2 more cuts
  • Stack each page on top of one another and adhere all the pages together by adhering the small flaps together. Adhere Only the small flaps.
  • Punch two holes at the top and thread a ribbon to each hole and tape the ends of the ribbon to the inside of the back panel.
  • Fold the small flap over and adhere to the back panel of the purse album
  • With the last cut, cut off one large panel and adhere to the inside of the back panel.


Click on the image to download SCUT file
or
Click here to download the SVG File


Hand cut Template

For those using the hand cut the template, using your photo editor program, increase the file to the desired height before printing. I recommend extending the file as large as you are able to print on an 8.5 x 11" paper.


With this second project, I created the purse using the Cricut "Wild Card" cartridge. I REALLY love this cartridge. There's so many possibilities in creating lots of different card projects. I can't wait to work on more projects using this cartridge.

I colored the image using my Copic Markers for both projects.


Card/Project Details:

Stamps: PCS digi image
Paper: K&Co Designer paper, CTMH card stock, SU Creamy Caramel
Ink: Copic markers, Pebbles Inc. pastels
Accessories: Nestabilities, trimmings, Grosgrain stitch ribbon, prima flowers, Accents daisy brad


Photo of the Day


Hey. . .I wanted to share a photo of my cat. Yesterday as I was heading downstairs I spotted my cat Dori hanging out at the corner of the hallway! She found a spot where the sun shines through the window. . .I guess she was cold. When I saw her laying there in that funny position I just had to run and get my camera and take a picture of her.

Hmmm. . .she sort of reminded me of myself right now. My cat is a bit overweight and I think she likes to lay this way because of her fat tummy. It reminded me that I need to get back and start working out again. I've been slacking for the past month. Just wanted to share. . .I thought it was such a cute pose.

Related Posts Plugin for WordPress, Blogger...
 
Share |