Tuesday, March 27, 2007

My adventure in Virginia

Well we got to Virginia at 8:30 last night and didn't get to our hotel until 10:00. Dulles Airport is the weirdest airport I've ever been to. The baggage claim is way on the other side of the arrival section. We had to hop on to this strange looking shuttle and travel to the other side of the airport. Obviously, if we had to travel a distance to the baggage area, our bags did too. The wait for our baggage was terrible. We had to wait close to an hour.

Virginia is very pretty and suprisingly warmer than California. The cherry blossoms are partially in bloom and there's a lot of them in the area. The kids and I headed out to the mall this morning. . .the Dulles Town Center. We got to the mall at 11:00 and it was EMPTY. I saw less than 50 shoppers. I thought the mall was closed but nope, it was open. I asked the clerk at one of the stores if the mall is always this empty and she said people in Virginia don't hang out at malls - it's not "cool" to do so. I thought that was funny.

In California, even on a weekday, the malls are packed with people. The mall in our town and the San Diego area is always crowded with people. . .it's like shopping is the favorite past-time for Californians. I absolutely LOVED the emptiness of the mall here in Virginia. Parking was a breeze and there were no lines at the check-out counter. The Dulles Town Center was very clean and HUGE - lots of stores to shop at and at times we were the only ones in the stores. I LOVED it!

We're heading to Washington D.C. on Thursday. It's actually about 35 minutes from where we're staying in Virginia but my husband don't want me to drive on my own to D.C with the kids. We accompanied him on his business trip this time around so he is working right now. Compared to California, traffic is much less busy and drivers are less "pushy". In California, when I drive 75 mph on the highway, people are tailing me which I find quite annoying. It makes me nervous when I'm forced to drive faster and I'm already above the speed limit.

I'm originally from Hawaii and the speed limit on the highway is 55 mph and drivers are very friendly and courteous. When I first moved to California, it stressed me out to drive on the freeeway and the busy highways because I always drove the speed limit and I felt harrassed to drive faster. After being in California for little over a year, I no longer care. . .I drive the speed limit and don't care if someone is tailing me. . .if they can't stand it, they can always drive in the other lane. Ha!

P.S. I'll take pictures tomorrow. . .I forgot to bring my camera with me today.

Until later. . .

Guest Stamper - Jan - Accordion File


Check out Jan's version of the accordion file! It's a larger size using larger envelopes! I love it and it's inspired me to make larger versions of this project. I have tons of unused envelopes lying around.
Isn't Jan's accordion file beautifull! I'm so impressed with the talent of all these ladies that sent me their version of the accordion file.
Thank you Jan for sharing your beautiful work!

Sunday, March 25, 2007

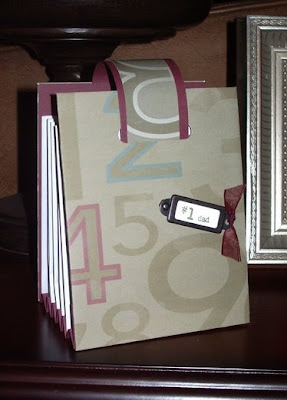
Guest Stamper - Ellen - Maculine Version of Accordion File

Look at what Ellen created! She created the accordion file with a masculine touch. I absolutely love it. I love the designer paper she used and the colors are wonderful. I never thought to make one for my husband but Ellen inspired me to make one for him.. He keeps every receipt he has. He is very anal in that sense. I think it would help to organize the important receipts he keeps. Right now he just piles all of them in a plastic organizer with no organization or order. When I get back from my trip, I'll make several of them and stack them inside that plastic organizer in a row and put them in categories. Because the accordion file is so easy to create, it won't be a problem to create a few of them.

Below is another of Ellen's creations! Isn't it cool? I love it. It would be a great organizer to give to someone. Ellen said it was also made with envelopes and it's an accordion style project too. There's so many cool stuff that can be created with envelopes. I was thinking up of another one. . .when I get back from my trip, I'll see if I can put it together. I keep a sketch book beside my bed and when I think of something to create, which happens to be right before I fall asleep. . .when I wake up in the morning and it's still fresh in my mind, I draw it out. I have a bunch that I haven't created but at least I have them drawn and written out in my sketch book for future reference.

Thank you Ellen for your beautiful creations. I'm honored that you shared them with me. There are so many creative stampers out there! It's wonderful!

Daily Special - Technique Day - Vellum - Easter Cards


Today's Daily Special is Technique Day. Just a simple technique using Vellum. The important thing about vellum is that whatever coloring you do should be done in the back of the vellum rather than in the front. When coloring with vellum I advise not using watercolor because it warps the vellum when it dries.


Here is a simple tutorial I did for my "Card Inspired" blog site a few days ago.

Click Here for the Tutorial.


I'm just wondering for those who do read my blogs. . .is my sketches helpful? I do sketches for all the cards I make and post on to both my blog site but if it's not really useful then I'll do sketches periodically rather than for every post. All of the sketches I post are my own unless stated. Of all the sketches I've posted, I used a sketch from another source only once but the rest is my own. Let me know if you'd like me to continue the sketches.


I'm heading to Washington D.C. tomorrow and will not be posting any card creations or projects for about a week. I'll post my pictures of my adventure. . .I'm not really excited yet. I'm not sure why. I always feel a little nervous going on trips. I worry about our house and our pets. Our pets are going to be boarding at a pet hotel but I feel bad that they'll be there. Pets don't know why they're there and I know they wonder what happened to their family. I'm sure they'll feel as if they are being abandoned. For this reason, trips stress me out a little.


I'm excited for my kids because they'll be able to say that they've been to the White House, Capitol, see the Lincoln Memorial, etc. I want my kids to look back at their lives and say that they've experienced a lot of memorable adventures. The two future trips we're planning is an Alaskan Cruise, maybe this summer and when my son graduates from high school next year, we're planning a European trip. We're planning a 1 month trip across Europe. When my daughter graduates, we'll probably head to Australia or Asia. I wish we could do a Middle Eastern trip and visit Egypt and the Pyramids, Taj Mahal, etc. . .but I know that'll never happen in my life time. My aunt visited Egypt, Jordan, and such. . .about 2 years before 9/11 and she got to see the Pyramids. She is so lucky.


When I was young, I had the opportunity to visit China, Korea, Taiwan, Japan, and the Philippines. Unfortunately, I was too young to remember everything. We went on two separate trips when I was 7 and 10 years old. Because my kids are teenager, they will be able to appreciate their trips and remember them a lot better than I did. I do remember Hong Kong and wow, despite being young, I really loved visiting that country.


I made these cards for a special order for a customer who buys cards from me. I made more of them and if I have the time, I'll post them before I leave tomorrow. I won't post the card details because in 15 minutes, we're heading to the kennel to drop off our pets.


Scroll down for more card creations and sketches.


Saturday, March 24, 2007

Guest Stamper - Nettie - Accordion File

Wow, check out Nettie's version of the accordion file. I absolutely love it! So spring like and the papers she used are wonderful. Beautiful creation I must say! I'm so glad my tutorial was easy to follow and other stampers are trying it out!

I love how Nettie used scrapbook paper for the labels! I have to definitely try that. She also used scrapbook paper to line the inside! Fabulous idea. Her creation makes me want to make more of these accordion files.

Thank you Nettie for sharing your work! You did a beautfiul job!


Until later. . .

Random Cards - Best Bar Codes

Why is it that all the good movies have lousy, depressing endings? I just watched "the Departed" and I'm not happy with the ending at all. It didn't have to end the way it did. Annoying. I won't spoil it for any of you who haven't watched the movie but in my opinion, the ending bums me out. Anybody watched "House of Sand and Fog"? Another excellent film. . .again, lousy, depressing ending. I mean, I REALLY felt bad afterwards. I felt the same way with Mystic River, the English Patient, Requiem for a Dream, even Brokeback Mountain. All of them were excellent films but it seems the writers and directors have to end the films with the audience walking out of the theatre needing a drink. Did "Crash" have a happy ending? I can't remember.

I believe the film makers, theatres, and the bars are in cahoots with one another. You walk out the theatre feeling bummed out because the endings are always shocking and not at all what you expected, you then feel the need to drink and discuss the movie so you head to the bar and have a long discussion or debate over the ending and possibly get drunk in the process. That's how it works.

Remember the movie "Jacobs Ladder". . .that movie disturbed me for years. Several years later, I watched the movie again. . .it still shocked me although I already knew what the ending implied. It's a matter of interpretation but I believe the movie was about Jacob's need to come to terms with his own impending death. . .oops, did I spill the bean? If you haven't seen this movie. . .it's worth watching in my opinion.

I guess these film makers are very smart. . . they've come to the realization that, psychologically, no one talks about happy memories, just sad, depressing ones and if there's a happy ending, well what's to discuss, right? The same applies with movies. I bet you now want to watch "the Departed" because you're now dying to know what happened. . . .. .see, that's how it works. If it had a happy ending. . .well, I wouldn't be writing about it.

Anyway, I made a few random cards. . .like the lousy endings of the movies. . .I think the color combos are lousy. I wanted to create cards with color combos that I haven't used together so these are what I came up with and I'm not really liking them. That's just my opinion. I do like the layout. . .maybe, I 'll redo the 1st card with different colors and see how it turns out.

Card #1 Detail:
Stamp set: Best Bar Codes, Island Blossoms, Sincere Salutations
Paper: Apricot Appeal, Green Galore, Cameo Coral
Ink: Cameo Coral, Green Galore
Accessories: Clear Embossing Powder, Making Memories Ribbon, Card Connection metal charm, Small yellow brads, Ticket Corner Punch
Technique: Embossing


Card #2 Detail:

Stamp Set: Best Bar Code
Paper: More Mustard, Green Galore, Brocade Blue, DCWV Scrapbook Paper
Ink: Brocade Blue, Ballet Blue Craft Ink, Versamark
Accessories: Clear Embossing Powder, Word Window Punch, 1 inch circle punch, scalloped scissors, Large and small circle brad, Making Memories Ribbon


Until later. . .

Friday, March 23, 2007

Daily Special - Retired Stamp Set Revival - Easter

Okay, I'm reviving two cute Easter stamp sets. The first one is "Bunny Buddies". Gosh, this is an old set. I think it retired a long time ago. This set is great to color with Colored Pencils with Gamsol because of the detailed image. The sentiment "Easter Greetings" is not a Stampin Up stamp. I couldn't find a Easter sentiment that fit into my design so I had to use another brand. Oh, well. . .sometimes, you gotta do what you gotta do.

Card #1 Detail:

Stamp Set: Bunny Buddies, Sentiment by Hero Arts
Paper: Ballet Blue, Green Galore, DCWV Scrapbook Paper
Ink: Prismacolor Pencils with Gamsol, Ballet Blue
Accessories: Making Memories ribbon, JoAnn Essentials tile sticker


This second card was created using the "Springtime Smiles" stamp set which I believe was retired in 2005. This is an awesome Easter stamp set. I'm not sure why it retired so quickly. This is another stamp set that's great to color in with colored pencils. The little chicks were stamped in a row, colored with yellow markers, cut out, then mounted over the bunny image using foam tape. You can't really see it in the picture, but the chicks have a 3D appearance. Unfortunately, I sort of covered the Easter basket image. Oh, well.


Card #2 Detail:

Stamp Set: Springtime Smiles
Paper: Pink Passion, Green Galore, DCWV Scrapbook Paper
Ink: Pink Passion, Prismacolor Pencils with Gamsol, Yellow Markers
Accesories: Dashes, Dots, & Checks ribbon, Organdy Ribbon, Silver metallic cord, JoAnn Scrap metal charm, Fiskar Scallop Template


Until later . . .

Thursday, March 22, 2007

Guest Stamper Cindy - Accordion File


Wow, look what Cindy made using my tutorial. I must say she did a fabulous job! I'm really glad she tried the tutorial out.

Sometimes what may seem simple to me because I'm creating the project may be difficult for someone else to follow but I'm glad that based on her sample, it looks like she was able to follow the tutorial as I instructed.

Thank you Cindy for sending me a picture of your sample and for your very sweet comment on my post!

Wednesday, March 21, 2007

Daily Special - Anything But Cards - Tutorial Accordion File/Crop File


Click Here for the Tutorial

As promised, I did a tutorial on this accordion file. It's really simple to create. I decorated this particular one more than the ones I created last night shown in my previous post.

It actually fine with just the scrapbook paper and decorating it further is actually optional. If you adjust the size but stick with the basic concept, you can also use any size envelope and create different size accordion files.

It's really simple to create and I really had fun making them. I added tabs to the pockets on this accordion file. See the picture below.

I used "Island Blossoms" as the stamp set to create the design and DCWV scrapbook paper. If you don't have larger sized chipboards, you may use cardboard, posterboard, or even cut up a cereal box. All you need is two pieces of sturdy material for the front and back of the accordion file.

I'm planning to use the accordion file to store pre-stamped images. I'll label the front with the stamp set name and whenever I need to pull an image or sentiment, I'll have them readily available.

Try out the tutorial and tell me what you think. Was it easy to create or do you know of another accordion filel that you found easier to create? Just curious. I thought this was an easy project mainly because the pockets were already created using the envelopes and all there was needed to be done is to assemble the pockets together.

Let me know if you liked this project and if you did attempt to make it, was my tutorial easy to follow. Your opinion counts! It really does! Hope y'all have a great day. . .I need to bring my dogs to the vet and pick up my kids from school. If I have the time today, I'll do another project!


Until later. . .

Daily Special - Anything But Cards - Accordian File or Crop File

I am so excited about these Accordion File or Crop File . . .or whatever you want to call it. It's so simple to make them and no template required.

I came up with this idea. . .who knows maybe someone else already came up with it but this evening, I was thinking of ways I could use my #10 envelopes (9.5 x 4) - yah, know the regular mailing envelopes and I thought, why not an accordion file or crop file. I also have a ton of scrapbook paper that I really need to use so I can buy more of them. Haha! No, really. I have so many of them, it's not funny.

I also wanted to use up all the small pieces of cardstock that were piling up so I began stamping sentiments on to these miscellaneous cardstock pieces but realized I didn't have a crop file available to store them. The ones at the stores are too expensive and call me cheap, but I hate spending money on something I know I could probably make myself.

Anyway, that's when I thought of making these accordion files or pockets. I had bought a stack of 8 x 11 inch fairly thin chipboard from Ebay (more like cardboard than chipboard but it don't matter) for the purpose of someday making something with them and the day has finally come!!

The size of the face of the accordion file is 4.25 x 5.5 inch. Materials for this project requires only two 4.25 x 5.5 inch chipboard (cardboard, posterboard, cereal box), one 12 x 12 scrapbook paper, two 8.5 x 11 inch cardstock, glue, scorer, word window punch and three sealed #10 envelopes cut in half to make 6 pockets. That's it. Imagine. . .at retail an accordion file cost at least $4.00 and up. The cost of this project is at the most $1.50 or less (if you use a cereal box, it'll definitely cost less than a dollar). Furthermore, it'll take you less than an hour to make. If you get good at it, maybe 1/2 an hour. I promise.

I'll do a tutorial tomorrow! It's really late and I need to go to bed.

Until later. . .

Monday, March 19, 2007

Jared Leto - 30 Seconds To Mars

I have a crush on Jared Leto. Ha! My husband thinks I'm weird. I don't care. . .it's not like I have a crush on a young kid, Jared is only a few years younger than I am so it's not like it's strange or anything like that.

Do you remember him? For Generation X'ers, he was Jordan Catilano on "My So Called Life". Well, years later, he re-emerged as a singer with his band 30 Seconds to Mars. He has a beautiful voice and I totally have a crush on him. Yeah, I'm hilarious. I just think he has a great singing voice and it doesn't hurt that he's cute. My kids love the fact that I listen to the same music as they do.

Here is a picture of him with his band 30 Seconds to Mars.

I love alternate music and indie films. . .so Jared Leto is perfect. He made a few idie type films such "Requiem for a Dream, Fight club and a few block buster movies such as Alexander, Panic Room, Lord of Wars, American Psycho, etc. . .

Anyway, just a little bit about me.

Random Card - What? Did I Hear You Say "Ugly"?

What? Did I just hear you say "it's ugly"? Yeah, I agree. It's an ugly card. I'm not sure what sort of design I was attempting but it was not working. I had a totally different idea initially but then my original design just didn't work and it still didn't no matter what I did. So what did I do? I pulled out the mustard colored garden looking thing. The picture below is what I ended up with. I'm still not liking it but I think it looks better. What do you think? I've been mistaken before. . .sometimes I've made cards that I totally hated and someone actually told me they loved the card. I'm like "huh?" Okay, whatever.

Honestly, I don't like the "Love Matters" set. I bought it because I liked the sentiments and there were a whole bunch of them. I don't like the primary images. Those who bought this set, do you like this set?


Card Detail:

Stamp set: Love Matters, Best Bar Codes
Paper: Pink Passion, More Mustard, DCWV Scrapbook Paper
Ink: Markers, Pink Passion
Accessories: Dots, Checks, & Stripes ribbon

I think this sketch challenge is a nice sketch if I use different stamps. I think I'll try it again and see if I can make something better with this sketch.


Until later. . .

Random Card - 30 Minute Card

I finally woke up with a clear head. No more stuffy head, no more headaches!! I still have a productive cough but other than that, I feel like I'm back to normal. Oh, I feel so free and so ready to return to making cards and stuff!


I'm so proud of myself. I actually made this card within half an hour. Typically, it takes me an hour to make a card. . .not because I do anything complicated, it's just I can't focus on what I'm doing. I usually stop at least 3 times in the middle of making a card and do something else. Before I know it, the card is sitting on my desk incomplete and at the end of the day, I've made only one card.


Well I've been a good girl and stuck to making the card from start to finish without getting off my chair and doing something else.


Using a double slot rectangle punch, I created a series of punches along the edge of scrapbook paper and thread a ribbon through the slots. I then layered the scrapbook paper on to a pale plum cardstock and using Fiskar scallop template, I created the scalloped edge. Using a lavender gel pen, I added dots to the edge to match my ribbon.


The stamped image is actually one stamp image. I stamped the image twice, one using pale plum ink and stamped another one using really rust. I cut the bottom sentiment inked with really rust and remounted it using dimensionals on to the image stamped with pale plum. I did this to give the image a contrasting color blend rather than just one flat color and to also give it a 3D appearance.


Card detail:

Stamp set: Best Bar Codes
Paper: Close to Cocoa, Pale Plum, Orchid Opulence, DCWV Scrapbook Paper
Ink: Pale Plum, Really Rust, Sakura "Souffle" 3D Gel Pen
Accessories: Dashes, Dots & Checks ribbon, Fiskar Scallop Template, McGill Double Rectangle Punch


Until later. . .

Saturday, March 17, 2007

Winner of the Blog Candy


Congratulations to the winner of my blog candy. I sent an email to the winner who happen to subscribe to both of my blog sites so I'll be sending a few extra goodies. Please check you email to see if you are the winner.

Here is a partial email address of the winner - "coombdav".

Obviously, the whole address is not shown but just in the case the person didn't read their email but came to visit my site. . .

Thank you for your participation and for subscribing to my blog sites! I really do appreciate it. There was a total of 217 participants in this blog candy, either subscribing to one of my blog sites or both! Wow, this was really fun.

Here are pictures of my daughter pulling the email address of the winner.
I hope y'all have a wonderful weekend and again, thank you for being such wonderful readers!

I'll Announce the Winner Today

I'm sorry I didn't announce the winner for the Blog Candy yesterday as promised. I had a bad day yesterday from this cold I have. I'll have my daughter pull the winner out of a hat and I'll take pictures of the process. I will then send the winner an email to let the person know they won. I will post an announcement on my blog that I sent the winner an email.

My daughter is still sleeping so when she gets up, we'll pull the the winner.

ATC Swap

Hi Everyone. . .well, I've been sort of MIA for the past few days. I still have this nasty cold that I've had for the past week. This is the 2nd cold I've had for the past month. Basically, I've had a a cold for the whole month. With the first cold, I was symptom free for a few days, then ended up with a secondary upper respiratory infection and it started all over again. Quite honestly, I'm very tired of it at this point.


In moments when my head wasn't stuffed up I was able to sneak in a few projects. I participated in an ATC swap and sick or not, I had to finish them and get them out in the mail today.


I hope the ladies who receive this ATC will like it. I sort of duplicated a card a made a few days ago and scaled it down to fit an ATC size.


I rubber stamped the images with Versamark and heat embossed them with gold embossing powder. I colored the flower with Cool Caribbean and Lumiere and shaded it with more mustard. I aded additional dots using gel pen. I framed the edge with gold leaf pen and topped it off with organdy ribbon, gold brad, and label using the round label punch. I had to make ten of them. Below is a picture of the 10 ATCs all ready to go. . .

ATC Detail:

Stamp set: Doodle This, Everyday Flexible Phrases
Paper: Chocolate Chip, More Mustard, Cool Caribbean
Ink: Cool Caribbean Classic Refill with Lumiere, More Mustard, Gel Pen, Versamark, Gold Leaf Pen
Accessories: Gold Embossing Powder, Gold brad, Organdy Ribbon, Round Label Punch,


Tuesday, March 13, 2007

Random Cards - Liquid Applique - Like it a Latte


Have you ever wondered how rubber stampers create those fluffy snow and fluffy features on their cards? As you can see with the cards I created, the whip cream is fluffy. It's a great enhancement for cake frosting, snow, and whip cream. It's a product made by Marvy and it's called Liquid Applique. This product is used for embroidery and 3D effects on fabric and paper.

Unfortunately, it comes in this little pen like container. I never investigated whether it came in a larger size. I know it comes in various colors besides white but the colors I've seen were too neon looking so I didn't buy them. I wonder if I can mix dye ink to it and see if it'll work. Well, I'll try it out one day and see what happens.

To create the fluffy look. . .you would apply the applique and heat emboss it until it fluffs up. You can't see it in the picture but before I heat embossed it, I added glitter so it has a sparkly appearance to it.

The tab where the ribbon is located was created using the "slit" punch and I just flipped it over and attached a brad. I looped a ribbon on the other end and taped the ends to the back of the cardstock then mounted it on to a mat.

Card 1 Details:

Stamp set: Like it a Latte, Doodle This
Paper: Bordering Blue, Cameo Coral, DCWV scrapbook paper
Ink: Cameo Coral, Bordering Blue, Close to Cocoa
Accessories: American Craft Element ribbon, slit punch, brad, small tag punch, Fiskar scallop template, clear glitter, Marvy Liquid Applique


Honestly, with this card I don't like what I did with the ribbons but oh, well. I wasn't in the mood to change it. This is the first time I've used this stamp set. I'm actually quite behind on the trend. This stamp set is well, I guess you can say "old news".

As I've said in the past, I tend to not mount my stamps right away when I receive them and they sort of sit around until I can get to them. Well, this is what happened with this stamp set. Initially, I didn't really want to buy it but I did anyway. Now that I've used it, I actually "like it a latte".

Card Detail #2:

Stamp set: Like it a Latte
Paper: Pretty in Pink, Cool Caribbean, Creamy Caramel, Close to Cocoa, DCWV Scrapbook Paper
Ink: Close to Cocoa, Cool Caribbean, Vanilla Craft Ink
Accessories: Dots, Checks, Stripes ribbon, Large circle brads, white embossing powder, Marvy Liquid Applique, Clear Glitter
Until later. . .

Monday, March 12, 2007

What I Like To Do In The Early Evening

During the early evening I like to sit out on our patio and look at our waterfall located in our backyard. It's really pretty at night. Can you believe that I'm the only one in my family that sit out in our backyard and admire the beauty of the waterfall. I'm not sure what's wrong with the rest of my family. What's the point of having a waterfall if you don't take the time to even sit out in the backyard. I wish they would sit with me outside and just listen to the water flow.

My husband is away on a business trip. He'll be gone for a week. Whaa! Whaa! Whaa! Naaw, it's not that bad. Although I miss him, I'm accustomed to him being on business trips. After awhile, it's just a part of life. Without the great job he has, well. . .we wouldn't have this pretty waterfall to look at. . .not to mention all the rubber stamping goodies I have (I can't forget that) . . . so well. . . I can't complain.

Anyway, I'll post a card sometime tonight. In the meantime, I just wanted you to see what I do during the early evenings. . . well, besides rubber stamping *wink*. Yes, I do step out of my stamp room once in a while.

Until later. . .

Daily Special - Technique Day - Creating a Bow

One of my readers emailed me asking how I create my bows. Considering the simplicity of a bow, how many ways can you create one. Well surprisingly, there's many way to create one.

Click Here on the tutorial on the different ways to create a bow on your card.

The current tutorial shows 4 different ways but there are actually more. I'll update the tutorial with more techniques when I have the time.

Until later. . .

Blog Candy at Continuing to Create

I hope I'm not too late by Leslie has a blog candy too. Check out her blog site Continuing to Create. Drawing is today!

Sunday, March 11, 2007

Update - Feedbitz Is Now Working

Looks like Feedbitz had a few problems accepting subscriptions yesterday. It appears Feedbitz is now working. If you attempted to subscribe yesterday and could not, just letting you know, that if you want to subscribe to my blog you are now able to.

Thank you!!

Saturday, March 10, 2007

Daily Special - Paperbag Projects - Paperbag Pocket Card


I made this pocket card last night using a regular brown paper bag. If I have the time today I'll do a tutorial on this card. It opens up like a card but there's a pocket (the opening of the paperbag) that you can insert a note or whatever you want to add. It's similar to the paperbag scrapbook album that I posted a few days ago but instead of multiple pages, it has only 1 page and 1 pocket. The paperbag folds into a 5 1/4 x 5 1/2 card and fits into a 5 1/2 x 5 1/2 square envelope.


The layout of the front of the card was created the way it is because I messed up the background and had to find a way to cover it up. When I stamped the background with the Canvas background stamp, the stamp was too small to stamp the whole front so I had to re-stamp the area that it could not cover. Unfortunately, this left a line across the top. I first attempted to cover it with a ribbon, but it was up at the top and the placement looked strange.


To fix the problem without having to think too hard, I just covered it with a scrapbook paper.


I hate wasting my materials and rarely ever throw awanything away even when I make a mistake. I'll try to find a way to fix it first before scratching the project. Materials are expensive and I can't see myself throwing a good piece of cardstock or whatever. I keep every little piece of scrap and use them for punches, sentiments, borders, or faux ribbon.

Scroll below for the rest of the card design.


I used the same concept as my "Cocoa Pocket Card" to create this pull out message. Scroll below to click on the link for the tutorial.


Card detail:
Stamp sets: Unfrogettable, Frolicking Frogs, Canvas
Paper: Ballet Blue, Whisper White, Positively Pink, DCWV scrapbook paper
Ink: Stazon Jet Black, Bordering Blue, Positively Pink
Accessories: 5 1/4 x 10 3/4" paperbag (fold into 5 1/4 x 5 1/2 card), Darice Easy Glue Eyes, American Craft Element ribbons, 5/8" organdy ribbon, slot punch

Techniques: Prismacolor pencils with Gamsol - Click Here for the Tutorial
Cocoa Pocket Card - Click Here for the Tutorial


Here is the sketch challenge:


Don't forget to scroll down to my previous post for the blog candy detail.

Until later

Friday, March 9, 2007

Subscriber Only Blog Candy

I now have a 120 subscribers to my Stampin Inspirations and Card Inspired blog sites. Wow, I'm honored. When I started my blog sites, I didn't think that anyone would even read them. Really!! I created them mainly because I thought it would be fun to create a blog. I started initially with my "Reflections and Perspective" blog site just for fun. I wanted to post my thoughts on various subject areas.


I decided to create a blog for rubber stamping because well, I love rubber stamping so why not. It was just something to do but it has grown into something that I really enjoy doing. It motivates me to create things and I have so much fun doing it.

When I first created my blog sites, I was unaware of the amount of other rubber stamping blogs out there. I'm shocked that there are so many. I'm lucky to even have the amount of readers that I do have because there are so many talented stampers out there who have great blog sites. . .who am I? Just another stamper blogging my work.

I would like to thank everyone who visits and/or who subscribes to my blog sites. This blog candy are for those who are subscribers of either my Stampin' Inspirations and/or Card Inspired blog sites. If you want to participate in the blog candy and is not yet a subscriber, all you need to do is subscribe.


To subscribe all you need to do is sign up at the top right of my blog's sidebar, add your email address and feedbitz will email you to let you know that you need to confirm your subscription. Annoymous subcribers will not be included in the drawing because there is no way for me to know who you are and how to contact you so when subcribing don't subcribe as "annoymous".


I will add extra candies for those who subscribed to both blog sites. For those subcribed to only one of them, you will receive the Stampin Up "Happy Harmony" stamp set and the JoAnn essential metal embellishments.


I will announce the winner on Friday, March 16th. . .this is one week from today. If you have a blog site yourself, I would appreciate you let your readers know about my blog candy or if you know of someone who loves to rubber stamp, please forward my blog site address so that they may participate as well.


If you already have the "Happy Harmony" set and want to substitute it for another Stampin' Up sell-a-bration set, just let me know which one you want.


Again, I would like to thank you all for being very kind with your comments and making my blogging experience a very fulfilling one!


Feedbitz has your email address on file so I will be informing the winner via email! I will not be posting the winner's email address on my blog. Announcement of the winner on my blog sites will only be just to inform that I had sent an email to the winner.


Until later. . .

Related Posts Plugin for WordPress, Blogger...
 
Share |