#10 Envelope Tag/Pocket Card Tutorial - Goody Bag
Hi Friends! Blogger was a little strange yesterday. I don't know if it was my Internet or it was blogger but I could not visit some blogs and the ones I was able to visit, I couldn't view the photos. Sometimes that happens when our Internet is running slow but I could visit other non-blogger sites without any problem. Did any of you have a similar problem?
Well. . .here's a tutorial for you. . .you're like. . hey I've seen this project/tutorial on your blog not too long ago. . .don't you have anything new? LOL!! For months now I've been trying to figure out the best way to transfer my tutorials from a website that I've been using to host and post them directly on to my blog. I want to cancel the web hosting service to reduce my expenses.
Initially, I was trying to directly upload the tutorials on to my blog but it's a pain to have to redo all the tutorials and upload the photos. The other problem is that by blogging the tutorial, I don't have a permanent file on my computer of the tutorials.
So, I decided to convert my tutorials to pdf files so it's uploadable on the web! So again, don't be surprised to see old tutorials with new samples on my blog. I think I won't create any new tutorials until I can convert all of my old tutorials to pdf and post it on my blog. Hope you don't mind.
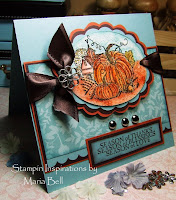
The tutorial is on a project I named #10 Envelope Tag/Pocket Card but my sample is a little different from the tutorial. Instead of creating a tag, I added a goody bag. You can also insert a cocoa packet rather than candy.
 I used the image from Our Craft Lounge stamp set "Life Is Sweet" I colored the image with my copic markers and added a little stickles to the image.
Project Details:
Stamps: Our Craft Lounge Life is Sweet
Paper: MME and CTMH designer paper, SU Chocolate chip
Ink: Copic Markers
Accessories: Fiskar scallop scissors, Coluzzle oval template, Stickles
With the tutorial below, if you want to print it, click on the drop menu that is labeled "iPaper". It'll give you the option to print. You may view a full page of the tutorial by clicking on the icon to the very top right corner. It'll open up a new window with the tutorial. If you just want to enlarge directly on the blog, click on the + button or the magnifying glass! Anyway, try the tutorial out when you have a chance!
Here is another sample of this project: Click here


27 comments:
Wow, Maria! This looks so good! I don't think I would open the goodie bag. It is too pretty to tear apart.
what a lucky person who will get this for her or his birthday
Yes, I've been having problems with blogger too!
What a great gift idea!! You are so clever!
TFS!!! This is so super cute! I would love to give this one a try!
I had the same problem yesterday. I could see headers and links but none of the posts.... including my own blog. Weird! I love this little pouch! So cute!
omgoodness this is so yummy!!! Love, love, love it!! what a fantastic job. thanks for sharing. Blessings. Renee
Wow, what a neat idea! They are very nice.
Ahhhhhhh! Super cute. I always make 6 or eight of these and bind it together to make a mini album. I never even thought to do this. I love it! Thank you Maria for sharing. So sweet of you.
Your project is so pretty Maria! I just love it!!!!
I have had problems with blogger also and it can be very annoying at times. I hope that what ever is going on is soon repaired.
hugs
Risa:)
Very cool tutorial, and I love how your bag turned out!! =)
hugs,
Jodi
Maria,
Very cute project!!! Great colors and composition!!
I want some yummy treats now.
thanks for the tutorial!!!
I hope you are having a good day!!!!!
Heather
cute gift and idea! love how it turned out! so simple yet so wonderful! tfs!
Wow thanks for sharing this Maria, what a great project love the colours too, just got my chocolate chip and regal rose from SU so might just give this a go. Thanks for your wonderful comments, much appreciated.
Hi Maria,
I just want to let you know that I love your amazing creations! You truly an inspiration to all. I'll add you in my friends and inspirational lists if you don't mind.
Have a wonderful day!
Maria, I just love these pocket bags you've created. I have made several of them since I saw the first one you posted.
I have lots of different sized envelopes from stores that carry cards. When the people replace holiday cards they don't keep the envelopes and some of the stores here will sell a big pack of various sizes for 25 cents (there's usually 30-50 in each bundle)
I love, love, love this Maria!!! Adorable! And thanks for the awesome tutorial! I really want to try this out! These would be so awesome for a birthday party! I love the colors and the coloring are fantastic!
Smiles,
janna
You are such a bomb Maria! LOve your little treat bag! :)
cute project! Lucky recipient!!
OMG - Maria this is amazing - I may just have to try this - super cute idea. Thanks for the comment on my blog...I knew there were others like me and him out there...glad you are part of the "SO IN LOVE" group.
Cute!
Wow, I'm glad to know that I wasn't the only one having problems looking at blogs yesterday, I was beginning to think I was having PC problems! Thanks for sharing that info Maria.
Aww Maria what a great little gift idea... i love these... that little sweet treat on the front of the pocket is just gorgeous... and the DP is beautiful...Have a great weekend Crafy Hugs Tina
Great gift idea Maria! Love the sweet surprise you could give someone!!
I had trouble with blogger too...thought it was my laptop...haha. The blogs would come up but I could only see people's sidebars. The center was always blank.
Amazing Maria! I love the sundae stamp & colours: Gorgeous! And the tutorial for this was way too cute. I would love to know how you made your PDF with such nice photos so I can use Scribd too. You are SUCH an inspiration! :O)
Very cute. I think this will become many peoples choice for a 3-d item to make.
Thanks for the tutorial.
Linda H
Sacramento, CA
Maria!!! Thank you so much for the tutorial!!!
I have this problem with viewing other blogs sometimes too!
Maria - Thank you for the wonderful tutorial. The goodie bag is awesome and I'm already thinking of ideas for this!! You are awesome!
I just found your blog and your things are lovely. I went to open one of your tutorials and got the message that you have to be invited to view. Here is the message:
This blog is open to invited readers only
http://stampininspirationsclubsite.blogspot.com/
It doesn't look like you have been invited to read this blog. If you think this is a mistake, you might want to contact the blog author and request an invitation.
I'd love to be able to view your things. Thanks.
Post a Comment