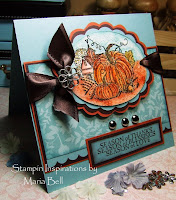
Shabby Chic Embossed Card Stock Tutorial

Good Evening, Friends!! Do you watch those home improvement shows? Well, I like to watch them and I especially like how they create those shabby chic looking tables and dressers by applying paint and distressing it or sanding it down.
 I thought, hmmm. . .maybe I can create something like that with my card. LOL!! Okay, you either hate or love my card. Actually, it has kinda grown on me. . .it wasn't exactly what I wanted but it's different so I like it.
I wanted to sand off more of the paint but it was too much work to distress it further so I just left it as shown in the picture!!
Are you the type that work on your cards for hours? Not me. . .my max is one hour. Anything beyond that is too long for a card. I do take a long time making scrapbook layouts but it's a keepsake so I think it's worth the time.
 Anyway. . .I don't know, what do you think? A work of art or crap? LOL!! If you'd like a short tutorial on how I did this shabby chic look to my embossed background, scroll down.
  Oh, before I go. . .I didn't know where to place my sentiment on the front of my card so I placed it on the inside.


22 comments:
Ooh, I love this card, Maria! Thanks for showing us how you made this card with the shabby chic look! So many details!
Wow Maria, was für eine Karte.... ich bin begeistert und von dir kann ich noch so viel lernen!!!
*Danke für dieses Tutorial*!
Ganz liebe Grüße
Doris
It does look shabby and vintage
Loved , very different from your usual style.
Loved it !
I think it's a keeper Maria... It's a total work of ART... Whoa Doris put some comment I can't understand... hehehehe I happened to look that way and sounds like she really really liked the card as much as I did... hehehehe
Fantastic car Mari. Love the gorgeous papers and your painted cuttlebug embossed background (and technique) are divine. Thanks for sharing your process with us!
Very nice....
thanks for sharing...
I have that embossing plate, I will surely have to give this a try.
Deb
Hi Maria, this is gorgeous...LOVE the distressing, so pretty :) Only recently discovered your blog, your work is stunning and full of inspiration. Thank you so much for such a lovely comment on my Lily and Billy cards..it's much appreciated, enjoy your day, love Katy x
I like it! I will have to try this one out! I haven't been able to stamp much since we were in the middle of the ice storm last week and were without power for awhile! This can be one of my first projects!
Oh wow Maria, this is just so incredibly stunning. I love everything about it, from the gorgeous heart embossing with the paint to the stamp you've used. Can't imagine anybody would hate this one. And as for your question... I'm the person that takes hours to create a single card. I just never seem to be able to get it done in a short amount of time. Love how you can make such gorgeous creations within the hour!!
xxx
(a jealous) Mariska
Awesome tutorial!! I will have to try this since I just got a CB! The card is fabulous - the design is so cool!
I love the shabby chic look of your card! What a great idea to paint over the embossing! HHMM I better try this!
Very beautiful Maria! I love the shabby chic look. I think I'll give this a try. Thank you for sharing.
OMGosh Maria, this is STUNNING!!! I luv it, I absolutely luv it! I luv shabby chic & this card is gorgeous! I have to give this a try, thanks for sharing! I luv how you change it up, your always trying different things & I luv that you share it all with us...you ROCK girlfriend!!!
I LOVE it! I love shabby chic and this is cool! I am going to try it.
What a fabulous idea!! This is gorgeous
Hi Maria! Love this card!!! There is an award for you on our blog if you would like to buzz by and pick it up :).
Barb
Oh this is fab I love the embossing and a great tutorial. TFS
Wow Maria, I love this card.. so gorgeous and love the shabby chic look, thanks for sharing your tutorial too.. just stunning! Hugs, Nikki x
This is AH-MAZ-ING! So beautiful. Thanks for sharing your tutorial with us.
Your card is wonderful, Maria! I don't know why you don't like it...
Thank you for the great idea and tutorial!
Maria, I really like it! I immediately thought of the shabby chic shows when I saw it and I too love the home improvement channels! I think you did an amazing job of creating the background and I really want to try this sometime! Thanks for the great idea and tutorial!
Smiles,
janna
Wow Maria!!!
I am away from blog land for 5 days and just plain wow!!!!
I love what you did here with the painting I have got to try that one for sure!!!
I love the top note one of my all time favorite elements!!! Woooo Hooo!!!
I love your colors and your coloring here!!!
So so good Maria!!!
Oh and Janna wanted me to tell you she is having trouble leaving comments on your blog. Every time she tries it cuts her off. She tried 5 times last night on one post and every time she could not do it, so anyway she is coming just can not comment!!!
Heather
Post a Comment