Accordion File/Crop File Tutorial
Happy Sunday, Friends!! A few people asked me what camera do I use to take pictures of my cards and projects on my blog. Although I have a Canon Rebel, I don't use it to take pictures of my cards. I use my Fuji S5200 camera. . .it's a regular digital camera and not a DSLR.
The reason I don't use my Canon for my cards is that for some reason, although the colors are nice and rich, the photos turn out darker compared to the photos I take with my Fuji camera.
I also don't take my photos in natural light because I don't have enough light that shines in my room. On one side I have an OTT-Lite (you can find at any craft store) and on the other, a lamp using a "craft bulb" that you can find at any hardware store. The reason I have a craft bulb on one side is because I don't have enough room on my table to put a second OTT-Lite, so I have a standing floor lamp that I can move around the room. Both the OTT-Lite and craft bulb provide "true full spectrum color" so when you take a photo of your card or project, the colors are exactly as you see them in person. Regular light bulbs cast a "yellowish" color to your photos.
 Another trick is to not shine your light directly in front of your card/project. Use two lamps, one slightly to one side and above your card and one slightly in front and to the other side of your card. If I don't use two lamps, one side usually looks too dark . . .that's the reason why I have two lamps.
Anyway. . .there's no real camera tricks except to take a picture of your card in "macro setting" with "no flash". Never use flash. . .arrggh, the color looks terrible. The "macro" setting prevents blurry close up shots.
Okay. . .now to my project and tutorial. I created this tutorial. . .gosh, like two years ago. It's been so long and I've never recreated the project since! Well, until now. Like I said in previous posts, I'm trying to convert all my past tutorials into "pdf files" so in order to post the tutorials in pdf, I have to create an updated version of the projects on my blog. The tutorials will still show the old photos when I first created the tutorial.
 When you look at the tutorial, the photos are terrible but back then I didn't have my awesome Fuji camera and I didn't have an OTT-Lite so good lighting and good camera makes a big difference on your presentation.
Anyway. . .this project is an "Accordion File or Crop File". In the past, I've used this file to store my pre-colored images so it's useful as a crop file.
As you can see in the photos, there are pockets created using a #10 Business size envelopes. It's a very easy project so try it out!! Scroll down for the tutorial.
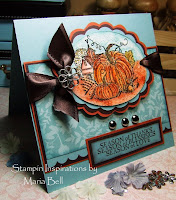
 I embellished my accordion file with metal embellishments. I love the contrast to the pretty paper.
Hope you all are having a fabulous Sunday!
Project Details:
Paper: Prima, Inc., SU Close to Cocoa
Accessories: Making Memories Metal Sentiment, SU Chocolate Chip Satin Ribbon, Blue Moon charm, SU Word Window Punch, SU Round Tab Punch, SU Corner Rounder, Silver metallic cord
With the tutorial below, if you want to print it, click on the drop menu that is labeled "iPaper". It'll give you the option to print. You may view a full page of the tutorial by clicking on the icon to the very top right corner. It'll open up a new window with the tutorial. If you just want to enlarge directly on the blog, click on the + button or the magnifying glass! Anyway, try the tutorial out when you have a chance! You may also scroll through the tutorial by using the scroll bar to the right of the tutorial!
The reason I don't use my Canon for my cards is that for some reason, although the colors are nice and rich, the photos turn out darker compared to the photos I take with my Fuji camera.
I also don't take my photos in natural light because I don't have enough light that shines in my room. On one side I have an OTT-Lite (you can find at any craft store) and on the other, a lamp using a "craft bulb" that you can find at any hardware store. The reason I have a craft bulb on one side is because I don't have enough room on my table to put a second OTT-Lite, so I have a standing floor lamp that I can move around the room. Both the OTT-Lite and craft bulb provide "true full spectrum color" so when you take a photo of your card or project, the colors are exactly as you see them in person. Regular light bulbs cast a "yellowish" color to your photos.
 Another trick is to not shine your light directly in front of your card/project. Use two lamps, one slightly to one side and above your card and one slightly in front and to the other side of your card. If I don't use two lamps, one side usually looks too dark . . .that's the reason why I have two lamps.
Anyway. . .there's no real camera tricks except to take a picture of your card in "macro setting" with "no flash". Never use flash. . .arrggh, the color looks terrible. The "macro" setting prevents blurry close up shots.
Okay. . .now to my project and tutorial. I created this tutorial. . .gosh, like two years ago. It's been so long and I've never recreated the project since! Well, until now. Like I said in previous posts, I'm trying to convert all my past tutorials into "pdf files" so in order to post the tutorials in pdf, I have to create an updated version of the projects on my blog. The tutorials will still show the old photos when I first created the tutorial.
 When you look at the tutorial, the photos are terrible but back then I didn't have my awesome Fuji camera and I didn't have an OTT-Lite so good lighting and good camera makes a big difference on your presentation.
Anyway. . .this project is an "Accordion File or Crop File". In the past, I've used this file to store my pre-colored images so it's useful as a crop file.
As you can see in the photos, there are pockets created using a #10 Business size envelopes. It's a very easy project so try it out!! Scroll down for the tutorial.
 I embellished my accordion file with metal embellishments. I love the contrast to the pretty paper.
Hope you all are having a fabulous Sunday!
Project Details:
Paper: Prima, Inc., SU Close to Cocoa
Accessories: Making Memories Metal Sentiment, SU Chocolate Chip Satin Ribbon, Blue Moon charm, SU Word Window Punch, SU Round Tab Punch, SU Corner Rounder, Silver metallic cord
With the tutorial below, if you want to print it, click on the drop menu that is labeled "iPaper". It'll give you the option to print. You may view a full page of the tutorial by clicking on the icon to the very top right corner. It'll open up a new window with the tutorial. If you just want to enlarge directly on the blog, click on the + button or the magnifying glass! Anyway, try the tutorial out when you have a chance! You may also scroll through the tutorial by using the scroll bar to the right of the tutorial!


24 comments:
oh wow that is a great one unfortunatly I am nog able to see everything in your blog , having problems with my xp, hope to be able to see it very soon
Yoyr accordion bag is fabulous Maria! You sent me a bag similar to this accordian bag a few years ago and IRL they are awesome!
Thanks for the amazing tutorial and the camera tips.
hugs
Risa:)
Thanks for all the info Maria. Love the look of your new folder. Wonderful work.
Hugs
Heather
Oh Wow girl this is over the top, I love your paper, superb!!!!!!!!!!!
what a great project thanks for the tut
Hugs
Norine
Hi Maria! Very beautiful! I love working with envelopes. Thank you for sharing.
Wow, this is awesome, I would luv to have one of these. The colors on this one are so beautiful Maria & I luv the detail you put into it!!! Thanks for the tutorial, I printed it out so that when I find time in the future I can make one.
Thank you so much for the info on taking pictures with our camera's, I just set mine to Digital macro for the next time I take pictures of my cards. Mine always came out blurry, now I understand why. You rock girl!!!
Hugs
Rita
Maria, I love this one! I made one when you first posted your tutorial. I have several of these metal words my Making Memories. I need to make more as it was so easy to do with your instructions!
Wow, this is fabulous Maria and what a great gift this would make for a crafty friend, I just love the metal sentiment, Thanks for the great tutorial, Have a great evening, Big Hugs, Nikki x
Wow this is just beautiful and great idea. This is the way to start off the month with these fabulous eye candy. Thanks so much for this awesome tutorial.
Great tutorial Maria! I've made accordian fold albums before but never would have thought to do a file folder. Thanks
Hugs~Becky
Superb tutorial, Maria. And it looks doable too. I will try to give this one a try this week. :-)
Hugs,
Smita.
I love this! Lovely colors and love your tutorial. I made one of these almost 2 years ago at a stamp get together and your tutorial will help me try it again..
WOW, Maria, this is the best tutorial!!! Just amazing!!!
Thank you for sharing some inforamtion about the camera, Maria!
And thank you so much for your tutorial!!!
Your accordion fold bag is fantastic!
First thanks for the amazing photo tips. You have such great pictures of your projects and I always struggle with mine! It is so hard to get a good image!
And I adore this acordian file! AMAZING!!!! Wow the paper is beautiful and I love the word and charm! stunning! You have the best ideas and adore that you put up a tutorial for the rest of us! It is so wonderful that you share that!
Smiles,
janna
I love the papers you used! These make for fun project!! Beautiful job!!
Hi Maria! Just dropping by to let you know I was able to make an accordion bag by following your step-by-step guide. I just adjusted the sizes since I already have a pre-cut 16cm x 16 cm chipboard. Thanks so much for sharing this idea coz now I have a bag for my favorite stamped images :D
Great accordian file Maria...love the paper and embellishments...very nice.
You are going on my blog roll!
Fantastic tutorial!
Viv xx
Hermoso el paso a paso , muchas gracias . saludos Maria Luisa
Maria, you tutorial is just not showing on this or for your accordion file purse, which is such a shame, all I get under your to print instructions is a big notice saying Bad request. I have sent you an email however in hopes of resolving my problem. Love what you have posted not seen all yet but I know I will love the rest too. Anything more recent from you or in the near future perhaps???? Thanks for sharing! xxx Karen xxx
Post a Comment